I Can't See It But I Know It's There
"It", of course, being all that unseen aftermarket that we so lovingly cram into our models in search of the ultimate in super-detailing and, since super-detailing is the name of the game in our hobby, it's definitely the thing to do, right? Sure it is. Absolutely. Maybe...
Wait a minute, you may well be asking yourself at this particular part of our discussion! He just said that super-detailing was the ultimate goal for us, a Holy Grail, if you will, so why's he vacillating over it? Detail's the thing, right? The guys who win those big contests all have it, so don't I need to have it too? There's no point in even discussing it! Or is there?
Ok, ya'll; I've just commited the ultimate sin as far as polystyrene scale modeling is concerned and suggested that you don't need to go cramming all those detail parts into your models. I have to be wrong, right? Well, yes I do, unless of course I'm actually on to something, and I'm pretty sure I am.
My premise in this whole thing, and one that should need no explanation whatsoever, is simple; a mantra that guides my own personal modeling world and could guide yours as well, if you were so inclined, to wit: If I can't see it, then nobody else can either and I'm not going to put it in there. No, I'm not saying we don't need to detail our creations---that's a big part of the fun for most of us---but I am saying that our time can often be more profitably spend doing something else on the model.
Think about that for a minute. Most of the aftermarket detail available to us (some of which we could just as easily scratch-build for a few cents rather than the many dollars a lot of us actually end up spending for reproductions of somebody else's scratchbuilt parts) goes into one of three or four places on any given model airplane: The cockpit; the wheel wells, the powerplant(s) and related areas, and the guns or ordnance, presuming the airplane you're modeling was armed.
Of those four areas two are pretty much a no-brainer, at least up to a point. Most plastic kits fall short in the areas of cockpit and wheel well detailing to one extent or another so enhancing those areas makes a great deal of sense, as long as what you've done can actually be seen on the completed model. To illustrate the point, the cockpit on a B-29 is extremely visible and benefits tremendously from any extra work put into that area, but the only other crew areas that fall even remotely into that category are the gunner's sighting positions on the sides of the fuselage and the tail gunner's position, and you honestly can't see very much in those places. The bomb bays could, of course, use a little extra love, but only if they're going to be displayed with their doors in the open position and visible to the casual viewer. If they're going to be closed any effort there is wasted. You can use the same logic with virtually any bomber, particularly in the larger scales, because you generally can't see very much once you get past a few select areas. Much in the same vein, the cockpit area in a fighter generally requires some extra work, particularly if the canopy is going to be displayed in the open position, but even then there's only so much that can be seen. In those instances, and in any similar ones as well, detailing something that will never be seen becomes a time trap that a great many of us can ill-afford since our hobby falls somewhere in-between employment, a family (or at least friends and a Significant Other), or maybe school. There's only so much leisure time available to most of us, so why waste it?
We need to use some common sense in our approach, of course, and we'll use the Douglas DC-3 family of transports as our final example. The cockpit on any 1/72nd scale or larger DC-3/C-47 kit I can think of will most assuredly benefit from some extra work. So will the portions of the interior visible through the passenger or cargo doors back on the port side of the aft fuselage, but with a considerable caveat, because the passenger door in a commercial DC-3 isn't all that big, which means we might want to do a whole bunch of detailing or the first inch or so fore and aft of said door, and probably the aft bulkhead too since it's pretty much sitting right there in full view, but the rest of the cabin could easily be handled with selective detailing of what can be seen through the cabin windows (which ain't very much, I'm here to tell you!). The same concept would apply to a military transport that has those big honkin' double cargo doors, but in that case you'd extend the cabin detailing a little bit further forward because you can see further up inside that dark tube that is the cabin.
The point to be taken here, and we've said it more than once on these pages, is that the scale modeler is dealing with illusion to a great extent. We do, quite literally, trick the eye into seeing what isn't there and that eye will actually see detail in the hidden area in that DC-3 cabin if we do our job correctly when we're detailing the area around the passenger door. The concept works, and works both well and almost every time, in cabins, cockpits, wheel wells, bomb bays, and any other semi- or completely hidden places in a model.
That's if you're building for yourself. If you're building for a contest you may decide to put a little more detail in some of those hidden areas we've just discussed, mostly because there's a breed of judge that thinks that sort of thing is necessary in order to win or place, but it can be as easy to fool the guy holding the tiny little bore light as it is to fool the general public if you've done your part in a credible manner. Remember that part about modelers and illusion? It's true, ya'll; it really is.
That's my story and I'm most assuredly sticking to it! Mostly...
Just in Case
We've had a couple of folks ask for our e-mail address here of late. We normally put it somewhere in each issue but in a somewhat garbled and goofy manner in order to avoid being inundated by spam. Here's that address again, but in a somewhat less jumbled form:
replica in scale @ yahoo . com
All you need to do is run all the letters and that "and" symbol and "dot" together into one moderately long string with no spaces in-between and you're there!
Lord I Feel So Lonesome; Can't You Hear Me When I Moan (with apologies to Robert Johnson)
Americans have a sense of humor, particularly when things aren't going as well as they should. We're going to open up today's edition with a little ditty once sung in the 3rd Attack (ne 3rd BG) during The Great Unpleasantness in the Pacific some 60 or so years ago. The words are from a wartime song that 3rd Attack vet Dwight Turner held on to for all those years and provided to us by way of Gerry Kersey. The photography comes to us thanks to Bobby Rocker and Gerry. The song itself is humorous, particularly if you've got a few Fosters under your belt. The truth behind the song, unfortunately, isn't funny at all:


CORRECTION: Please note that Barakoma is in the Solomons, not New Guinea, and that P-38 sitting in the middle of a runway and not on a beach. Given the location it's pretty evident the airplane couldn't be from the 80th FS either! These errors are all mine and have been corrected thanks to information provided by Bobby Rocker. We don't mess up often but when we do, we do it in style!!! pf


We build our model airplanes, and we recite the history to those who would listen, and sometimes we close our eyes and imagine what it must have been like down there, in New Guinea during the war. And many of us---no, almost all of us, totally miss the point.
Those guys were uncomfortably hot pretty much all the time, and often smelled of dirty airplanes and sweat. They flew when they were fit, and when they were tired, and sometimes when they were sick if they could get away with it. They flew in airplanes that weren't always 100%. They contended with some of the worst aviation weather in the world and did it on a daily basis. They all went out, and most of them came back. The ones that survived took or, for those few still living, will take, New Guinea with them to the grave. That's worth remembering as we recount their deeds and build our models. We owe those guys, and we owe Bobby, Gerry, and the other historians and collectors who continually and unselfishly add to our understanding of the war in the Pacific.
They call it "The New Guinea Blues".
A Long Time Ago
That's when I built this issue's model; a long time ago, back around 2005-2006 I think. I was on a Great War binge at the time and Eduard's seminal Albatros DV was calling my name---who was I to refuse the invitation?
Anyway, the Eduard Albatros truly is a seminal kit, easy to build with relatively few errors (although it is possessed of at least one problem that just might leave you talking to yourself before you're done building the thing) and an excellent appearance once it's completed. Those of you who have been with us for a while know that kit reviews only rarely live on these pages and you aren't going to see one here today either; just a quick and dirty run-down of the kit as it pertains to the production of a decent model.
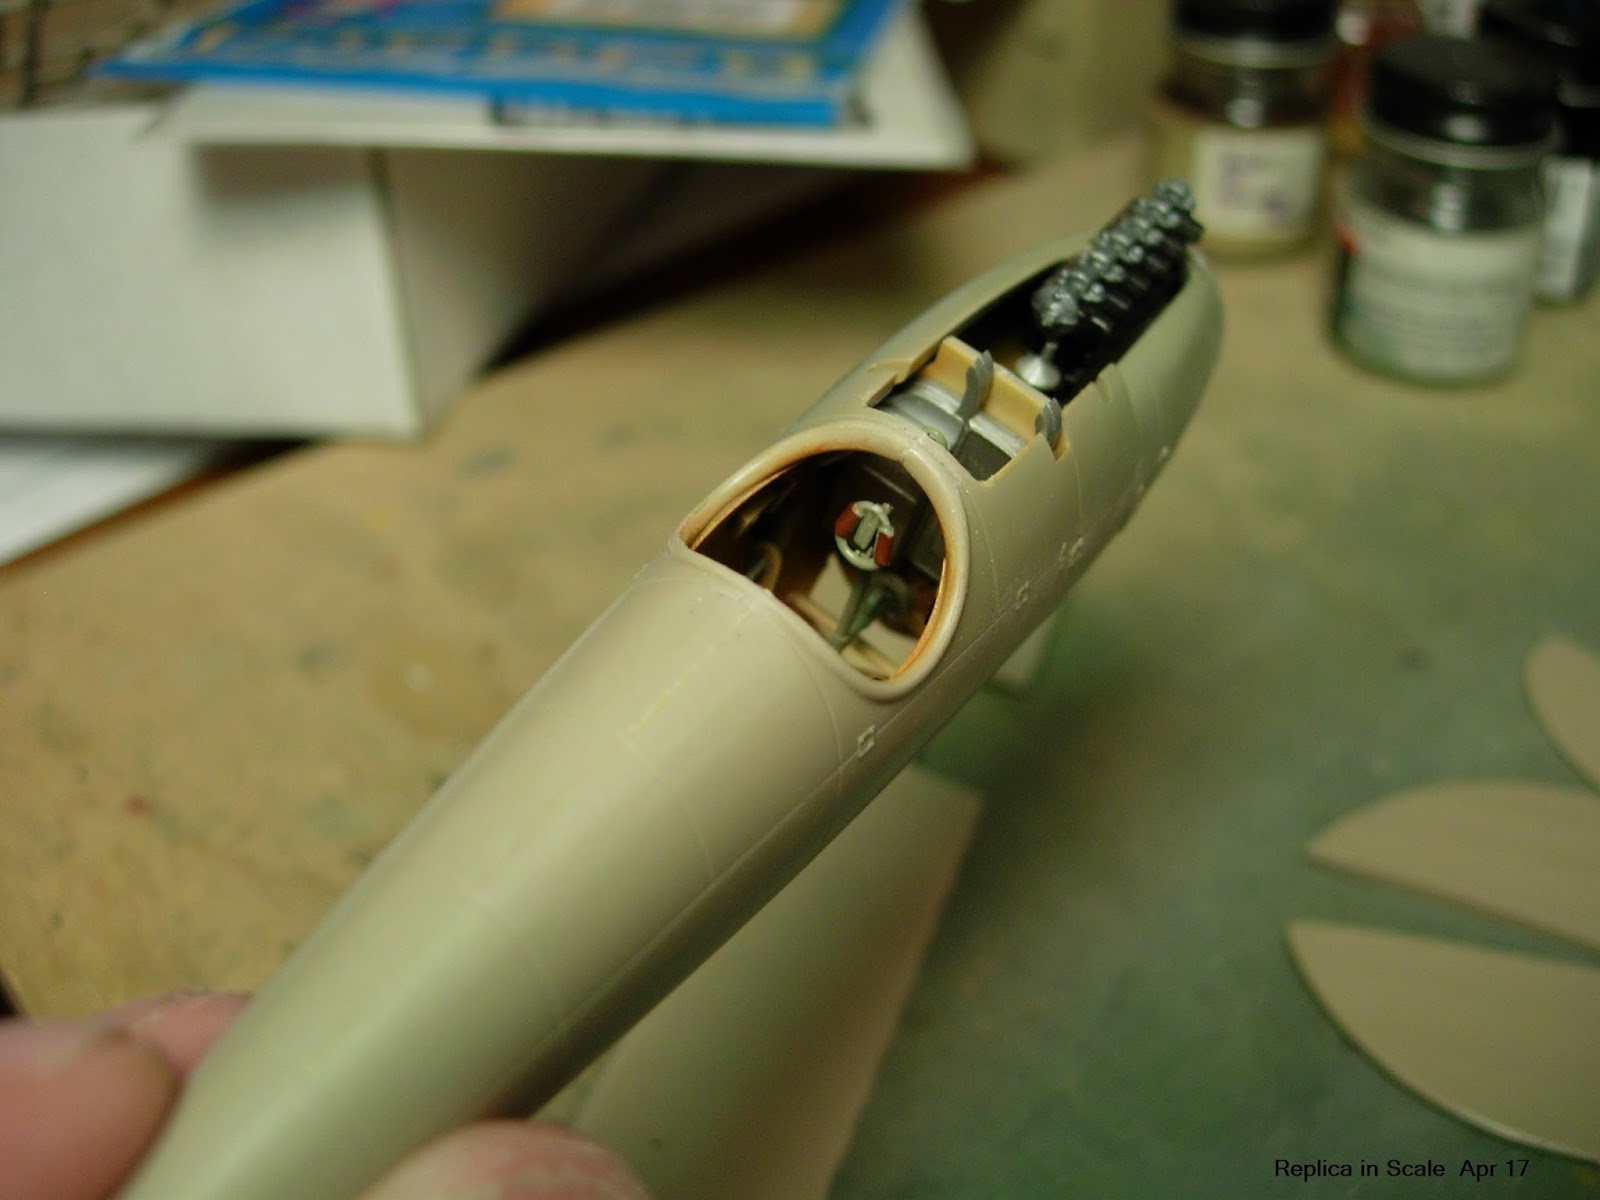
In point of fact there are only a couple of things you really need to know about this kit. First and foremost, it's comprised of relatively few parts and they all fit as intended with relatively little cleanup. Those parts are pretty accurate too, and you can get a really decent model, with just that one little caveat that we'll get to in a minute, with the most basic weekend edition release of the kit, although we strongly recommend getting the ProfiPack version of it or, at the very least, getting a set of seat belts/harnesses and Master gun barrels to spruce things up a bit. All those extra photo-etched bits and pieces will make a lot of difference to your completed model and are well worth the price of admission.
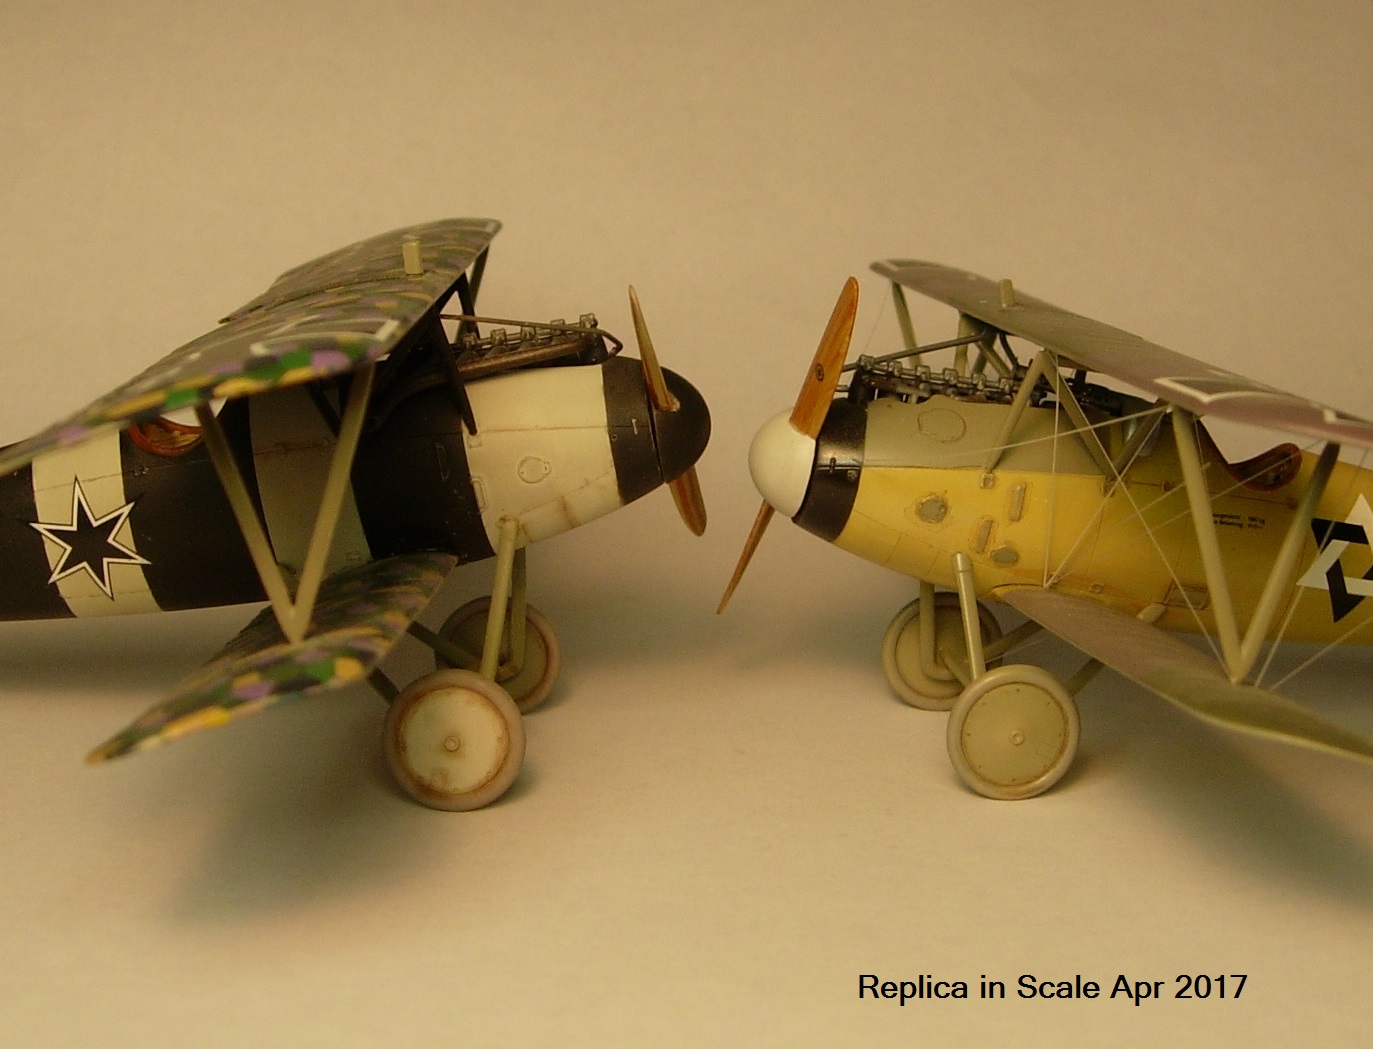
ProfiPack parts won't, however, fix the clanger that Eduard incorporated in the the kit back when they designed it, and you may want to fix it (read that "HAVE to fix it if you want things to look right") on your model---I didn't correct it on the model you're about to see because I didn't know about it at the time I built the thing, but it just screams out "Look at me I'm wrong!" once you know it's there.
The easiest way to explain the problem is to look at the photographs of my completed model, focusing your attention specifically on the undercarriage. See how goofy it looks down there; sortof like a low-rider modification if you can imagine such a thing. That's because Eduard missed the length of the landing gear struts and they're some 3mm too short both front and back! It looks as goofy as it sounds, too, and it really needs to be fixed by carefully splicing a 3mm section into each side of the gear and then equally carefully sanding that splice to the proper cross-section. It's not really hard to do and your model will appear somewhat cartoonish if you don't do it, but it's your choice. You pays your money...
Anyway, I actually took a few photographs during the construction of this one and I think I deserve some sort of award for remembering to do that, even though it probably won't ever happen again. In spite of that the photos do exist, so here's a quick and dirty rundown of the project for your perusal:


A Picture to Prove a Point
You may remember the discussion we had in our last issue regarding the painting of models, and how operational conditions could impact the appearance of real airplanes on active service. That piece caught the attention of Steve Birdsall, who was kind enough to send along this image for your perusal. It's an airplane he had the opportunity to fly in on more than one occasion and one that will featured in an article by him in the next issue of Aviation History. Here's what he had to say about it:
Hi Phil – I read your latest edition and the bit about aircraft paint being touched up when it “gets scabby enough” resonated. I thought you might be interested in what could be considered a classic case of that situation . . . 43-48356 was an AC-47 at Bien Hoa, South Vietnam, where it was known as “The Leper” because it couldn’t seem to hold a coat of paint.
I flew in it a couple of times and I have a story about it coming up in the next Aviation History. Anyway, I thought you might like to see the attached photo of it, taken in February 1967 by a Seventh Air Force PIO, Captain Ray Quillin. All the best – Steve

Many thanks to Steve for sending the photo to us!
You Probably Need This Book
Most of you know, or know of, Doug Barbier by now. For those few of you who may not be familiar with him or his work, he's a retired blue-suiter and airline pilot with considerable stick time in the T-33, T-38, F-4, and F-16, among other aircraft. He's an excellent writer and a superb photographer as well, and those of us who know him have been urging him to share his expertise and write a book, any book on any subject, for a great many years now. He's retired from his "real" job (a substantially vague and somewhat nebulous concept in his case, since "retirement" has only caused him to become more active than he previously was) he's had the time to actually sit down and write that book, with the result you see before you:

The Convair F-106 Delta Dart has been one of those great enigmas of American military aviation, an interceptor everyone knows about but few actually know about. Designed as a follow-on to Convair's own F-102 Delta Dagger, the F-106 was the ultimate interceptor in every respect; a cutting edge aircraft who's capabilities were never explored to their fullest potential and which could offer many contemporary military aircraft a run for their money in certain performance envelopes.
In spite of those abilities the aircraft has gone largely underappreciated by aviation enthusiasts, and until the publication of this book there has been precious little available in print regarding the type that was worth having. This title changes the game substantially, and for the better in every respect. Its text is concise yet extensive and provides considerable detail of the design and development phases of the F-106's history as well as its active service.
The F-106 was designed as a weapons system and that aspect of the aircraft is covered as well, both in text and in photographs. Cockpit evolution is covered photographically, as are the rest of the changes made to the airplane throughout its development and service life. (There were more changes than you might imagine, so that aspect of the work is particularly useful!)
Illustrations are both photographic and graphic (factory drawings) and are exhaustive, with 144 photos in color and 229 in black and white---a great many of the photographs were taken by the author while many others were shot by individuals well-known to the serious aviation community which means that all of the photos presented are useful to the enthusiast or aerospace scholar. Reproduction of those images is excellent throughout the book.
Finally, it has to be noted that the folks over at Specialty Press are a class act in every respect, and the production of the book is flawless. Images are crisp and clear, layout is concise and user-friendly, and the paper used is of the thick, coated variety. Those of you who already own works by this publisher know the quality in everything they produce; their books are meant to be used as references, not just looked at once and put away.
The F-106 has been largely ignored by aviation journalism, but this book more than makes up for the paucity of titles available to date. It's one that we recommend without reservation if your interests run to such things and whets our appetite for further titles from this author. You can even get your copy autographed by the author if you order directly from Specialty, at least while supplies last!
Now then, would anyone like to see Doug author a book on the "Hun"? Can we see a show of hands? Can I get an "AMEN"?
Many thanks to the folks at Specialty Press for our review sample.
Late and Getting Even Later
Yes indeedy, we've allowed ourselves to get about as late as we've ever been with one of these things, so it's time to publish! We're still working on another piece for this issue which has, by default, just become our lead article for next time---we didn't think you'd mind!
One more thing before we go: We've recently received a couple of requests for an address to send photos and the like to. Lately we've been printing that out in a manner that's allegedly incomprehensible to The Spam Brigade, but this time we'll give it to you straight and get ready to bear the consequences. Just do replica in scale @ yahoo . com (but you need to run all those together like you normally would in an e-mail address). That will get pretty much anything you'd like to send to us.
And that's it for this time; a somewhat truncated edition but an edition nonetheless. Be good to your neighbor and we'll meet again soon!
phil
