Wednesday, December 29, 2021

Rules? What Rules?, We've All Seen It Before, A Fine Legacy, and Some Jugs From the Guard,


Can You Really DO That?

Scale modeling is one of those evolutions that we progress with throughout our lives, or at least those of us who stay with the hobby for any length of time do. That evolution gives us the opportunity to see what others do with the hobby and how they do it and, if we're lucky, allows us to grow as modelers. I'd like to share an example of that with you today.

Two years of my collegiate career involved working part time at a local hobby shop in San Antonio which in turn led to meeting, and in many instances becoming friends with, a number of highly talented individuals who were far better modelers that I was at that point in time. It was what some folks might call a Golden Opportunity to Learn and even though I was at that time, and pretty much always have been for that matter, what certain of my relatives would call a slow study, I knew a good thing when it slapped me in the face. Yeppers; strange as it may seem to many who know me, the ability to pay attention and learn did, and still does, overcome me from time to time. It's nothing deliberate on my part but it's there. Sometimes...

Anyway, one of those customers who became a good friend was a guy named Bill Todd. He was attending Texas A&M at the time but would visit the shop fairly regularly, both to purchase things and to show his latest work to us. He was a figure painter of superior abilities, probably one of the best in Texas at that time if truth be told, and he was pretty good at everything else model-related too. He was also an intellectual in the truest meaning of that term and was prone to thinking in unconventional ways to solve problems so it didn't surprise me one bit the day we received our first shipment of Imrie-Risley enamels allegedly blended, color-wise anyway, specifically for figure painting and he expressed considerable, if polite, disinterest towards them. It wasn't that he thought the paint to be inferior or anything like that; he just had no particular use for it and that, of course, resulted in me asking why not.

Bill's answer shouldn't have surprised me at all but it did, and it got me thinking. He had never bought any of the paints by any manufacturer specifically formulated for use with military miniatures but he did purchase a fair quantity of paint of almost every variety we sold, eventually to include the aforementioned Imrie-Risley. He bought Floquil. He bought the classic Testors in the little square bottles. He bought Pactra. He even bought some of the first Floquil Polly-S to hit the market, but he purchased everything a bottle at a time and almost never bought a lot of paint on any given occasion. 

We were both the same age and shared a number of similar interests so it wasn't unusual that we began to hang out together, which eventually led to him showing me how he painted figures. His work was amazing and quickly accomplished; there was no agonizing over brush strokes for him! That wasn't the astounding part, however. Nope, the astounding part was the way he mixed his paint to achieve the colors he used. He had a small color cup, maybe the lid of a paint bottle although it's been near fifty years since then so I honestly don't remember that particular detail, and he had the several colors of paint ready for mixing on his work surface. The thing was, none of the paint he was using came from the same manufacturer. He mixed square-bottle Testors, Floquil, Pactra, and even a little Polly-S in the same batch, thinned it all with regular modeler's paint thinner, and applied it to the figure he was working on. I was pretty astounded and told him he couldn't do that and expect it to work. He told me he did it all the time and it worked just fine, thank you very much, and he was right! All that paint, admittedly in extremely small quantity, was mixed, blended together, and worked the way it was supposed to. He painted with his mixture, and he applied thinner to his brush and blended the colors he'd just applied as though he was working with fine oils instead of bottom-end hobby paint. His results were spectacular. 

So what's your point, you may well be asking yourself at this juncture. It's a simple one really and, at the heart of the matter, is something that only peripherally has anything to do with blending paint:

Bill didn't mix all those different brands of paint together because he necessarily wanted to. He did it because those were the colors he needed and they were on hand, while buying anything else would entail borrowing his dad's Delta 88 and making the 30-minute drive to Dibbles to get it. The problem was a simple one and it had a simple solution. If it hadn't worked he would probably have made that drive but it did so he didn't, and everything worked out just fine in the end.

I'm not saying you should do that literal thing yourself and I'm here to tell you that if you indulge yourself in such madness you're 100% on your own and I'm in no way responsible for whatever mess you might make, but I'm also saying that the conventional way may or may not be the best way to solve a problem in each and every instance. Chew on that for a minute or two and let's look for a conclusion we can draw.

Our hobby is presently choking with readily available assets for the modeler. There are web sites and blogs (somewhat obviously including this one!), there are magazines and books, and videos by the battalion telling you what you can and can't do. They can all be helpful but sometimes the solution to a given problem is already in your own head, just waiting to pop out and amaze everyone you know.

I once knew a retired Systems Command Lieutenant Colonel who made things happen each and every time he encountered something that was difficult. His solutions were often unique and very much outside the norm but they were also effective solutions that worked. I once asked him what his secret was. His response? Just work the problem. That's all there is to it, ya'll; just work the problem! Maybe you really do need to buy something special that you don't already have, or do something the way all those other folks are doing it, or maybe you don't. Maybe all it takes is for you to work the problem

Think about it...

Everybody Has Seen the Airplane

But a lot of folks haven't seen it like this:

44-84778 was purpose built for photo recon as an F-6D-25-NT and ended up with the 45th TRS in Korea. She was extensively photographed and a couple of decal companies have featured her on their aftermarket sheets, a relatively pointless activity at the time since there were no F-6D kits to put them on and the one conversion kit that we're personally familiar with, the 1/48th scale offering from QuickBoost, was inaccurate. That all changed when Eduard released their very own F-6D model a year or two ago, and we can now build photo-Mustangs to our heart's content, or at least those of us who primarily build in 1/48th scale can! With that as an introduction, let's take a look at one photo ship you can build!

Our first image shows 778, aka "My Mimi" undergoing preflight prior to yet another mission over the North, and we get a fine look at her markings in consequence. Of particular interest is her nose art, a tiny cartoon character aft of her name. The airplane's somewhat battered overall silver paint stands out against the natural metal finish of her spinner, and the airplane is relatively dirty. Not all of the 45th's F-6Ds carried the squadron's polka-dot motif on the spinner, as exemplified here. As always, the Devil's in the details!   NARA via Replica in Scale

Here she is again, running up and getting ready to taxi out. The inboard gear doors are coming up as the hydraulic system pressurizes, while the pilot is busy scanning the gauges. Of particular interest in this image are the taped-over gun ports and the corrosion-resistant exhaust covers, as well as the ADF loop just aft of the radio mast. Note the lack of gas bags under the wings; the Mustang possessed superb range on internal fuel alone (one fuselage tank and a pair in the wings) so extra gas wasn't necessary most of the time when serving in Korea, which in turn allowed the F-6D to take full advantage of its speed during combat ops.   NARA via Replica in Scale

Time to go to work! This great side view shows 778 about to pull out of its parking slot for another mission. The aircraft still has functioning tailwheel doors, an increasing rarity as the conflict progressed since many Mustangs had them locked in the "down" position and the doors removed to accommodate operational conditions found on the often primitive South Korean airfields of the day. The pilot's helmet features the 45th's famed "Polka Dots", although they have yet to be added on this particular airplane. That low ceiling almost guarantees the mission will attract considerable ground fire, but that was the norm most of the time.     NARA via Replica in Scale

Many thanks to NARA for making these wonderful images available to the public, and to Eduard for releasing their superb F-6D kit that allows us to build a proper photo Mustang. All we need now are some decals!

Gotta Love a Sharkmouth

The Second World War saw the creation of a great many squadrons and wings, some of which continued on into peacetime after the conclusion of that terrible conflict. The 23rd Fighter Group was one such unit, the heirs of the Flying Tiger mantra and legendary sharkmouth insignia that they subsequently applied to many of their post-War operational aircraft. The story of the group is too extensive for study here, but a couple of photographs of one of their more colorful mounts could certainly be in order.

Lee Bracken shot this particular Corsair II, more popularly known by its nickname "The SLUF" (Slow Little Ugly F******" on the transient ramp at Bergstrom AFB in January of 1980. She was from the 76th TFS and was built as 74-1758, an A-7D-16-CV. She's wearing a modification of the SEA pattern camouflage paint, albeit of the later wraparound variety, and she's a well-used airplane.  Lee Bracken

72-0184 was built as an A-7D-12-CV and was assigned to the 74th TFS when Lee Bracken's brother George photographed her on the ramp at Holloman in March of 1980. Her paintwork appears substantially more dull that that of 1758 but that's a trick of the ambient lighting existing when George took the photograph---it's also a fine lesson to scale modelers to thoroughly research their paint colors before applying them to a project because what you see isn't necessarily what things actually are! Of particular interest is the fact that this airplane has been zapped by No 6 Sqdn RAF, who have applied their famous "Flying Can Opener" marking to the fuselage immediately in front of that open avionics bay door. The flight gear hanging off the retractable boarding ladder implies an imminent departure.   George Bracken

Finally, here's a portrait of A-7D-9-CV 70-1051, all resplendent in a fairly new wraparound set of SEA colors sitting on the display ramp early in the morning of 02 August, 1980, at the late and often lamented Bergstrom Air Force Base. Her markings include a sharkmouth on her travel pod as well as a "caption", for want of a better term, tying the Wing to its Second World War predecessors. This SLUF was eventually written off in a handling accident but she was in her prime when this image was taken.   Phillip Friddell

Here's a parting shot of a pair of 23rd TFW A-7Ds on short final into Kelly, taken on 09 December 1979. We don't know about you folks but it makes us think back with fondness on The Good Old Days.   Phillip Friddell

The Boys From the MD ANG

Maryland's 104th Fighter Squadron was an early player in the post-War ANG and a linear descendent of the ETO's 489th FS. Organized at Harbor Field in Baltimore, the 104th achieved Federal recognition by the National Guard Bureau on 17 August, 1946, flying the P-47D Thunderbolt. They kept their P-47s until 1951 when they converted to the F-51H Mustang (note the designation change---Maryland's Thunderbolts were P-47Ds when the squadron was constituted and became F-47Ds while in service when the Air Force changed their fighter designations from P to F in June of 1948). 

Mike Burke, a longtime friend of frequent contributor Mark Nankivil (he of the Greater St Louis Air and Space Museum) had collected a series of black and white photographs of the group and recently shared them with Mark. Sadly, Mike passed a few months ago, but the images of those P-47s remain; we're presenting them today thanks to the kindness of Mark Nankivil and in memory of Mike Burke. 

Clean hangars and safe work areas are the norm nowadays but the definitions of "clean" and "safe" have changed somewhat over the years, as illustrated by this early view of the 104th's maintenance  hangar. The variety of aircraft parked in there is of interest and includes an A-26B (44-34676), a T-6 (originally AT-6C 41-32747), an R-5 (serial unknown) and several P-47Ds, all assigned to the unit. Messy hangars weren't exactly the norm in the late 1940s but they weren't all that unusual either. Time (and a horrendous accident rate among most American aviation units) would change that!   Mike Burke Collection via Mark Nankivil/Greater St Louis Air and Space Museum

Sometimes you do what you have to do, including performing basic maintenance on the ramp. This sort of thing was the norm during the Second World War and Korea and can still be seen to this day. although the safety standards have changed considerably since those early times. Take note of the tip warning treatment on the propeller; those stripes aren't an anomaly but rather the way the A.O. Smith company (a subcontractor to Curtiss Electric) marked their propeller blades prior to shipping them to Curtiss for final assembly and firmly identify these airplanes as coming from wartime production.  Mike Burke Collection via Mark Nankivil/Greater St Louis Air and Space Museum

On the gun butts! This wonderful image is just full of detail for the scale modeler, including the squadron markings under the canopy, the post-1947 national insignia, and the primitive (and left-over) RHAW antenna on the vertical stabilizer. 45-49115 typified the squadron's -40-RE Thunderbolts in so many ways!    Mike Burke Collection via Mark Nankivil/Greater St Louis Air and Space Museum

This photo could have been taken in Western Europe during 1945, but it wasn't! Nope; this wonderful imaged was shot in Maryland on April 1st, 1948, which could have made it a record of the ultimate April Fool's Day joke on the squadron safety officer, although we somehow doubt that. There are other possible explanations, of course. It could've been the unfortunate result of parking in the dirt during facilities construction prior to a rainstorm, or maybe it was something involved with a training exercise, but we don't know. If you think you do, that properly-encrypted email address is   replicainscaleatyahoodotcom  . We'd definitely like an answer!   Mike Burke Collection via Mark Nankivil/Greater St Louis Air and Space Museum

Let's end this essay with a wonderful photograph of a MD ANG four-ship formating over the countryside. It was taken late during the squadron's employment of the Thunderbolt and may well depict their contribution to the District of Columbia's air defense umbrella since the unit rotated a four aircraft detachment to Andrews for that purpose during part of the time they operated the type.   Mike Burke via Mark Nankivil/Greater St Louis Air and Space Museum

Blue skies, Mike!

The Relief Tube

Long-time friend Steve Birdsall noticed our A-4 close-up posted in Happy Snaps two issues ago was probably miscredited and offered this:

Hi Phil -

Glad to see the latest update at RIS.

The photo of the VA-36 A-4 caught my eye and I suspect that is a Tom Hansen photo. As you well may know, Tom was an airman aboard the HU-16s stationed over the Gulf of Tonkin, and he devoted many hours to photographing the many other aircraft he encountered. The timeframe fits too.

Anyway, I've attached a somewhat similar closeup . . .  A-1H NE 581 of VA-25 from USS Coral Sea on 18 September 1966. Tom noted that Crown Alpha's escorts that day were Canasta 81 and 73.

Feel free to run the photo if you wish - on the next update, or Facebook or whatever, just as long as it's credited to Tom Hansen. He rarely if ever gets the credit he deserves.

All the best -

Steve

Thanks very much for the correction and the insight, Steve, and we'll make certain Tom gets the credit! 


Happy Snaps

Just in case you were wondering what happened to the Skyraider photo Steve mentioned in The Relief Tube:

Once again Tom Hansen captures the sheer joy of flight! Of special interest in this shot is the excellent depiction of the Yankee Extraction System as used in the A-1. Aviation photography honestly doesn't get much better than this!   Tom Hansen via Steve Birdsall

We may run an article on that extraction device at some later date but in the meantime here's a page from the manual to illustrate the way it worked:

These illustrations are pretty basic but you get the idea, right? 

Many thanks to Steve Birdsall for sharing both the correction and that marvelous image with us!

That's about it, both for this issue and for this year. These are challenging times and our exceptional paucity regarding the number of issues we've published during the past twelve months bears that out, but we're still kicking over here and we'll see you again early next year. Until then, be good to your neighbor! We absolutely WILL meet again soon!

phil

Thursday, November 4, 2021

Something Different at the 'Canal, Another Darned '109, They're Your Photos, A Couple From John Kerr, and a Tadpole


The Very First One

We're going to take a somewhat different approach with our opening piece this time and talk about something we've all had, and probably all remember. That's right; we're going to discuss the very first plastic model airplane we ever built, either solo or with help from someone, so let's jump right into it!

My first personal exposure to the world of plastic models came in 1955, while my dad was stationed at Chitose AB on Southern Hokkaido helping the Air Force stare down those bad guys just a few clicks away. It was an unaccompanied tour in those days which meant no families allowed so my mom and I were cooling our heels staying with my grandmother in the wilds of North Georgia while waiting for his 18-month assignment to pass. That, in turn, meant visiting relatives and, magically, getting to see my teenage cousin Jerry's model airplanes! He may have, and probably did have, have a stick and tissue flying model or two on display somewhere but the real treasure was on the dresser in his room; those first Revell jet airplanes! He may have had them all---my memory can recall the F-84F, F-94C, and F7U. He may have had a Cougar too, but I know for certain that he had those three. I saw them, I asked if I could play with them and was told "no" in terms I could understand, and the die was cast. Those models, plus Jerry's car (a used Sunbeam Alpine that he spent most of his weekends working on), rapidly elevated him to the exalted status of Favorite Relative in my eyes. The fact that he tolerated me and let me watch during those interminable hours he spent trying to synchronize the SU carburetors on that Alpine didn't hurt either, and in retrospect he's probably the reason I grew up loving sports cars too, but this isn't about sports cars. It's about plastic model airplanes.

Jerry took me to the hobby shop that was near his home but at six years of age I couldn't afford to buy anything so I just looked, and dreamed of the day I could build a model too. I asked my mom to buy a kit for me and, if truth be known probably drove her crazy with the frequency of my requests, but she always had said no, right up until The Magic Day. 

It started out as a normal shopping trip for groceries at Blair's Supermarket in Canton one Saturday afternoon. The place was large for a grocery store in a small Georgia town and sold things besides food and related dry goods and sundries. That meant they had a small toy section in the store, and in that toy section were a handful of models, one of which was a black "Me109 Night Fighter". It was in a smallish scale, just the size for someone of my tender years, and my constant pestering, coupled with a desire on my mom's part to get out of the store and go home, won the day. She asked if I could really build it all by myself, and I said YES loudly enough to be heard throughout the store. She bought it for me, and I suspect I danced all the way out to the car. I HAD A MODEL AIRPLANE! It was mine to build, and then I could play with it! I could be just like my cousin Jerry; could a sports car of my own be far behind? Ok, maybe not, but I had a model of my own and all was right with the world!

My attempts at assembly began almost as soon as we got home. We hadn't purchased glue because the thought had never occurred to either of us to do that, but Grandma always had Elmer's Glue somewhere around the house and glue was glue, so I was set. 

Or maybe not...

We all know that Elmer's doesn't work with polystyrene but I didn't have a clue back then, so I broke all those black pieces (it was a night fighter, remember?) off their sprues and set to work. The results were predictable but also eventually salvageable once someone had the idea to call my cousin to find out why all the of the kit's component pieces were literally falling off the model. A tube of plastic cement was somehow acquired and I began again, which allowed me to learn about Indelible Glue Fingerprints and how black plastic turns purple if you get enough cement on it. I got the thing finished in spite of myself, although I don't remember putting decals on it---my recollections of that very first polystyrene model airplane indicate it was overall black, which was just fine with me. It was a night fighter anyway, right? 

And that was how it all began for me! The subject matter might have had something to do with my ongoing modeling interest in the Ost Front Luftwaffe, although probably not, but the kit started me off on a lifetime of polystyrene misadventures that has carried through until this very moment. I look on the whole thing as a gift!

And here's the culprit! Everybody has a first model they built all by themselves, with no help from adults or older siblings, and this one was mine. I don't have a copy of it now and scabbed the picture you see off the Internet, something I almost never do, but I'd sure like to have that kit again. Drop me an email ( replicainscaleatyahoodotcom  ) if you have one you'd like to part with and maybe we can talk.

Long ago and far away...

Guadalcanal Birds of a Slightly Different Flavor

When we think of the aerial struggle that took place for the island of Guadalcanal from mid-1942 into early 1943 we usually think of Wildcats, Dauntlesses, Corsairs, P-38s, and P-400s, but the Army Air Force operated a number of other types in the theater. Take these airplanes, for example:

41-13153 was a B-25C from the 390th BS/42nd BG and was photographed at Henderson Field in the Spring of 1943. There may or may not be a name or nose art on the airplane; although this view doesn't show one, it wouldn't have been unusual for it to have been on the port side of the airplane only. This one is a straight-up bomber rather than one of the highly modified strafers found flying with the 5th Air Force in New Guinea during the same time period; those mods were the exclusive property of General George Kenney's boys during this phase of the war. Note how relatively clean this airplane is. I'm guessing it had only recently arrived from New Caledonia but it didn't last long, going down off Guadalcanal in July of 1943.    Friddell Collection

When we think of Martin's Marauder in the SouthWest Pacific we usually think of the 22nd Bomb Group and their operations out of Port Moresby, but there were B-26s at Guadalcanal as well. "Yap Trap" was a B-26B (41-175681) assigned to the 38th BG and nominally operating out of New Caledonia, although they could sometimes be found operating from Henderson Field as well. The group didn't operate the type for very long and didn't stay in the Guadalcanal area either, but they were there long enough for "Yap Trap" to be immortalized on film.   Friddell Collection

From the scale modeler's perspective we're relatively poorly served as far as kits of these airplanes are concerned, at least if you build in 1/48th scale (which I predominantly do). Accurate Miniatures attempted a B-25B/C/D/G a number of years ago but it has some serious errors that cause it to be only a fairly good model rather than the accurate one we'd all prefer, while nobody, as of this writing at least, has ever kitted a 1/48th scale short-winged B-26 of any sort. Big sigh.

A Great One From Norm

Long-time contributor Norman Camou is at it again, this time with a remarkable YouTube film of early l940s US Navy activities. It's an amazing look into the past and well worth the time it takes to watch it!


Thanks very much, Norm, for taking the time to find these jewels for us!

Not Another Bf109!


There are quite a few airplanes that are considered iconic, and those airplanes so designated generally have plastic model kits produced of them in substantial variety and in many scales. Willy Messerschmitt's 109 series of fighters certainly falls into that category of iconic airplanes, and the sheer quantity of kits available of all its various iterations is legendary---it seems as though there are as many different kits as there were real airplanes produced by Herr Willy, but we digress...

We're going to restrict today's discussion of the 109 family a bit, however, in favor of looking at and fixing the flaws of a kit that's often been called the best of the 1/48th scale Bf109Es; the Airfix Emil. It's got a lot to recommend it, you know; it's closer to scale than almost all of its competition, and it's relatively simple to build. It's easily available and was, until, recently, the most affordable of the good Emil kits as well, and it's also the only one out there that will allow the modeler to build all of the "normal" Bf109E variants from what's in any of its several boxings. That's right; excepting the barely produced and hardly used Bf109T, each and every Emil variant is right there in that Airfix box from E-1 to E-7, so the kit is what we used to call a Bargain as well as accurate.

We have a premise, then: The 1/48th scale Airfix Bf109E is the currently the best kit available of the type available to us (and yes; I'm fully aware of the recent Wingsy kit of the airplane, but I'm standing by what I just said about Airfix, for now, anyway...), but it's not without its flaws. Let's see what needs fixing!

The canopies are thick and the squared-off set for the E-4 and E-7 variants is just wrong. That's because Airfix allegedly used a real Emil for their kit research, and that real airplane was wearing an incorrect for the variant, later and far more heavily-framed Me09G canopy, a situation apparently caused by the paucity of proper Messerschmitt canopies in stock over at the local airplane parts emporium. The fix is pretty easy, if possibly expensive---either modify the kit parts by reworking the frames or swipe a canopy, or the entire canopy stack, from an Eduard Weekend Edition kit since that particular edifice (once our favorite Emil kit!) is just too darned big! Yes, Virginia; the Eduard E is overscale but a lot of the parts can be used to detail someone else's kit, which almost makes sense if you either have an unbuilt one lying around, or can get a Weekend Edition for cheap. Either way, the canopy situation is fixable.

The prop is way too thin, and the spinners provided with the kit (3 different ones) are all a little on the soft side. Our Canadian friends at UltraCast make replacements out of resin that are just super, and will fix the problem regardless of the spinner your model requires. 

The tailwheel is a little too small as well, and the main gear wheels are lacking detail. UltraCast can help with the wheels for the mains, while the Bf109F kit of your choice, or the tailwheel from the Eduard "Brassin" set for the Emil, will cure the problem at the back end of the model. 

The interior could stand some work, of course, but the simple addition of an UltraCast seat (with belts molded in) and painting will go a very long way towards making the office presentable. Yes; I use a lot of UltraCast products when they're available for whatever I'm building at the time. That's because I like their work a lot and I'm a fan of their products. Your mileage may vary in that respect and there are other solutions out there for the issues just mentioned but the boys from Canada tend to get my vote most of the time. You pays your money...

Then there's the real heartbreaker of the kit, which lives in the form of the main landing gear struts. As tooled, the model sits way too high and ends up looking pretty silly once it's completed, but those struts aren't the problem. Nope, the whole issue stems from the way Airfix have you mount the mains into the wheel wells, but there's a super easy fix for that too---that over-long gear is the long pole in this particular tent, but we can fix it in just a few minutes:

The guys at Airfix do great work these days but I'm pretty sure the guy who designed those struts wasn't talking to their wing department when those items were tooled because, as designed, they sit ON the wheel wells instead of IN them. The fix is an easy one; just open up the mounting slots so the strut attachment pegs can drop down into the wing. The struts are approximately 1/8th inch too long but not really; they just mount incorrectly, and this fix almost exactly equals the dimension required to fix the problem. 

Here's the finished opening. It's rough (I coulda/shoulda been neater!) but it works, as we will shortly discover.

See how those struts are sitting in the photo? The one with the red box around it has been corrected, while the one furthest away is just sitting there as Airfix mistakenly intended it to be. Dropping the strut down into the wing makes the whole problem go away.

Notice how the top of the strut's mounting peg hits the bottom of the upper wing---that can be used as an ad hoc fixture to set your spacing, after which all that's required is to make certain the splay and rake of the gear is correct and let the cement cure. How easy can this be!

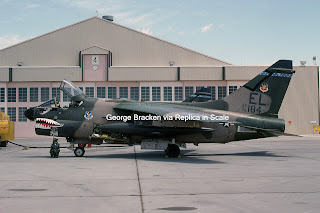
Here's how the finished model looks. Note the "sit" of the airplane---much better, huh? One thing about the Airfix kit that poses a problem is the relative fragility of the pitot tube and aileron mass balances, which are extremely fragile and easy to break when removing them from their sprues. Caution is required. That said, this model was built mostly as an Old School sort of project so the kit gun barrels were drilled out and most of the other parts on the airplane came from the kit. Normally I would use Master Barrels for that sort of thing but this time around I didn't and Old School worked out just fine. 

Early reviews of this kit slammed it for over-large panel lines and there's some truth to that, but they largely go away once the model is painted. My model received a coat of Mr Surfacer 1200 prior to painting and everything worked out just fine in the panel line department but that's a matter of taste, isn't it? I'm ok with the way it looks but you might not be. One thing I definitely should have done was replace the canopy stack, because those parts are way too thick even for an airplane using the E-1/E-3 canopy, which this airplane did. As previously mentioned, the parts from Eduard's oddly proportioned and overscale Bf109E kits will work just fine with the Airfix offering, as will Hasegawa's for that matter. If you're building an Emil with the "square" canopy and windscreen frame you'll have to do something about the issue anyway, but I got lazy and could get away with it since the E-7 I was building (Herbert Ihlefeld's LG-2 bird in Romania, immediately prior to the launch of Operation Barbarossa) carried the older canopy set. Sharp-eyed readers will also note that the windscreen hand-holds and canopy retaining strap still need to be added. All together now: Jeez---doesn't he ever actually finish anything?

Here's a parting shot, just because. The paint on this one was all Mr Color while the crosses, swastikas, and what little stencilling is evident were taken from the kit decals, which look awful on their carrier sheet but are actually quite good. The LG-2 insignia, commander's chevrons, and victory markings came from Eduard's limited edition Barbarossa set. I chose not to use their national insignia because they're too big for the Airfix kit, which is actually 1/48th scale. The Eduard kit (which I used to like a lot) has scale errors similar to their initial-release Me-109G series, which means it's a great selective parts source but you have to pay attention because some of the components, to include the national insignia on the decal sheets, are just too darned big! Forewarned is forearmed...

Public Resources

It's an odd thing, of the strange but true variety, that thousands of excellent photographs of American military airplanes are available to the aviation enthusiast an historian on line, and they're there for free! That's right; they're free, but you will have to dig for them. The point is they're out there, just waiting to be accessed. 

The resource is the United States' very own national archives, and you can tap into them at National Archives | if you'd like. It's a huge, and we mean HUGE, resource, albeit one that can be notoriously difficult to navigate until you get the hang of it. That said, once you learn how to get around in there the images and documents that are available to the public absolutely free of charge will astound you. Here are a couple of examples of the photography that lives within:

Do you recognize this airplane? You should, because this very image has been used over and over again in books and magazine articles, sometimes properly credited but far more often not. It's been in the Archives forever and depicts "Scatterbrain", a P-40E of the 7th FS/49th FG during their time at the Port Moresby complex of airfields. The date on the photograph is somewhat misleading because it defines when the image went into the collection rather than the month and day the shot was taken, but still...  National Archives

Here's another photo you're probably familiar with. This time airplane is "Poopy II" and is another 7th FS/49th FG Warhawk stationed at Port Moresby. 

One of the things that will stand out if you choose to explore this resource is the overall quality of the images that reside there. Most of them are first-generation prints off the original negatives or first-generation color transparencies that have been scanned at a reasonably high resolution, although some of the photography held there isn't quite as good as these images are. That's not the point, though. The important thing is that the images are there, available and waiting. All that's required on your end are time, patience, and the ability to use the "search" function on a web site!

You can thank us later...

Maddog's Legacy

John Kerr, also know as "Maddog" to his friends, was a retired Air Force Air Commando and aviation photographer and collector who sadly passed away several years ago. That passing left quite a void for many of us but Maddog is still with us thanks to his tireless efforts in acquiring old and unique photographs of American military airplanes and his generosity in sharing them with others. We're offering this pair of images today to prove that point:

While the B-50 family was originally designed to be bombardment aircraft and the logical follow-on to Boeing's legendary B-29 SuperFortress, photographs of it in its bomber guise are difficult to come by because of the airframe's adaptability to other missions. We can find photographs of it in its weather, recce, and, most frequently, aerial tanker variations, but the straight-up bombers are fairly rare. This airplane, a B-50F (47-0141) of the SRS/55th SRW is rarer yet because it has retained its armament into 1953, when this photograph was taken at Olathe. The type is relatively obscure today but the B-50s in all of their variations were Cold Warriors par excellence and served the Air Force well from their introduction into service until the early 1960s. This one is a remarkable example of the type.   A.L. Meyer via Ron Picciani Collection

Here's another Cold Warrior that's often overlooked by the amateur enthusiast. The Douglas B-66 wasn't much of a bomber and in consequence didn't serve long in that role, but it was the parent of the highly successful EB, RB, and WB variations of the airframe and deserves more attention than it normally receives. This photo illustrates a perfect example of one of the early RB-66s; an RB-66B (54-0534) of the 30th TRS/10th TRW stationed at Laon AB in France during the early and mid-1960s. The photo was taken at an open house, we think at Bitburg although we aren't certain of that. The airplane is a gorgeous representative of the Destroyer in its photo-recce guise and a fine representative of The Silver Air Force.   John Kerr Collection

Let's end Maddog's contribution to today's edition with a relative rarity. That tiny helicopter is a Bell HUL-1 (BuNo 143143) of HU-1 resting on the deck of a diesel-powered submarine, probably during the early 1960s. It was assigned to HU-1, an AirPac asset, and is proudly done up in the utility paint scheme and markings of the day. What a neat little helo! We suspect this image may have originated with the Navy but you never know, because John knew and traded with a lot of people! We think the photo is special no matter where it came from, and we're happy to be able to share it with you today.
   John Kerr Collection

Many thanks to Maddog John Kerr for the lifetime he devoted to the collection of photographs of American military airplanes and to his ongoing legacy to us all!

Sneaky Pete

It's been quite a while since we've walked a military flight line with a camera but there was a time when we could often be found there, wearing out shoe leather chasing airplanes. This photo takes us back to those days:

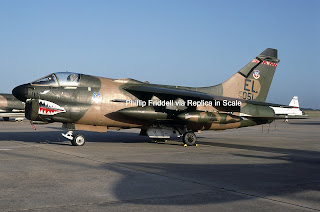
155681 was an A-6E assigned to VMA(AW)-533 and was on the ground on an overcast day at NAS Chase field when we caught her behind a tow tractor on 12 June, 1982. She was being moved into her parking place on the T-Line when this photo was taken.   Phillip Friddell

Here's another view of "Sneaky Pete" (probably the pilot's nickname and call sign rather than a literal aircraft name) in concert with an A-7E from VA-97 (BuNo 156828) and another A-6E, this time from the Navy's VA-165 (BuNo 155715). All three were robed in the NAV's classic "Easter Egg" paint job which was soon to give way to the more practical but far less attractive TPS schemes.   Phillip Friddell

The TPS camouflage paint schemes live on to this day, but we still prefer those long-obsolete Easter Egg paint jobs. There was a time, now many years behind us, when Navy airplanes wore color---a LOT of color---as a normal everyday part of the way they looked. Long ago and far away...

Happy Snaps

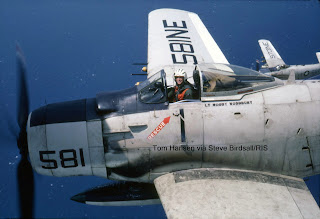
By now you're probably all familiar with Rick Morgan but for those of you who aren't, he's a career naval aviator (now retired) who managed to have a camera with him almost every time he was around or even near to a military airplane, and he's a talented writer as well. He's a superb photographer and it's always a pleasure to share his photography with our readership, so we'd like to offer another example of his work for you today.

Rick spent a fair portion of the mid 1980s flying with Air Wing 14 off the Constellation, which gave him the opportunity to photograph this gorgeous Tomcat (F-14A  BuNo 161609) from Fighting 21 while airborne over the Pacific Ocean on 10 June, 1986. It's one of those images that defines the airplane as well as the magic of flight and we hope you enjoy seeing it as much as we enjoyed sharing it with you. Fly Navy? You bet!   Rick Morgan


The Relief Tube

In the I Should've known Better part of today's entertainment, I need to make a significant correction to a Bobby Rocker image I ran last issue. That photo of the P5M loading casualties in the lead photo essay isn't that at all; the airplane is actually a Consolidated PB2Y Coronado based either in the Caribbean or the Atlantic. I missed it completely but Paul Boyer and Mark Aldrich didn't! First, from Mark:

 Hi Phil,

Man! I love your blog. I was just getting caught up and working my way through a few recent issues that escaped me and noticed one minor flaw in a fantastic August issue. That PBM loading casualties that came from Rocker is a Consolidated PB2Y Coronado. Probably a PB2Y-3R. No doubt about it.

Mark A.


And from Paul:


I just viewed your most recent blog entry from August 17 and noticed an oopsie. You have a Bob Rocker photo of a couple of litter patients about to be evacuated in a “Coast Guard PBM off Makin Island.” I can’t tell where it as taken, but that ain’t a PBM. The lack of wing dihedral from the fuselage, location of the hatch, and the two window-frame cockpit ceiling hatches are tells. What we’re looking at here is a PB2Y Coronado and it looks like it is in the “Atlantic” or “antisubmarine” scheme of dark-gull-gray over white. That would suggest a Navy Atlantic patrol assignment, possibly in Central or South America. I’m attaching a couple of shots: a reference photo, and a model I made of that aircraft using the 1/72 scale resin Kora kit.

Hope you and yours are well!

Paul Boyer

Here's a photo Paul provided to prove the point, and a photograph of an excellent model of the Coronado he built from the 1/72nd Scale Kora resin kit.   Paul Boyer Collection

And this, boys and girls, is how it's done! A good modeler with a good resin kit can do some amazing things indeed and, while I can't vouch for the quality of that Kora PB2Y kit, I can most assuredly confirm Paul Boyer's skills as a modeler! He was kind enough to share some other models from his collection with us as well, which we'll be sprinkling in as we go along!   Paul Boyer

Thanks to both Mark and Paul for the correction to that photograph! 

One more thing before we go: There's a Comments feature that can be used with this blog software but I've never turned it on and don't intend to. That's because of all the nastiness that appears on the various sites that allow such things; life's too short for that! Still, I'd love to hear from you and do publish pertinent comments, corrections, and photography, should you be so inclined. The email address for that, all run together to confound and befuddle The Picture Pirates, is    replicainscaleatyahoodotcom  . 

It's been a crazy year without much activity around here but we're still alive and well. We'll see you again, hopefully soon, with another edition of our modest blog. Until then be good to your neighbor!

phil


Tuesday, August 17, 2021

A Couple From Bob Rocker, Those Hasegawa P-40s, A Hog or Two, A Big Bird, and A Special Documentary


OOPSIE, and The Consequences Thereof

Let's start at the beginning, or maybe quite a bit before then. I acquired my first airbrush back in 1968, an early-60s Paasche H given to me by the next-door neighbor of a girlfriend. It was and still is a quality piece of work and I still have it, velvet-lined case and all, although it must be admitted it hasn't been used in a very long time. These days it's mostly a treasured keepsake of my early days in "serious" modeling, albeit one that could easily be put back into service if necessary. 

1968 was a watershed year for me in many ways, but the two that matter to this ramble are that Paasche H and the Binks hobby compressor I purchased to feed its requisite air supply. That first Binks compressor was a horse; it always worked and it was seemingly unbreakable. It was in almost daily use for some 20 years before finally giving up the ghost when it became the victim of a ruptured diaphragm in late 1988. Still, it had proven itself, which mandated an easy decision to replace it with an identical unit. That replacement is still chugging along, or at least it was when I retired it in favor of the far quieter Paasche D3000R my wife gave me for Christmas back in 2015. Ah; that Paasche! It was a revelation because it had an air tank, a water trap, and a pressure regulator built into the unit; none of which were present on either Binks as-purchased, plus the Paasche was nearly silent since it ran off the compressed air stored in the tank most of the time, a huge plus in the ongoing game of ensuring domestic tranquility on the home front. (Translation: Mama don't like that compressor noise!)

Nothing lasts forever, though, and that spiffy Paasche compressor gradually began cycling more and more frequently and taking longer to fill the air tank each time it cycled, which should have been a tip-off of some sort if I had been paying any attention at all, but of course I hadn't been. A cursory check and several leak-down tests had proven to me that none of the various air fittings on the unit were compromised even though the holding tank no longer held pressure for very long, so the whole thing was written off as the idiosyncrasies of an aging compressor. Stuff happens, right?

That's been the status quo for several months now, but everything changed a week or so ago. There were warning signs, as there so often are in Life, but like so many of us I chose to ignore them until The Fateful Night which began as I went to bed and was told by my wife that the compressor was running again. That's wasn't unusual so I made some sort of reply that involved ignoring the compressor until the next day, and I went to bed. That was Strike One. Strike Two came at 0330 the next morning when I got up to answer natures' call and noticed the compressor was merrily compressing away, apparently without making any progress at all where filling its modest storage tank was concerned. That's not what's supposed to happen so the continual racket should have been yet another a major flag for me, but the need for sleep overcame any curiosity on my part so I went back to bed. Strike Three came when I got up at 0630 and discovered the darned thing was still running! That finally stirred me from the grasp of Self-Induced Oblivion and I went over to turn the darned thing off, only to discover that it had somehow managed to pee a nasty greyish liquid all over the carpet in the space where it sat beside my modeling desk. Yes; it was, and still is, a Stupid Thing to keep a compressor on a piece of unprotected carpet and I never should have done it, but then I'd never had any personal experience with an oil-less hobby compressor puking assorted nastiness all over the floor either. Who would've thought that could even happen!

Then I noticed the compressor, which had been running until the moment I manually shut it off, wasn't actually compressing anything; it was just merrily humming away and making no productive contribution to the situation whatsoever. A close examination led to the discovery of a hole, maybe a 16th of an inch in more-or-less diameter at the edge of the holding tank, pretty much where you would find the weld that attached the end cap to the unit. A phone call to Paasche seemed in order but that only produced a No-Joy moment for me because their compressors, or mine anyway, are only warranted for one year and I'd had this one for far longer than that. The guys over there were nice enough, you understand, but they weren't any help at all, although they did take the time to section a compressor tank to show me they all would exhibit some degree of rusting over time and there were definite signs of rusting around that hole in my unit (but not on the carpet; go figure).  They also assured me, multiple times and in three-part harmony, that both halves of the problem were mine because the unit was several years out of warranty---an unpleasant reality, if you will---and there I was, hard down with no recourse as far as the manufacturer was concerned. It was time to Work the Problem.

The immediate solution was simple enough. A miraculous cleaning product called Spot Shot took away every vestige of staining from the afflicted carpet. The tank repair was simple too: The rusted-out hole was enlarged with a drill and a sheet-metal screw of a greater diameter than the hole I'd just made was wrenched into place using epoxy as a potting agent to ensure the thing couldn't possibly leak anymore, which it doesn't. The tank holds pressure, I can paint again, the carpet is clean, and everything is probably as good as it can be except that now I think there's some sort of pressure relief valve that's beginning to fail too, which takes us to today's lesson, to wit:

Don't ignore the obvious. If your compressor, airbrush, or any other tool or fixture you use is acting in a peculiar manner it would probably behoove you to investigate the reason it's doing that. Throwing in a little basic preventive action too, such as putting a compressor in a shallow plastic tub or similar before you even turn it on, can help matters considerably and you can save yourself some grief down the road.  

In hindsight, I'm guessing there was a pinhole at that weld in the tank that allowed the rust monster to develop to the point where a penetration was the inevitable result of what I'm thinking was inadequate QC at the manufacturer's level. (I was a certified aircraft welder in my younger days and I've got more than a passing familiarity with such things...) The cause really doesn't matter very much, though, because I could've/should've investigated the situation when the unit very first began to act up and I didn't. I also could've/should've had some sort of containment under the compressor, to keep the rubber pads on its feet from discoloring the floor if nothing else but I didn't do that either. Jeez, Phillip...

My ultimate solution was a new compressor, relegating the Paasche to the status of backup unit. That came with a personal decision to avoid that company's compressors as well, although it must be said that hobby compressors belong to that family of devices that can no longer be economically produced within the United States, thus rendering them all to be somewhat at long-term risk of failure. It's not so much a case that one compressor is Good while others are Bad, but rather a case of paying attention to your tools. That means I discovered once again that there's always something to learn and taking the time to do that would lead to a better outcome at the end of the day. You'd think I'd know that by now...

What We Think and What It Really Was

We live in interesting times. If you're reading this blog it's because you're an aviation enthusiast, and maybe a scale modeler too. You collect resources, you buy books, and you might even scour the deepest reaches of eBay looking for old photographs of airplanes to add to your collection of references. You quite possibly build model airplanes as well, with the substantial investment in kits, paint, decals, and accessories that comes with that hobby. If you're like most of us, your view of such things has been greatly influenced by the documentaries and movies that are out there, but rarely has there any thought to what we're going to call The Truth. We're going to take a minute to share a couple of photos provided to us by Bobby Rocker to illustrate what we mean.

Here's a prime example of what, for the purposes of this conversation, we'll call The Norm; it's an A-20G from the 90th BS/3rd BG over Lake Sentani late in the Pacific War. The airplane's intact and nobody's shooting at it. The crew was probably scared at some point in the mission, or is possibly about to be scared, but everything is calm right now, almost serene. It's what we think of when we think about our modeling subjects at all.   Bill Rupert Collection

Special Note: Contributor and friend Gerry Kersey has pointed out to that this image came not from Bobby Rocker's collection but from that of Bill Rupert. Apologies to all concerned and please disregard the credit line applied to the photograph! 

There's a whimsical side as well, as illustrated by this 67th FG P-400 participating in a close encounter of the worst kind with a US-marked Tiger Moth on an airfield in New Caledonia. We don't know the circumstances of the mishap but it's not unreasonable to presume that nobody was seriously injured, and the photo depicts the sort of accident we can find humor in. It's superficially funny and we can even make models of the airplanes involved.   Rocker Collection

And then there's this. The airplane is a Coast Guard PB2Y somewhere of the East Coast of the United States, or possibly in the Caribbean, loading casualties for the trip to proper medical attention. No; those casualties weren't from an airplane engaged in combat or even in the SWPAC but hurt is hurt, wounded is wounded, and dead is, unfortunately, dead, no matter how it happened. The big difference here is the fact that those guys could be recovered to be placed on that Coronado for transportation to a field hospital. Aviators were rarely so lucky.   Rocker Collection

We study the conflicts and we build the models. We discuss the merits of both the airplanes involved and the campaigns they fought in, and some of us publish books and magazine articles about them. I do those things too, and I enjoy them, but we need to remember the reality of the situation. None of those guys would have been doing what they were doing when they were wounded or killed if they could have done otherwise. A bad situation required them to stand up, as soldiers always do, and it required some to pay a terrible price. That's worth thinking about.


Not As Bad As You Think

That lead-in could apply to many different things, but in this instance it's a way to introduce a simple fix for the 1/48th and 1/32nd scale kits so many people love to hate: The modular Hasegawa P-40 families Curtiss Warhawks. The kits share similar design features in both scales, with separate empennage and cockpit sections as well as a handful of inserts intended to allow the manufacturer to produce different variants of the kit without going to the added expense of tooling different fuselages for each and every one of them. It's a smart and, at least in theory, cost-effective way of dealing with the problem, but there's a catch. Those inserts are no big deal if you've got a little time in the saddle as a modeler, but they can prove tricky indeed for the total novice or the lesser-skilled. With that in mind, let's see what we can do to ease the pain!

This shot, taken directly from one of Hasegawa's instruction sheets, defines the three areas that produce the problems encountered by many modelers. None of the inserts are shown, nor are the halves of the empennage assembly, but the  details that have been circled define what we need to know.

Here's the most important piece of the puzzle regardless of the scale you're building, or even the specific sub-variant of P-40 it might be. First and foremost: Totally ignore the kit's instructions for assembling the fuselage as Front and Rear sub-assemblies. Instead, take the big pieces for each side of your modular Warhawk and clean them up, then assemble them to make two complete fuselage halves. Align from the outside of the parts, where you'll see any mismatches when the model is completed, and CAREFULLY wick liquid cement (Tamiya Extra Thin Quick Setting, for example) into the joints from behind. Align the parts properly and allow them to cure. (A word of warning here: Do NOT put your fingers over a joint when applying your cement because there's a substantial risk of the stuff wicking out of the seams and leaving a fingerprint in the model's plastic. Yes; that's Modeling 101 and yes, I've done it. You have too, or you someday will, so paying attention to this basic construction technique is a thing that will save you from unnecessary frustration and cleanup!) 

This extremely simple modification to the kit's instructions will allow an almost perfect fit to the big pieces which means minimal finishing work for you later on, as well as a better-looking model once you're done.

This shot illustrates how everything goes together in the area of the radiator bathtub. If you attach the  cowling lip to the assembled radiator parts at this time and make sure everything is centered when you look at the thing from the front, you'll end up with perfect alignment of a part that goes wonky all too often. Let it cure and then assemble it to one of the fuselage halves. That one deviation from the instructions will, once again, produce a far better model with a lot less work on your part!

Before you permanently install that radiator lip, drill a couple of holes in the insert bays on the nose, and drill a couple into the the lower wing gun bays as well. This will allow you to adjust them all for a flush fit from behind before you wick in your liquid cement to lock the inserts in place---just poke a toothpick or similar into the proper hole to push a panel that may not be sitting flush into the proper position before the cement can cure.

While we're at this part of the assembly, take notice of that triangular piece that's immediately aft of the rear-most exhaust stack. The P-40D and E don't have those fillers but all the other P-40s do, and careful alignment is once again required, probably to be followed by a tiny amount of filler and some light sanding to obtain a smooth homogeneous surface there. 

This is what you'll have just before joining the fuselage halves together. Since you've already dealt with the area behind the cockpit, the intake lip, and the back end of the fuselage, what you're doing now is just like working with a "normal" model airplane kit. If you've done your part at all during the assembly process, every bit of the nonexistent drama many modelers associate with these kits is now gone. Eliminated. Vanished!

Here's what you'll end up with if you do things the way I've described them. There are a couple of other things here to pay attention to as well:

Those baseball-sized rivets in the cutouts behind the headrest on the P-40D through M are hugely oversized and have got to go, so sand them off. 

The machine gun inserts in the leading edges of the wings are another heartbreaker for many modelers, but you can avoid that particular bit of angst by carefully cleaning them up, then installing them in their cutouts in the upper wing halves prior to attaching said halves to the lower wing. It's the same deal as with all the other inserts; fit them carefully and wick some liquid cement in from behind to lock them in place from inside  the wing where it can't be seen and therefore can't create problems either. Align them on the tops and they'll fit on the bottoms too, but make sure those inserts are fully cured before assembling the wing halves!

You'll probably want to fill in those little ID lights on the fuselage sides too. They were on P-40Ds and very early Es, but very few Warhawks actually had them beyond those early variants. 

Thanks to this picture you now know what the pattern on the carpet in my studio (the one the compressor peed all over) looks like, but you've also got a pretty good idea how the undersurfaces of the nearly completed model should look. In this case it's a P-40M from the RAAF ca. 1944 but the assembly basics are the same regardless of the variant you're building. Once again, there are a couple of minor details you might want to consider as you move towards completion of your model:

First, those white spots you see on the model are MicroScale Krystal Klear that's been employed to replace the lenses that go in those places as given in the kit. That's because I'm clumsy and invariably manage to put a nick in the kit's clear parts where they attach to their sprue, or maybe sand a flat in them when I'm cleaning those parts up. Either way I end up with an out-of-round part, so using Krystal Klear instead of the kit components eliminates that problem before it can occur.

In a similar yet totally unrelated vein, the kit provides a tiny lens that goes into a hole in the front of one of the landing gear knuckles but the real airplane didn't have one there, so fill in the hole, sand it out, and move on.

Study of photographs seems to show that very few wartime P-40s had gun cameras, at least in the Pacific, so building and installing the one provided by the kit (parts A2, A24, A25, and U2) is very much up to the individual modeler unless you have a photo of the real airplane you're replicating that shows one in place.

Here's the way the model under construction for this article ended up immediately prior to finishing. It was an easy date with no drama, and all those modular components so often cursed by a vocal few in the modeling community ended up fitting like a glove, with no significant parts mismatches and little putty or sanding required. 

If you're around the hobby enough you will eventually hear a few modelers decrying these kits because of the way they're designed, although the complaints often come from people who haven't actually built any of them! Ain't that always the way!

In my world single-piece fuselage halves would have been preferable but that's not what comes with the kit, and it really doesn't matter anyway, because those Hasegawa P-40s are great kits that are capable of producing outstanding replicas of the real thing if the modeler does their part. The models build easily, or at least they do for me using the tips mentioned in this article, and they capture the look of Curtiss' pugnacious Warhawks as no other presently existing kit does. To each their own, as the old saying goes, but on a personal level I'm a big fan of Hasegawa's 1/48th and 1/32nd scale P-40s. Your mileage may vary, of course...

 An Overdue Look at Old Hose Nose

Jim Sullivan has been part of the Replica in Scale family since 1973. Aside from being both a superior modeler, photographer, and long-time associate of this project, he's also a highly valued friend. Today we're going to look at a few Corsairs from his remarkable collection of photography. They're fascinating, to our way of thinking anyway, because they show "The Hog" during normal day-to-day operations during both good and bad times. Let's take a look!

There's a general perception among a great many enthusiasts that tired or obsolescent American military airplanes were simply scrapped in place or dumped after they'd passed their usefulness in the Pacific. That was certainly true post-conflict and even during the last days of the War, but some of those older airplanes were still useful in many respects, even though their days as effective combat aircraft were over. These F4U-1As are a prime example of the practice of salvaging combat aircraft that still had life left in them. They once belonged to the legendary VF-17 and were photographed on 7 July, 1944, while being unloaded at Mugu Beach in California. Too worn for further combat, they were perfectly viable as training or utility aircraft. To borrow an old Southernism: Never throw nothin' away!   Jim Sullivan Collection

April of 1944 saw VMF-322 operating out of Kadena Field on Okinawa. These F4U-1Ds belong to that squadron and are armed with napalm as they taxied out for another mission against a highly motivated and determined enemy that wasn't interested in surrendering. 322's combat time while they were stationed on Okinawa was largely spent performing highly dangerous air-to-ground work, with the squadron's aircraft often flying multiple sorties per day in support of the ground troops. It was a tough way to make a living for all concerned.   Jim Sullivan Collection

Winners and losers; an F4U-1D from VMF-322 sits on Kadena prepped for another mission behind the remains of a Ki-36 "Ida" once used by the airfield's former IJAAF occupants. Damaged Japanese airplanes littered may of the airfields captured by US forces during the course of the war, but they rarely remained intact for long. Souvenir hunters would continue the destruction of the airframes created by combat activity and then most remaining aircraft would be scrapped, with a select few being retained for further study or shipment back to the CONUS for serious evaluation. The "Ida" was far from the cutting edge of technology even when it was new, guaranteeing that this example would soon be scrapped.   Jim Sullivan Collection

Whoa, Big Fella! In an event that must have created increased heart-rates in everyone who witnessed it this VMA-312 F4U-4 snags a late wire coming aboard the USS Badoeng Strait off the coast of Korea during September of 1951. The flight deck has always been a scary and dangerous place, even during the course of normal operations. Adding combat to the mix made things that much worse, but this Corsair managed to avoid disaster. We can only imagine what the Marine on the wing root of the "Hog" in the left front was thinking while all this was going on!   Paul Jerominski Collection via Jim Sullivan

Sometimes you got lucky when things went wrong, and this was one of those times. BuNo 97503 was an F4U-4B, also from VMA-312 during their time on the Badoeng Strait, and seen here after a landing accident that took place on the boat in 1952. The airplane is pretty banged up but it's salvageable and, most importantly, the pilot walked away from the accident. That wasn't always the case when things went wrong on the flight deck...   Paul Jerominski Collection via Jim Sullivan

Here's an undamaged F4U-5P from VMJ-1/MW-11 sitting on the ground in Korea during 1953. The Corsair was one of those classic airplanes that looked good in every one of its many variations; a brutish yet somehow elegant warrior from prototype to final production. It was state of the art when it first went into service, truly a cutting-edge sort of airplane, and was still modestly viable when it was finally retired from US service in the mid-1950s. It was truly the stuff of legends.    Clay Jannson Collection via Jim Sullivan

Thanks very much to Jim "Mr Corsair" Sullivan for sharing these photographs with us. They're a fitting salute to that most unique of American naval fighters and we're grateful to be able to run them!

They Used to Be Everywhere

We're talking about Lockheed's once-ubiquitous C-141 Starlifter, of course. Your editor saw his very first hint of the airplane in an early '60s issue of Air Progress, shortly before the type entered service, and than his first real one overflying Misawa Air Base in Japan during 1964. After that it seemed as though the C-141 was everywhere the United States had any sort of presence; it was truly a transport for all times. Norbert Graser, he of ThunderCals fame, sent in a couple of interesting photos of the C-141B a few months ago and we thought we'd share them today.


66-0138, a C-141B of the 63rd AW, was originally built as a C-141A and later stretched, as were most of the A-models. Nor caught her at NAS Glenview on 27 June, 1992. She looked as though she'd just come out of corrosion control but she'd been around since the mid-60s and you can bet the airframe had some stories to tell.    Norris Grazer


Here's 0138 on arrival at Glenview---a picture perfect airplane if ever there was one. We honestly can't remember ever seeing a Starlifter that pristine during our time chasing military airplanes, mostly because the 141 was just too busy to stay pretty for very long, but this one was gorgeous!   Norris Grazer


Here's the icing on the cake; a spiffy bit of nose art. The 63rd Airlift Wing was only two years away from deactivation when Nor took these images, but they definitely went out with a bang!   Norris Grazer

Many thanks to Norris for sharing these with us!

Bloody Buna

Let's finish the day with another YouTube documentary from regular contributor Norman Camou. It's not about airplanes for once but it makes the point about the horrors of the war in the Pacific as few documentaries can. There's a personal connection here too; my dad was at Buna for that particular party, and was present at the Battle of Manila as well, with excursions to a few nasty places thrown in-between for good measure. There was a time when he would talk about his days in the SouthWest Pacific but he never shared very much about his time at Buna, and I'm pretty sure he carried the memory of the place with him to his grave. Thanks to Norm for discovering and sending this along. 


Let's raise a glass to those guys and gals, and all their brothers in arms who came both before and after, who gave so much for us. 

The Relief Tube

We have an entry in our corrections and comments section known around here as The Relief Tube. It comes from Rick Morgan and corrects a misconception or two we had about today's Happy Snaps entry. The actual correction has been appended within that section in boldface.

While we're at it, you can contact us with comments, criticisms, or to share photography, at   replicainscaleatyahoodotcom   which is an all-run-together attempt to deceive those rascally spammers out there. Just put an @ sign and a dot in the appropriate places instead of the words I ran together and you're home! We look forward to hearing from you!

Happy Snaps

Every once in a while we'll come across a photo that defines the magic of flight. This image, which was shared with us by Rick Morgan, is one of those very special pictures.

We think, subject to correction, that "Boom" Powell (who was assigned to VA-36 at the time) was involved in the making of this photo but didn't actually take it since he was a "Scooter" driver by profession and we think the shot was probably made from the right seat of a Grumman "Stoof", either an S-2 or a C-1. That honestly doesn't matter because this photograph is Magic, and expresses the sheer joy of flight as few photographs can. Can you say "WOW"?  And, of course, we got it wrong! Thanks to Rick Morgan we now know that Boom Powell was never in VA-6 at all, although he did drive the mighty "Scooter" in anger during the Late SouthEast Asia War Games. The image did come to Rick via Boom but originated with someone within The Skyhawk Association; here's a link to that outstanding site if you don't already have it saved on your computer.   skyhawk.org  Many thanks to Boom and Rick, and apologies to all for the confusion!  pf

Rick had a couple of other comments regarding this particular A-4:

No idea who the pilot is; 99% chance it’s not Paul Palmer.

NG706 is not listed as being lost on that deployment.  VA-36 lost four jets on that deployment with two pilots made POWs, one recovered and one KIA.

VA-36 Roadrunners (callsign “Gale Force”) were an east coast squadron attached to CVW-9 for Enterprise’s first combat deployment. The Air Wing had a unique four Skyhawk attack complement with VA-36, VA-76, VA-93 and VA-94 attached along with Phantom squadrons VF-92 and VF-96 and the normal “cats and dogs”.

Besides the Shoehorn mods you can also see the under-cockpit antenna for AGM-12 Bullpup guidance.


Thanks very much to Rick for sharing this one---what a photo!

And that's it for today, ya'll. Be kind to your neighbors and we'll meet again soon!

phil