Sunday, September 23, 2012

Long Live the King, Long Ago and Far Away, and One You Don't See Every Day

It Just Never Got Much Better

Kitwise, that is. Nowadays we're all a little bit spoiled by the various offerings coming from those companies who provide us with the kits for our hobby. Even an economy that seems to be spending most of its time hiding in the cellar hasn't stopped the new releases, and it seems as though we're getting a new "dream kit" almost every month. Those new kits are great examples of the kit maker's art, putting all that came before them to shame. Or maybe not.

We've talked about the Once Mighty Monogram several times before, and each and every one of those times we've taken the position that the offerings from Morton Grove were, and in many cases still are, right up there with the best ever made. There's no doubt some of our readership will argue with that, mostly because they don't care for raised detail and are put off by the fit issues that all older kits, not just Monogram's, have experienced. In that one respect they're actually right for once; a great many "classic" kits have problems with fit that would lead most of us to drink, and Monogram's offerings are all too often right up there in the lousy fit department.

OK, then, what is it about those old Monogram kits that make them so wonderful? That's easy; a great many of them are more accurate in dimension and shape than the whiz-bang wunderkits that have replaced them. It's true that some of the really old offerings were pretty dicey in almost every respect, but The Big M turned over a major leaf when they released their ground breaking P-51B way back in the middle sixties and most of what followed was absolutely superb, albeit with the occasional gaffe to keep us all on our toes. Take today's example, for instance:

Somewhere back there in the mid or late 1970s, we forget which, Monogram decided to produce a 1/48th scale AT-6 Texan. That was a pretty amazing thing in and of itself since very few people ever bother to kit trainers, but Monogram did it and it was quite simply a revelation at the time. There had been only one previous kit of the AT-6 in that scale, Aurora's ancient AT-6/SNJ offering, and it had become distinctly long in the tooth (not that it had ever been very good in the first place). The Monogram kit was a quantum leap ahead of that and is, for that matter, still our Texan of choice in 1/48th, handily eclipsing the far more recent Occidental/Italeri offering of same. It is, and always has been, The Best Game in Town, and today we're going to take a quick look at it.

Monogram originally offered the kit molded in silver, with parts to allow a more-or-less accurate model to be built of any T-6 variant from A through F (or SNJ from SNJ-2 through -5), as long as the moder knew which details to tweak. A mid-80s attempt at marketing saw the kit offered as a racer, which was significant because that kit included the spinner, upper cowl deck, and canopy set to allow the kit's completion as a T-6G (as long as the modeler added the ADF fairing or DF football found aft of the canopy). There was a remarkably detailed single-piece engine, beautiful landing gear, and an interior that was almost adequate out of the box, needing just a small amount of detail and a set of belts and harnesses to be presentable. The nay-sayers all had bad things to say about the rivets, and the fit, but those rivets belong there since the real thing is absolutely covered with universal head rivets. As for the fit; well, it is pretty awful in places, but in theory we all possess the modeling skills necessary to fill a couple of seams, don't we? DON'T we?

So, besides that fit thing, what exactly are the issues with this beloved dinosaur of a kit? Lessee now...

The tailwheel and strut are clunky and awful, simply screaming for replacement. We're not entirely certain what we need to replace them with, but they need some serious help.

The mains are pretty darned good and honestly just need a little bit of cleanup, and the tires aren't bad either. The wheel covers are another story, requiring a little help in order to look right. Of course that won't matter if you're building a T-6G with open wheels; just rob the wheels and tires off the P-51 kit of your choice and life is good.

The gear doors are pretty thick. That's why there's sheet styrene, so replace them with a scratched up set if you feel the need or ignore them if you don't.

The engine is over-simplified and doesn't have a gajillion parts we'll never be able to see once the model's been assembled. If that matters to you then you'll need to go find yourself An Expensive Resin Engine to replace the kit offering with. If, on the other hand, you know how to use a paint brush and fine wire, the issue becomes almost entirely irrelevent. Of far greater concern is the cowling, which has a small "dent" in it to accomodate the single nose gun mounted on the early T-6s back when it really was an attack trainer. You'll have to fill it with a little putty, then sand it to make that dent go away. It's just a little more Modeling 101; you all should know the drill by now.

The spinner's a little clunky. If you're building a T-6G and if that bothers you then you can always steal the spinner off that Occidental kit.

The horizontal stabs are a little too thick and that, my friends, is truly a major problem. Since it's highly unlikely that any of the aftermarket resin folks will bother to issue a set of T-6 stabs in our lifetime, said worthies being far too involved in creating detail sets we honestly don't need, we're going to have to either ignore the issue or rebuild what we've got. The somewhat deranged staff over here at Replica (that would be me) is going to do the former because we're inherently lazy and don't want the extra work, but those stabs do need some help if you're of an ambitious nature. Don't say we didn't tell you.

The fuselage steps (those little tab thingys sticking out of the port fus) are too thick and too clunky. Yep. They are. You can replace them if you want to.

The landing lights are very Old School and need replacing. We advise cutting out the "lamps" that are molded into the wings and replacing them with MV lenses. You'll be amazed at how much that one little thing will add to your completed model.

The upper cowl decking provided for the gunless variants doesn't fit. It doesn't, in point of fact, come anywhere near to fitting, at least not on the kit we're presently building (the current issue "Revell" made-in-China edition). You're going to need your modeling skills for this one, but since the fix requires little more than filling and sanding you're still in pretty good shape.

If you're building a T-6G there's no ADF antenna or football and most of the real airplanes (but not all) had one or the other. You'll need to scratch up the former or steal the latter from a B-25J or Hasegawa P-40 kit if you want to build a "G". It ain't no thang, ya'll.

The pitot tube is clunky and doesn't look right, but you can surely fix that problem without any help from us.

The kit offers a cowl gun, a wing gun, and a gun for the aft cockpit, but it doesn't have any ordnance whatsoever if you want to build an LTA-6 or one of the French birds as used during their difficulties in Algeria. You can get most of the underwing stuff from the Occidental kit if you're so inclined, and those (or their Italeri reboxes) are easy enough to find at almost any large model contest, at least here in the States.

Finally, Eduard once offered a detail set for the Occidental kit. You won't need much of what's in there if you're building the Monogram kit but some of the details can be useful. The trade tables at your annual contest may be the place to go to look for these, although your favorite local hobby shop (if you still have one) may be able to order the set from Stevens International, a major distributor that used to have quite a few of the older Eduard detail sets in stock.

So, what conclusion have we reached today regarding this "dinosaur" of a kit? Well, folks, we'll give it to you plain and simple: We'd like a new kit of this classic airplane, preferably by Tamiya (if you're giving us our druthers), but the simple truth of the matter is that the old Monogram kit is, much like its cousin the F-100, still the best game in this 1/48th scale town and the game we're likely to have for some time to come. That's our story and, as usual, we're sticking with it.

Here you go: It's a T-6 (or SNJ), Type 1, Class 1, Mk 1, by Monogram. This is about where we are with our kit today but there are still some things we can learn from the photo. First, the upper cowl decking for the T-6G was not a part of the original kit and it doesn't fit very well as a result---the other side is a whole lot better than this side in terms of fitting the airplane and yes, that's a piece of Evergreen strip stuck to the rear part of the joint. Yes; the step there really is that big, at least on the kit I'm working with. It probably wouldn't be an issue if I was building the original iteration of the kit, but I'm not. Check out that pitot tube while we're looking at this shot, because it really does look that clunky and will have to be replaced before we call this project done. All those rivets stay, however; they're as close to scale as you can get and they belong on the airframe. We'll ultimately swipe over them with some polishing cloth just to knock them down a bit, but they're an essential part of the character of the Texan and they need to be there.

Here's another view that illustrates how things don't quite fit. There's a lot of gap in that upper cowl deck and a big sink hole in the intake on the port side of the fuselage, so there's a lot of putty there to fill them in. Contemporary modelers, particularly the younger ones or the ones new to the hobby, would cringe at any kit with that much bodywork required, but it was the norm back in what some folks might call The Day. A lot of the kit's detailing is soft, but that's as much a function of where the thing was molded as anything else---this model is the recent Revell offering and is manufactured in China. Everything, and we mean everything, is better defined and far more crisp on our 1987-vintage kit that was manufactured in Morton Grove.

 Those belts and harnesses are from Eduard's somewhat dubious WW2 USAAF and USN set and they help the model immensely even thought they aren't accurate for the T-6 or SNJ. As we mentioned earlier, there's also an Eduard detailing set available for the Texan in 1/48th, but it's meant to be used with the Occidental kit and a lot of the stuff in there isn't necessary for the far-better-detailed Monogram kit. If you happen to be a modeler of the Old School you'll do most of your cockpit enhancement with what Monogram provided.

This shot illustrates a few more things that will require fixing before we can move on. The lips on both those scoops need refinement, and the model's presence will be greatly enhanced by a set of MV lenses in the landing light bays. The kit's flap bays are detailed and we even painted them in Testor's version of Mil-P-8585Y "Zinc Chromate", but military T-6s and SNJs were rarely if ever parked with the flaps deployed in real life so they'll end up being retracted on our model. That's a shame, because there's adequate detail in those flap bays, but them's the breaks. That little hook-shaped thingy on the lower cowl is a sensor probe and is supposed to be there so don't knock it off (or be prepared to replace it if you do!). The wheel wells could stand a little rework too, but we aren't going to do it, and the "zinc chromate" application is wrong if it's going to be representing properly-applied primer; the appliciation specs for this material call for enough coverage to effectively seal and prime the metal, not an even color coat, which makes this one of those times when a splotchy paint job is ok. We might go back and change that, but then again we might not...

Here's how the interior looks, sortof. The instruments on the student and instructor's panels were picked out with silver colored pencil and the switches painted appropriately, while the necessary cockpit placards (and there are a fair number of them in the T-6) were left-overs from various Eduard sets---you're looking for size, shape, and color for that sort of thing, not a word-for-word copy, so whatever fits is perfectly adequate. If you don't care for that particular philosophy then we heartily recommend that you don't do it that way, but it works just fine for us.

We ran this shot because we wanted you to see how thick and clunky the boarding steps are. They belong there, so we'll either thin and re-shape what's already on the kit or maybe we'll replace them. The jury's out on that one at the moment. We've got a little bit more to do in the cockpit, including a set of buckles on the student's shoulder harnesses, but that's an adventure for another day.

Stay tuned as we progress with our T-6 project. The intent, at this moment anyway, is to end up with an overall yellow '50s USAF trainer, although that could change. The point to be taken here is that we're having a whole lot of fun with this kit and suggest you give one a try for yourself.

Things Were Different Back Then

A terrible war had been won but there were still bad guys in the world, and the actions of said miscreants occasionaly caused the Air Force to deploy fighters to Europe. One of the earliest, staged in direct response to the Soviet blockade of Berlin, was the 1948 trans-Atlantic deployment of a portion of the famed the 56th Fighter Group to Furstenfeldbruck in an action named Operation Fox Able. Thanks to the efforts of Mark Morgan (we think---if these didn't come from Mark would the real contributor please stand up so we can give credit where credit's due?) we have some unique photography of that deployment to share with you today.

***And a special note: Within hours of the posting of this blog we'd heard from Mark Morgan, who said the photos weren't his, as much as he wished they were. That leads us to our 2nd Best Guess, Mark Nankivil of the Greater St Louis Air and Space Museum, so we've changed the credits. With luck we got it right this time!!!

****And, of course, we got it wrong again! Just when we thought we had things figured out we heard from Doug Barbier, from who's collection these photos actually came. Working on the theory that the third time's the charm, we're going to change our credit lines again. It's the last time, we promise! Maybe...

Getting there is half the fun! While the 56th F-80s, under command of Col. Dave Schilling, made the hop on their own, they couldn't carry the support elements required to operate the group in their fighters---most of that assemblage made the trip in C-47s and C-54s. This photo was taken during a gas stop at Goose; it's a long way to anywhere in a C-47.  Michigan Air Guard Historical Association via Doug Barbier

Partying down in the Goose O-Club. It was, as they say, a simpler time.  Michigan Air Guard Historical Association via Doug Barbier

If you're in the service you do a whole lot of waiting. The place is Goose Bay, and those pilots wouldn't have looked terribly out of place in 1944. It took a while for the flight clothing and equipment to catch up with The Jet Age.  Michigan Historical Air Guard Association via Doug Barbier

Overflying the Atlantic always meant the possibility of taking a swim in same. In this shot we get to take a look at the apex of 1948 survival gear, the immersion suit. It was as good as such things ever got back then, but at the end of the day it only prolonged the amount of time it would take a downed pilot to freeze to death. Rescue options were limited at best.  Michigan Historical Air Guard Association via Doug Barbier

Opened up for maintenance, probably at Goose. The F-80 was an extremely simple airplane, both to fly and to maintain, making its participation in Fox Able One easier than it might otherwise have been.  Michigan Historical Air Guard Association via Doug Barbier

Once the 56th was settled in at Fursty it was possible to enlist the assistance of the local workforce with certain aspects of aircraft maintenance. The young fraulein was hired to paint the flags on the 56th's F-80s prior to their departure from Fursty---it's a really neat glimpse into the way things once were.  Michigan Historical Air Guard Association via Doug Barbier

All good things must come to an end. After a 45-day deployment at Fursty the 56th deployed back to the CONUS, and in this photo Col. Schilling's aircraft is preparing for departure. As much as we love those old Monogram kits we'd sure like to see a new-tool F-80!  Michigan Historical Air Guard Association via Doug Barbier

Goin' home. You'll need gas if you're going to cross The Pond. This shot was taken at RAF Odiham; what an idea for a diorama!  Michigan Historical Air Guard Association via Doug Barbier

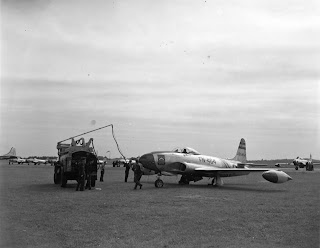
Many thanks to Doug for the contribution.

They Also Served

When we think of the SBD we most often think of its sterling service in the Pacific during the Second World War, but a significant part of Dauntless operations took place flying seemingly endless anti-submarine patrols in That Other Ocean. Reader Pat Donahue built a model of one of those Atlantic-based SBDs and sent us a few photos. It's a really spiffy model and we thought you'd like to see the pictures too, so without further fanfare:

The kit is the venerable Accurate Miniatures offering in 1/48th scale. The so-called "Atlantic" scheme is difficult to pull off in either of its iterations but we think Pat's done it to perfection. The model is extremely clean but really shows of that particular camouflage variation to advantage.

Here's a better view. A-M did their own aftermarket set that included, among other things, an aerial depth charge. Now there's a thought!

Here's a view that illustrates how the camouflage works from above. The SBD-5 is an aircraft with classic lines and the paint job really shows them off to advantage.

And here's The Other Side. We normally put a little wear and tear on our own personal models, but it would be a shame to do that to this one.  Beauty!  Thanks, Pat, for sharing these with us.

Under the Radar

Sometimes it's the Mainstream that sneaks up on you. Take today's topic, for instance:

USAF Plus Fifteen, A Photo History 1947-1962, by Dave Menard, Schiffer Publications, 1993. We first saw this book some five years ago during a visit to Frank Emmett's home, were suitably empressed by it, and then promptly forgot we'd ever seen it until this past weekend when we discovered a copy for sale at Hill Country Hobbies in San Antonio. If you enjoy the photography we run on this site you're going to want a copy of this for yourselves too. Let us tell you why.

Dave Menard is a friend of many years. He's also the owner of one of the best collections of early USAF photography in the country, with extensive files running into the tens of thousands of images. Fortunately for us all he enjoys sharing those images with others; hence this book.

USAF Plus Fifteen is a photo book pure and simple; 142 pages of color photographs of The Silver Air Force. The pictures presented contain quite a few fighter types, as you might expect, but there's an excellent representation of the bombers, transports, and trainers of the era as well. The photography is well reproduced and is by and large unique, making the work a must-have for any aviation historian's personal library. We can't recommend it highly enough and stongly urge you to track down a copy for yourself if it's not already in your collection. Just thumb back through the pages of this blog and see what Dave's offered in the past. This book is all of that on steroids---it just don't get no better!

The Relief Tube

We've just got one lonely little Relief Tube entry for today, but it's a pip:


Phil: Barrett Tillman started a thread on Zippers today- he pointed out this neat video on the Luftwaffe-
One of the usual suspects, the legendary “Youthly Puresome”, retired A-4 and reserve F-8 driver, had several dets up in Cold Lake against the Canadian F-104s with Crusaders and reported thusly in his own unique style-
Still have the drawn documentation of each fight, used for debriefing purposes. Canuckian chaps great guys, learned not to do any turning: blow thru at heat's speed, go out and come back thru. Their best defensive move was to go head on, beak to beak, because they had no frontal cross section. Of course, we always tried to approach any merge with angle off. Eagle can elaborate, but my memories of flying the thing mostly involve buffeting anytime I pulled on the pole.
But ain't they purty.
YP

OK, ya'll; everybody here knows how much we like the F-104. Just watch the clip and enjoy. Thanks, Morgo!!!

And that's all there is for today. Be good to your neighbor and we'll see you again real soon.
phil

Monday, September 3, 2012

How Could a Little Tape Be So Hard?, We REALLY Need a Kit, A Couple of Lightnings, And a Modeler's Lesson

If It Ain't One Thing It's Another

Or, How 'Bout That Lozenge? It's a simple truth, one to be encountered by a large percentage of modelers sooner or later. Great War German lozenge camouflage is a royal Pain in the Patootie to duplicate on a model and, since it's a camouflage found on most late-War aircraft from the Kaiser's air service, and since it's on some of the most colorful aircraft of that era, you need to learn how to do it if you want to build certain models. In point of fact that whole lozenge thing is quite an interesting topic and can be a challenge but, quite frankly, it's not what we're going to talk about today, at least not specifically.

Nope! Today's topic is rib tape, that nasty stuff that went over the lozenge at all the ribs on the wings and empennage. Pretty much every German airplane that flew in the last year or so of the First World War, or at least the ones that were built in that time period, had a better than average chance of leaving the factory with pre-printed lozenge fabric applied to some, if not all, of the airframe. Said fabric was stretched and doped into place, but just skinning a wing or fuselage wouldn't make for a particularly airworthy flying machine. Nope, that fabric had to be secured into place, a task accomplished by running thin fabric strips along the tops and bottoms of the wing's ribs. The resulting rib tape can be found on pretty much every fabric-covered wing of the period, but it was generally finished at the same time the wings received their color coat of dope, which means they weren't very noticeable except under close scrutiny since they blended in with everything else around them.

That uniformity of color didn't work with the pre-printed lozenged fabric, though; not unless the pilot of said aircraft had the wings, or portions thereof, overpainted with some sort of marking, in which case the rib tape once again became the same color as the fabric it was applied on. That's not what we're looking at today, though. Nope, today's topic is rib tape over lozenge, and we're going to give you an easy and relatively foolproof way to simulate it.

Historically speaking, there are a couple of ways we can reproduce that lozenge fabric that we're not going to be talking about today; you can draw the pattern on your airplane and paint it on, either by hand or by airbrush, or you can get some of those really spiffy paint masks that Montex makes and mask and paint your pattern, or you can do what most modelers opt for and use decals, either kit or aftermarket. Whichever path you choose still doesn't matter, because you're going to have to deal with rib tape no matter how you do that fabric. Therein lies The Rub.

Most kits that offer lozenge also offer decals for the rib tape. It's not a bad idea on the face of things, but it does have a few drawbacks---you have to be really careful when you apply the "tape" so everything's straight and parallel, and you have to be equally careful that those "tapes" end up where you want them to be. The problem with using decals for rib tape isn't one of application, though, but rather one of appearance. The darned things are just too wide to be scale, no matter how carefully you put them on!

You could paint them on, of course, by carefully masking the tapes and airbrushing them to the correct width, but that's extremely time-consuming and won't work over decal, because almost anything you mask those tapes with will pull up some, if not all, of the lozenge decal underneath when you remove it. We need to think outside the box on this one!

Through thinking yet? Me too, and here's what I came up with:

The kit is the Eduard Albatros DV, and the lozenge is done with kit decal (which, by the grace of a merciful diety, almost exactly matches the lozenge fabric found on the National Air and Space Museum's example of the type). There's rib tape there, almost to scale, which was done with a flexible straight edge and an Eagle Prismacolor colored pencil! There's some touch-up needed on the decal along the trailing edge of the wings, easily done with a fine brush and a little bit of paint, but the rib tape is ok. All we did to get to what you see was to apply the lozenge, let the decals dry overnight, and spray the wings with Dull-Cote, after which we took a straight piece of .020 styrene to use for a mask and drew on the rib tapes with our afore-mentioned colored pencil, after which we applied the upper and lower wing crosses. The entire operation of taping those wings, upper and lower/top and bottom, took maybe a half-hour once the process was begun.

There's more touch-up required, including the completion of some of the tape, but it'll be a simple thing to accomplish since you're just drawing things on with a pencil. Here are the rules of the road for you just in case you want to try the technique for yourself:

You can vary the width of your tape by controlling the width of your pencil point; sharper means a finer line, while less sharp means wider. You get the point, right? (A poor pun, but the best we've got for today!).

It's best to drag the point of the pencil across the surface of the wing using a fairly light touch. If you don't do this you run considerable risk of tearing your lozenge decals, thereby uttering those words that will cause your Significant Other to dislike your apparent complete and utter lack of civilized expression. Don't push that pencil point! This technique is really effective but the surface you're using it on is fragile! A delicate touch is your friend on this one!

You'll probably have to use Dull-Cote or similar to put some "tooth" to the lozenge decals so the pencil will stick. We only used one type of pencil, the aforementioned Eagle Prismacolor, so we're not in a position to make a blanket one-size-fits-all statement, but we're pretty sure you can't just go and do this over a gloss finish with any pencil, no matter what brand. It has to be matte and it has to be something besides the decal itself.

Once the pencil lines are on the Dull-Cote they are well and truly On The Dull-Cote, so you should do your best to get it right the first time. If you look carefully at our Albatros you'll see a couple of mistakes; this isn't a contest model so we aren't especially excited about that, but you'll get your best results if you're really careful with this process. (We don't do Paying Attention very well at all, in case you were wondering about that...)

Finally, you can apply any sort of finish you might want to use over the pencilled-on rib tapes, and them apply the national insignia decals, etc., just the way you normally would. It's almost too simple, isn't it?

One more thing while we're at it: We stumbled on this technique while trying to reduce the frustration of putting rib tapes on one of our own models but you can use it for other things too, like maybe nose art. The brand of pencil we used is pretty opaque and would work well to do a name with, and wouldn't build up the way paint can. We haven't tried that yet but we're going to---we think it just may end up being the solution to a number of problems! Time will tell, of course, but in the meantime you've just acquired another trick to use on those pesky Imperial Air Service Fokkers and Albatri. Up and at 'em!

We Sure Do Like the Fury

The North American FJ series of Furies, that is; the Sabres from Columbus. They are, somewhat arguably, among the prettiest of American fighters from the 50s (and we say that with apologies to Dave and Marty!), and we honestly can't get enough of them. What follows is a collection of FJ Dogs and Cats, thanks to Doug Siegfried over at the Tailhook Association. Those of you who insist on stealing our stuff and publishing it without any sort of credit line might want to remember that...

A Regulus I cruise missile flies in close formation with a pair of director aircraft, one of which is---what else; an FJ-3! The Fury proved to be of considerable use to the NAV as its days as a first-line fighter drew to a close, and the VC and VU outfits made substantial use of the type for a number of years.  Tailhook Association via Doug Siegfried

Fighting Thirty-Three flew pretty good form back in the day, as illustrated by this immaculate three-ship. Modelers take note of the finish on these airplanes, which actually show the sort of panel staining that most modelers so grossly overstate. Of more interest, at least to us, is the appearance of the fuselage insignia on all three of the aircraft; all are very heavily compromised and look to be in need of at least a good cleaning if not replacement, while the area around the 20mm cannon is heavily stained with gun blast residue. Rode hard and put away wet is a description that applies here.  Tailhook Association via Doug Siegfried.

Most folks know VF-84 from their days with the F-4 and F-14, but they flew the FJ as well. This FJ-3M four-ship shows the other side of the coin maintenance-wise; these aircraft are as immaculate as carrier birds can be. They're ready to rumble, with each aircraft carrying a pair of AIM-9B Sidewinders, although no FJ-3 or -3M ever flew combat. (There are persistent rumors that a handful of FJ-4s made toothpicks over Laos in the early days of our involvement in SEA---corraboration one way or another would be greatly appreciated! The address is replicainscale@yahoo.com .)  Tailhook Association via Doug Siegfried

The FJ family, as illustrated by this FJ-3, spanned the Glossy Sea Blue to Light Gull Grey over White era of Navy camouflage. That changeover coincided with the ever-increasing requirement to put maintenance stencilling on the airframes for the benefit of the ground echelon. This shot, although somewhat fuzzy, provides a classic example of that stencilling on a clean airframe. We don't know much about 135777's history except that she sure looks ugly with all that stencilling.  Tailhook Association via Doug Siegfried

OK, so it's not a particularly pretty airplane, but the markings are somewhat unique anyway. 141441 was an FJ-3M assigned to VF-111, and was marked with 111 as her Modex. That sort of thing really isn't very rare, but it's not all that common either, making her an aircraft well worth modeling if we were to ever be blessed with a kit of the type! This view also shows off her undersides, and in particular the staining generally found down there, to what the classic aviation writers used to call "good advantage".  Tailhook Association via Doug Siegfried

And here's 111 in a four-ship. The IFR probes and AIM-9 rails really busy-up the airframe and add a great deal of visual interest to it. If only we had a kit...  Tailhook Association via Doug Siegfried

There were drone directors and then there were drone directors. These pristine birds were FJ-3D2s and were photographed with VU-3 Way Back When. Engine Grey and Insignia Yellow makes for a really pretty airplane!  Tailhook Association via Doug Siegfried

The Reserves used the FJ for quite a while, as illustrated by this Plain-Jane -3M. We aren't running the photo because of the markings, though, but rather because the aircraft has its RAT deployed, something you seldom see in photographs of the Fury. Everything's hanging on this bird, and the sharp-eyed will note that both her tail code and Modex have been repeated on the gas bags. The shot also illustrates the way the canopy rails are cut away to fit the fuselage---this is an essential part of the FJ-3's personality and something to watch for if we ever see a kit...  Tailhook Association via Doug Siegfried

Up until now we've been showing you some fairly bland airplanes, so here's one with some color. 136133 is another bird from Fighting Eighty-Four, but with a difference; she's nominally assigned to the CAG. The CAG colors are on the rudder and the fuselage stripe motif is repeated on the upper (but only the upper!) wingtips. She's a beauty!  Tailhook Association via Doug Siegfried

And that's it for the Fury today but we've still got a few images you haven't seen yet, so be sure to watch this space!

It's Been a While

Yep, it's been a while since we've run anything from the Rocker Collection! Here are a couple of images to put things right in that regard; today's subject being the 36th FS/8th FG:

"Hell From Heaven" was the personal mount of "Pappy" Turner, shown here between missions. The two kills on the nose don't seem to signify a whole lot, but the bomb markings adjacent to them tell a story---moving mud was a dangerous business in the SWPAC and more than a few 5th AF pilots paid the price engaged in ground attack. It's tough to make out all the details of the artwork, but "Hell From Heaven" would make for a really interesting model all the same.  Rocker Collection

Harold Graham was the 36th's CO at Mindoro, and is seen here posing with one of the squadron's aircraft on the ramp---note the presentation of the pilot's and crew chief's names inside the lightning flashes on the nose. That's a well-used P-38, ya'll!  Rocker Collection

And here's the "regular" pilot of the aircraft shown above, Harold Graham, seen posing on the wing of his ship. Careful enlargement of the photo shows what appears to be battle damage to the wing; at any rate something is drawing the interest of Graham, the ground echelon, and those doggies. This photo was taken late in the conflict but flying fighters with the 36th was far from being a safe occupation even at this late date.  Rocker Collection

Sometimes you come across one of those photos that poses more questions than it answers. This is one of those shots. The place is Finschaffen, which dates it substantially earlier than the previous photos. The aircraft are most likely P-38Js but they're all in OD over Neutral Grey, and nose art is tantalizingly evident on several machines. Those guys are on their way to ruin someone's day, no doubt about it. If any of you have documentation on either the mission or the aircraft we'd sure like to see it---once again that address is replicainscale@yahoo.com .  Rocker Collection

Gotta Be Real Careful When I Paint That Model!

Or maybe not. Check out this pre-War image to see what we mean:

The year is 1939, and it's War Game Time. The aircraft is a Douglas A-17A from the 95th Attack Squadron and she's getting herself all spiffed up in a special paint job for the occasion. The paint's water-based, which is probably a Very Good Thing for all concerned, and that airplane is a mess! It was, as they say, a somewhat simpler time.  R. Morgan Collection

Under the Radar

Today's entry in the unofficial Replica in Scale You Really Need to Have This category is a book we're betting most of you missed when it was new.

Buzz Numbers, The Explanations and Regulations Behind America's Military Aircraft Identification System, Peter M. Bowers and David W. Menard, Specialty Press, 2006, is one of those monographs you really can't afford to be without if your interests run towards The Silver Air Force. Co-authored by two of the nation's most respected aerospace photo historians, the book's 96 pages graphically illustrate both the theory and the practice of the USAF's "buzz number" system throughout its brief history. Well written and easy to understand, the photographs alone are well worth the price of admission. You may still be able to find one at your local aviation hobby shop; if not, the folks over at Amazon or E-Bay should be able to help you out. This is a book worth searching out.

Happy Snaps

A few years back, or maybe slightly more than a few, a young Mark Morgan was heavily engaged in learning how to become a B/N with the NAV. We're please to report that he often had his camera with him back then, resulting in this gorgeous image.

What better way to end our day than with a shot of a section from VA-195's Dambusters. Many thanks to former Naval Aviator and friend Mark Morgan for supplying this gorgeous air-to-air. Fly Navy!  Mark Morgan

The Relief Tube

All of our mail lately, and we mean all of it, has concerned the guys with the Yahoo group who keep stealing our photography and running it on their site without provenance. You'll get to truly appreciate them as we go along since they've forced us to begin visibly watermarking our photography (you will, unfortunately, begin to see that next issue). Their actions, and those of a couple of others, are going to cause us to somewhat diminish the quality of images we bring to you in upcoming editions, and for that we extend the most profound of apologies to our readership. On the other hand, to those who just can't seem to credit the photography they "borrow" we offer an up-lifted middle digit, raised with considerable enthusiasm. Salud!

In the meantime, let's play a game! Go back to our past couple of issues and look at the photography. See if you can find the "xxx via RIS" that's imprinted in very tiny letters somewhere on the image, maybe somewhere near the airplane or maybe, just maybe, hidden somewhere in the shadows of the airplane itself. Then go find that same image on somebody else's site, maybe in a user group or in one of those photo storage sites that are so popular these days. Then look for provenance for that photo. If you can't find any, well, that pretty much tells the story, doesn't it?

On the other hand, if you want to collect our images for your own personal use, please go right on ahead. Right-click and save your heart out! You can even publish them as long as you give credit to the folks who took them, or at least to RIS. It's ok with us as long as you're honest about it. And if you know any of those folks who're so shamelessly using and abusing our photos, please tell them we said to cut it out!

Be good to your neighbor until we meet again,
phil