Thursday, December 7, 2017

Too Good to Let Pass, Deja Vu All Over Again, A Hero From The Bad Old Days, A Companion Warhawk, Equal Time, More Technology, and Not What You Expected


Tickling the Ivories

Or maybe not, but that "ivory" part is important to us today regardless of whether or not your fingers have ever touched the keys of a piano, because today we're going to discuss those oddly-colored Hasegawa decals that plastic modelers have been complaining about since the beginning of time. You know the ones, right? They've got a goofy-looking, almost milky color to what would normally be white in anybody else's decal sheets and that color is obviously wrong wrong wrong, totally unusable on a model of any kind. The decals are throwaways because of that off-white, and that's not even taking into account the fact that the stickies are too thick and don't respond well to normal decal solvents. In short, those decals are poo-poo!

Wait a minute, though...  Hasegawa has been a leading force in the design and manufacture of scale polystyrene models since their evolution away from their first generation kits back in the late 1960s, and almost everything about their kits since then has been a class act. Why in the world would they put those lousy decals in such otherwise impeccable kits? Are they crazy or what? Let's think about that for a minute, because I did, and I chose "What" over "Crazy". Maybe, just maybe, you should too. Let's consider a couple of things.

The number one complaint regarding Hasegawa kit decals, or at least the complaint that comes across based on what I can tell in published kit reviews, is that ivory white color they use in lieu of a more traditional and generally more acceptable pure white. Reviewer after reviewer, probably to include myself at one time if the truth be known, has lambasted those decals because of that color and often lamented the fact that the markings so defiled were unique, therefore making the horrific crime of failing to use a pure white all the more unbearable to contemplate.

Then again, color is a highly subjective topic when we're discussing it as applied to a tiny edifice of the real thing, because pure color really doesn't cut it on a scale model, tending to be entirely too stark to be believable most of the time. A phenomenon known to us as scale effect comes into play when we're dealing with something as tiny as as any scale model is, and that includes those produced in the larger scales as well. Pure, bright red is generally too bright as it appears on a scale object, as is pure bright yellow or, dare we even suggest it; pure bright white! You almost have to tone your colors down to make them believable, and that's across the board. The soon to be late and lamented Testor took that concept so far as to produce certain of their aircraft colors in a pre-faded format back in the late 90s, and there was a reason, albeit poorly understood at the time, for their doing it.

On a more personal note, my own experimentation with color and tone led me to adopt an off-white for my own models several years ago, and nowadays I often use one of the Air Force's SEA colors, 36622 Grey, for the purpose because it's actually a nice, subtle off-white, or at least it is if it's been properly formulated and doesn't run towards the overly warm, i.e. yellowish, end of the color spectrum. It works well as a journeyman color most of the time, and it's usually my go-to color anytime something needs to be painted white. Yes; it can be (and almost always is) a slightly different color than the white in, say, American national insignia. In my world that variance isn't necessarily a bad thing because such variances also appear on real airplanes, although your own personal opinion my vary substantially in that regard. We digress, however...

The point I'm trying to make here is that Hasegawa's infamous Ivory White isn't necessarily the end of the world as far as "correct" scale modeling is concerned---that horribly inaccurate color can actually work pretty well on a model that's had it's paintwork suitably enhanced, either by substantial weathering or through the concept of scale effect. Yes; it's a matter of personal taste and yes; it can look pretty odd in the wrong context, but in many instances it ends up being appropriate and therefore right. It's a subjective thing, of course, and one that's left entirely in the eye of the beholder, but that notion of scale effect goes a long way towards explaining why Hasegawa chose to use the color in the first place, internet reviewers notwithstanding.

One final thing while we're at it: We also mentioned the fact that Hasegawa kit decals, or at least those used throughout the 90s and early 2000s, were too thick to be used and reacted poorly to conventional decal solvents. Those things are true, sortof, but the issues go away if you use the setting solution recommended by Hasegawa, which is Mr. Mark setting solution. A quick application of that particular product, easily available in Japan and not all that difficult to find here, makes those unusable kit decals snuggle right down the way they should, and a coat of flat finish (or whatever you use to finish off your models) goes a very long way towards eliminating the "too thick" part of the equation. Those kit decals were designed to work within the parameters of a specific set of circumstances, and tend to fail when those parameters are ignored. There's a message there, I think.

You can't roller skate in a buffalo herd,
But you can be happy if you've a mind to...

Roger Miller

The Road Less Taken

Sometimes things sneak up on you when you least expect them to, and the photograph you see immediately below is a fine example of that phenomena. The model is by Herb Arnold and it's a fine example of a 1930s French floatplane about which I'll freely admit I know next to nothing; the Loire 210. The French navy bought some 20 of them in 1938 for use off their cruisers but a major structural flaw kept them from being of any significant operational use. It's an interesting airplane, though, and one you won't find in just any collection!


Herb used an extremely limited production and rare resin kit to produce this replica of the virtually unknown Loire 210. Produced by POMK (Pend O'Reille Model Kit) in 1/48th scale, the kit is definitely among those defined as "some modeling skills required". Herb's results speak for themselves on this example, however, and you can definitely get a good model out of the kit if you've got the chops and a little patience. Just as Herb!     Herb Arnold

Many thanks to Herb for sending along this photo for our enjoyment!

Long Ago and Far Away

Back in November of 1972, to be exact, we published our second print issue of Replica in Scale. Our very first issue had featured an interview with former 56th FG fighter pilot John Keeler---we weren't entirely certain how that sort of thing would go over with our brand spanking new readership but it turned out to be a hit, so we set off in search of someone else to talk to for that forthcoming second edition. As things turned out we didn't have to look very far, and our second effort included an interview with former 80th, 49th, and 48th FG pilot Stanton T. Smith. A recent electronic conversation with reader and friend Jean Barbaud re-kindled our interest in that old interview or, more specifically, the photographs that accompanied it. As things transpired Jim Wogstad still held copies of the photography we ran way back then and scanned and sent them along, which inspired the piece you're about to see.

Let's start at the beginning, with this shot of Stanton in front of the group commander's P-40N in Burma during 1944. This photo is representative of his first combat assignment, with the 80th FG ("Burma Banshees") and fresh out of gunnery school at Matagorda Island in Texas. Stanton had several comments regarding his time with the 80th, two of which stuck in our minds at the time. First, he commented that the group used a large number of 100 lb GP bombs because the blast effect wasn't as hard on aircraft and pilots as the larger weapons were at the extremely low altitudes where the group normally operated. The second thing, stated after he had consumed a couple of early-evening vodkas, was that he sure enjoyed shooting up trucks. It was a simpler time!   S Smith via Wogstad Collection

By 1945 the 80th had transitioned to the P-47D Thunderbolt and Stanton is seen here in front of 42-47722, "Kay P.", his personal aircraft. He didn't have much to say about his time in the "Jug" except that it had a lot of firepower and was really tough for the Japanese to shoot down. The 80th was strictly an air-to-mud operation in the CBI and air-to-air encounters with the enemy were extremely rare, but it's just as easy to die strafing trucks as it is to be the loser in an aerial combat engagement. The aces made the headlines, but the ultimate victory was very much a joint effort.   S Smith via Wogstad Collection

Col. Smith was commanding the 49th FG out of Misawa AB, Japan, when the Korean War began. This photograph of his personal aircraft (49-0500A), shows the wear and tear of those desperate days. Stanton was a flying commander in every sense of the word and is shown at left in this photograph preparing for yet another mission. His command of the 49th was cut short after two of his pilots expended ordnance on an unspecified target near Vladivostok, and he was relieved of command and punished by being moved to Headquarters 5th AF to assist in running combat operations in theater. (An extremely brief account of the incident appears in Robert F. Futrell's The United States Air Force in Korea, Duell, Sloan, and Pearce, 1961.) We chose to omit that particular adventure in the original article but times have changed, although we know next to nothing about the event and would like to encourage any of our readers who might be able to offer further information to contact us at replicainscaleatyahoodotcom.    Col. J.E. Jenkins via Smith via Wogstad Collection

1955 saw Smith in command of the 48th FW at Chaumont AB, France following a stint at Britain's Imperial Defense College. The wing operated F-100Ds as illustrated in this 1956-vintage photograph of 54-2222 being serviced in a revetment. Most USAFE bases were fairly well endowed with servicing facilities and all the comforts of home but it wasn't all that unusual to find the wing operating in the primitive conditions likely to ensue in the course of a major conflict. The wing's markings were fairly simple at this point, but that would change soon enough!   S Smith via Wogstad Collection

1959 saw the 48th back in the ZI for participation in aerial competition in a William Tell meet along with other units from the USAF. This scheme is the one the Wing wore during that time period---there was little doubt regarding the unit flying those candy-striped "Huns"!   S Smith via Wogstad Collection

The world of serious aviation journalism was led, and rightfully so, by the British during the 50s and 60s. A term that seemed to crop up somewhat frequently in their publications was "scudding through the clouds", which caused Jim to label this image "Scudding" when he copied it out of Stanton's scrapbook. Those 48th birds look great even in a low-resolution black and white photo such as this!   S Smith via Wogstad Collection

Stanton's final 48th FW F-100D was 56-3252, photographed with him in the cockpit on the ramp at Chaumont in 1959. He had a factory model of the F-100 painted up in these markings and sitting on his desk when we interviewed him, leading Jim to ask if the airplane really was painted that way. It could have been a tense moment but the grin on Jim's face showed that we were just funnin', and Col Smith started grinning too. Do any of you remember The Silver Air Force of long ago? We sure do, and we miss it!   S Smith via Wogstad Collection

Col. Stanton T. Smith, Wing Commander of the 48th FW, Chaumont, France, 1959. Col. Smith never had to talk the talk; he walked the walk!        S Smith via Wogstad Collection

"Colonel, can I get just one more please?" Stanton Smith poses for the official camera. It's an unusual shot of Stanton Smith in 0262 and a fine one with which to end this essay.   S Smith

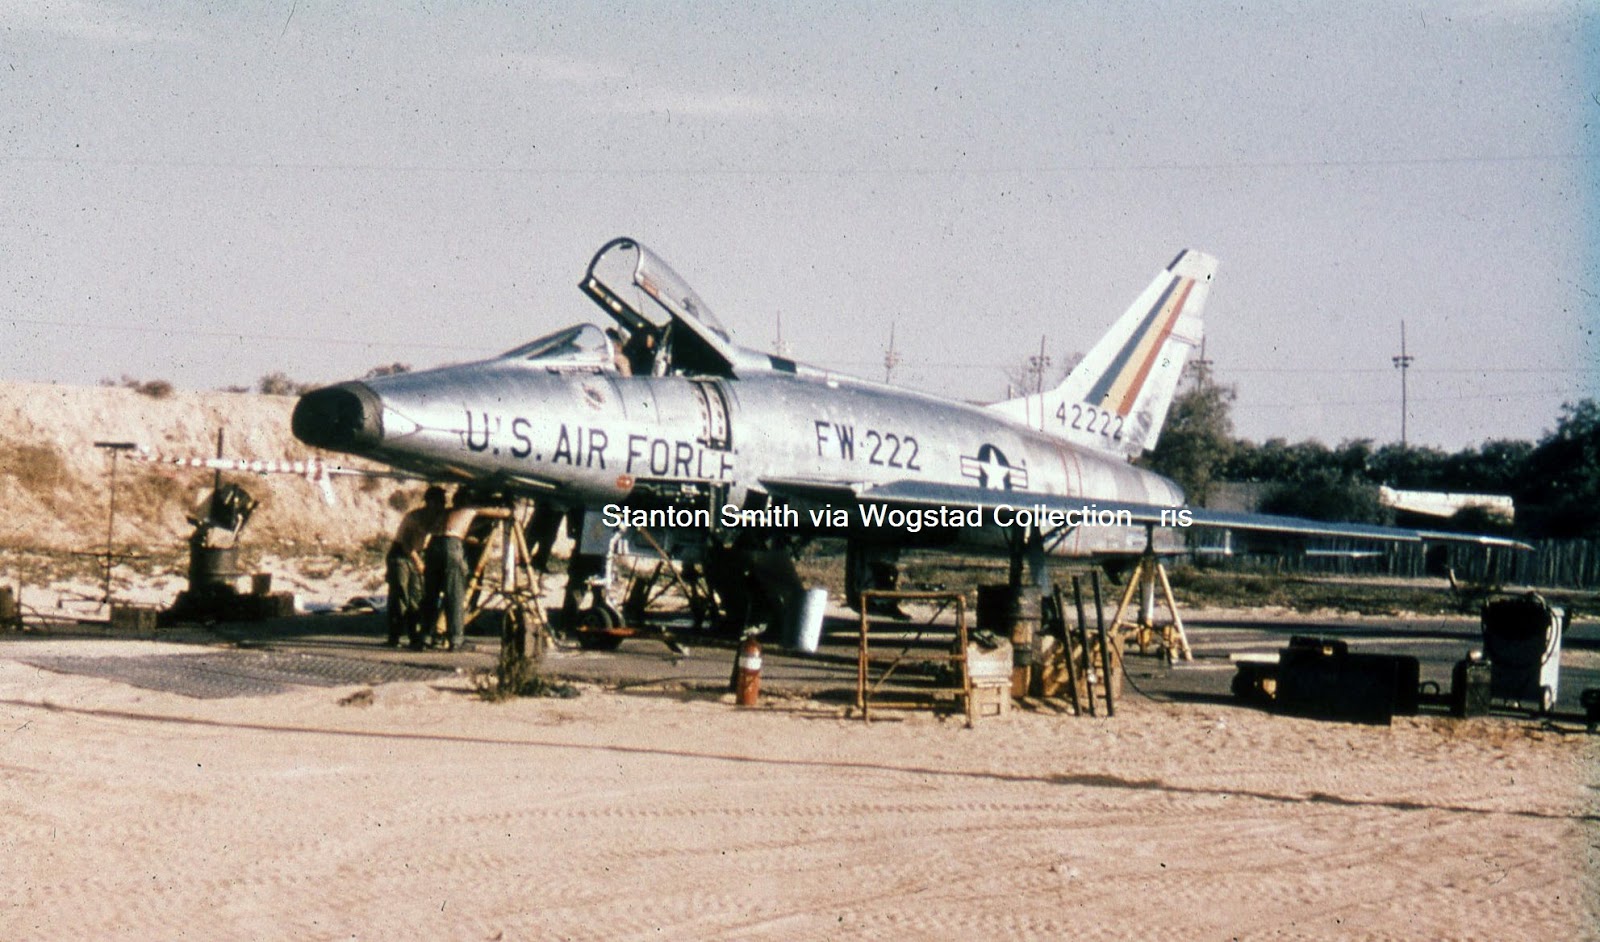
Many thanks to Stanton Smith for allowing us to interview him all those years ago, and to Jim Wogstad for pulling these images out of the files and sharing them with us!

Almost Forgotten

Boyd D. "Buzz" Wagner was just another All American Boy from Pennsylvania until he enlisted in the Army Air Forces in 1938. He ended up with the 24th PS after training, staying there but briefly until reassigned to the 17th PS at Selfridge Field. He made 1st Lieutenant in June of 1940 and shortly afterwards assumed command of the squadron, a position he held when the 17th was sent to the Philippines in late 1940. He was there when the Japanese attacked the islands on 8 December, 1941, and was credited with 5 combat victories prior to being wounded and evacuated to Australia. Reassigned to 5th AF Fighter Command, he helped plan and led a fighter sweep (in P-39s) over Lae Aerodrome on the northeast coast of New Guinea, and he was officially credited with an additional 3 kills on that 30 April, 1942, mission. Shortly afterwards he was transferred back to the US and was killed in an accident in a P-40 flying out of Eglin Field on 29 November 1942, an unfortunate end to a stellar career. Thanks to Bobby Rocker we're able to offer a photograph of Wagner that you may not have seen before:

Buzz Wagner flew both P-35As and P-40s in the Philippines, and P-40Es and P-39s while with 5th AF Fighter Command. In this rare and fascinating shot he's seen in the cockpit of a 49th FG P-40E outside of Darwin, during a stint with that unit as Temporary Group Operations Officer early in 1942. That Warhawk is very much a Plain Jane, without even a side number on the nose, and is in basic OD over Neutral Grey camouflage but with a differently-colored spinner cap which may possibly be red, indicating a veteran of  the Java Campaign---there were several such survivors in the 49th at that time. (The spinner could also been dark blue, although its hue doesn't match that of the fuselage corcarde.) The regulation "U.S. ARMY" appears under the wings and the wheel covers appear to be in natural metal, although they could also be in white.   Rocker Collection

Wagner was somewhat controversial after his arrival in Australia, allegedly due to the fact that he seemed unfamiliar with the Mitsubishi A6M2 Zero-Sen even though he had been credited with victories while in the Philippines. The situation caused some individuals to doubt the truth of his claims at the time, although the benefit of hindsight indicates they were valid since he was flying primarily against elements of the IJA rather than the Imperial Navy and quite possibly never faced the Zero-Sen in combat. Whatever you may think of him, there was no doubting his abilities or courage---his assignments after his wounding over the Japanese beach head at Vigan say it all in terms of his stature among his peers with the 5th. His career, and his life, ended far too soon. Let's raise a glass...

While We're Talking About P-40s...

Bobby sent along yet another image of a 49th FG P-40E that might be of interest to you:

The P-40E depicted in this photograph should be familiar to you, although that's not evident at first glance. The image was taken at one of the fields outside of Darwin during 1942 and depicts a fighter from the 7th PS pushed back into what passes for a hardstand. The only other marking evident is the tip of the vertical tail, which appears to be in white or possibly yellow, but take a second look. The tail number is presented in an unique style unlike that normally found on aircraft assigned to the 49th, but it's virtually identical, not only in style but also in size and location, to the tail number found on 2nd Lt Bill Hennon's aircraft, and there's a clincher when we look at the aircraft's spinner---the spinner cap appears to be in a different color than the OD of the rest of the airframe and Hennon was a veteran of the 17th Provisional Pursuit Squadron in Java---several ex-17th pilots ended up in the 49th FG and were nicknamed "The Java Flight", carrying red spinner caps to commemorate their status within the unit. The aircraft in this image is missing the band of stars and equally stylized number 36 that eventually appeared on the nose of Hennon's bird, but there's an answer for that as well, since a number of P-40s assigned to the 49th acquired nose art and/or names all at one fell swoop for a publicity function that took place prior to May of 1942. It's our contention (or wild guess---you pick which one you prefer) that the airplane either pre- or post-dated that time frame and you could decide on either one since the airplane doesn't appear to have the "U.S. ARMY" logo painted under its wings. That's our guess, but comments and corrections are certainly welcome!

That Other 5th AF Fighter From The Bad Old Days

The 49th held the line in Australia when it looked as though things just couldn't get any worse, but the 8th went to New Guinea to fight during the same time frame. The conditions over that island were abysmal and took their toll on both man and machine, as illustrated by this somewhat amazing photograph:

We've mentioned on numerous occasions that New Guinea ate both men and machines without regard for nationality, and this photograph proves the point! Aircraft number 37/M, a P-400, is from the 80th FS and is seen in the air after a recent overhaul---note the heavy exhaust stains and beat-all-to-snot paintwork, highlighted by the brand spanking new OD control surfaces installed on the airplane. We're willing to bet there's some sort of name or artwork on the port side of that bird as well, but we haven't been able to locate additional images of it. "M" is quite an airplane in spite of that, however, and would make a wonderful subject for a model, nose art or not!   Rocker Collection

Bobby Rocker has been with this project almost from the beginning, and the photos he continually copies for us, or locates from other collectors, fills an enormous gap in our knowledge of the aviation side of the Pacific War. Thanks, Bobby!


A New Trick Worth Learning, or Lessons for Old Dogs

Last issue we discussed an e-book published by the folks over at Detail and Scale. That's significant to us because Bert and Rock have come to the conclusion that it's far easier to provide the aviation community with quality publications at an affordable price by doing them electronically, and they've forgone conventional print publishing to that end. It's The Way of the Future and I could certainly say it's a trend I don't personally like, but then again you aren't reading this blog on in a conventional print publication either! Nope; the future's here to stay, and it's time to jump on board!

Colors and Markings of the F-102 Delta Dagger, Rock Roszak, Detail and Scale, 2017, 380 pp, illustrated.

When we reviewed the new Detail and Scale F-102 publication last time around we mentioned that it was big on unit markings, which is certainly true. What we didn't mention, even though we were well aware of the fact at the time, was that Rock Roszak was working on a follow-up volume that was strictly colors and markings worn by the "Deuce". That book has now been released and it's a pretty amazing publication, electronic format notwithstanding. The author is obviously comfortable with the medium of electronic publishing and manages to make the title both informative and user-friendly, even for an electronic dinosaur like myself.

The book is exactly what the title says it is and is exceptionally complete (although we reserve the right for Marty Isham to contact us and let us know if anything significant is missing!), covering every era of the "Deuce's" service to include both active commands and the ANG. There are sections on what officialdom thought about the aircraft's paint work and what was actually done, all illustrated in color, and each section is copiously illustrated (I always wanted to say that but never had the chance until now---thanks, Rock!), and accurately captioned. The book includes 48 full-color illustrations and 520 photographs, 320 of which are in color and all of which can be manipulated for size thanks to the volume's electronic format. It's a publication that you honestly need to have if your interests run towards the F-102, Century Series Fighters, or the US Air Force of the 1950s and 60s.

There's a catch, though. We mentioned it last time when we reviewed Detail and Scale's first e-book on the "Deuce" and it's worth repeating here---you're going to have to embrace the technology to enjoy the book, and you're going to have to learn all the nuances and how to navigate them. That's intimidating for and old-stager such as myself, but the rewards are well worth the effort of learning how to use the format. Consider this if you will: In its present (and only) form, this publication sells for $9.99 retail. If it were a conventional book, on glossy paper in a decent size, and containing all of the photographs and color illustrations that it does, it would have to be priced in the $75 to $100 dollar range. It's an incredible value at its price. It also represents the future, like it or not.

That said, this book  is well worth adding to your library if you have any interest at all in the airplane. It's a worthy companion to Detail and Scale's previous F-102 effort. We recommend it.

Review copy courtesy Detail and Scale

A T-Bird's a T-Bird No Matter How You Slice It

The folks at Lockheed definitely hit a home run way back there in the late 1940s when they designed the T-33 jet trainer. It was simple to fly and maintain, more than adequate to the tasks assigned to it, long-lived, and pretty! Jim Sullivan and I were discussing aviation photography a couple of days ago and the subject of the T-33 came up, immediately followed by a request by me for photographs. A couple of days later a care package from Jim arrived in the electronic mail. Most of what was included was the of the anticipated USAF variety (which you should be seeing next issue), but it Turned out Jim had a couple of other tricks up his sleeve as well:

If this shot doesn't make you want to jump into a T-33 (or, more correctly in this case, a TO-2) and go flying, nothing ever will. The aircraft, from the Marine Corps' FLAM, wasn't configured for carrier use at all---that would come later with the T2V, which was Lockheed's "serious" attempt at a viable trainer for the Navy---but both the NAV and the Marines used the TO-2/TV-2 fairly extensively as a trainer, hack, and liaison aircraft. Of interest in this shot are the early gas bags under the wings and the total lack of aircraft gun armament. The T-33 family were simple aircraft both in concept and in execution, and this photo illustrates that fact as few do.   Sullivan Collection

Here's another early (ca. 1951) photo of a Marine TO-2 for your perusal! 124580 was assigned to HEDRON 12 when this photo was taken and was, in many respects, identical to WD 5 shown immediately above. Both photos show the aircraft's Bronze Green anti-glare panels to advantage, and the photo of 580 also demonstrates what the speed boards look like when fully deployed. Neither aircraft appears to have been fitted with ejection seats, marking them as extremely early aircraft.   Sullivan Collection

Most people know The Blue Angels used TO-2s as hack aircraft, and as a source of Gee Whiz rides for the press, but we generally think of those members of the family painted in blue to match the other aircraft on the team. 128676 was one aircraft assigned to "The Blues", but she's still in natural metal---her blue paint would come later on. Far enough in the production cycle to be designated a TV-2 rather than a TO-2, she was photographed on the ground at Detroit in 1952. Sharp-eyed readers will note that this aircraft has gun ports, although it's highly doubtful there were guns in the nose, and the aircraft has been fitted with Fletcher tanks instead of the earlier Lockheed tanks. She's a classy little jet, isn't she?   Sullivan Collection

Here's a 3/4 rear view of the same aircraft, which better illustrates the painted outline to the U.S. Navy logo on the aircraft's flanks. She's pretty, and not what we'd expect in natural metal...   Bob Esposito via Sullivan Collection

This is more in keeping with what we expect when we think of aircraft assigned to "The Blues", but look at those gas bags! We're big fans of black and white imagery around here, but this is one time we really wish a photo was in color!    Sullivan Collection

Let's take a look at one final photograph before we call it quits for this time around. 131801 was one of the TV-2s still in service that got itself re-designated as a T-33B in 1962 during the infamous McNamara-inspired Armed Forces Aviation Redesignation Shuffle, although she's still called a TV-2 on her aft fuselage. She was in red and white and assigned to the station at NAS Anacostia when this photo was taken, a pretty bird to be sure, but no prettier than the natural metal Marine aircraft we began this essay with. It's all in the eye of the beholder, right?   Bob Dorr via Lionel Paul via Sullivan Collection

Next time around we'll have to take a look at the USAF and ANG T-Birds that Jim sent, but those are for another day!

The Relief Tube

You may remember our piece on the F-100s of the Missouri Air National Guard that we ran a few issues ago, and that F-100C that had been fitted with a D-model vertical tail. Tom Smith has a perspective, and a comment, on 54-1794 that's worth a look and consideration:

Dear Phil, 

Once more, I find myself putting fingers to keys in response to a picture and question you aired, this time in the March 2017 blog. In that issue, you showed a picture of a Missouri Air Guard aircraft 54-1794 labeled a F-100C-1-NA (though the serial number seems to be for a C-5-NA) which was painted silver lacquer and wearing a F-100D tail. You questioned the how of this configuration. While I can't be sure, I would like to offer a SWAG or two on possibilities. Project High Wire was a program to take F-100C/D/F Huns and replacing wiring harnesses and upgrading electronics. It also involved deep IRAN, refurbishment and modification to select airframes. Without seeing the aircraft data card or knowing the date of the picture, I first have to make the assumption that if the MOANG kept this aircraft for a while (the tail mod suggests this is so), it went through High Wire. Using the "Way Back Machine" (thanks Mr. Peabody), we see that North American and the USAF knew that the F-100A tail had a serious lack of tail surface area, one that even the larger "C" tail fin did not adequately cure. Witness the 118 F-100A aircraft transferred to the ROCAF. Most had a F-100D tail fin retrofitted prior to delivery to the Republic of China Air Force, complete with the tell-tale AN/APS-54 Tail Warning Radar fairing and a commensurate increase in fin area than, along with a dampener mod, all but eliminated the yaw problem. It also meant that North American was well versed in adding a "D" tail to an earlier version. Back to the picture. I suspect that there was a problem with the original tail on 1794 and that there was not a suitable replacement "C" tail available (this model had been out of production for quite a long time). Rather than junk the airframe, an better and available "D" tail was substituted (remember, NA knew how to do this). Even if the APS-54 wasn't live, the increased fin area would be welcomed. Technically, this works. The rest is "guesstimation" but I'll bet I'm close. Anyone in Missouri know for sure? 

 Tom Smith 

Thanks very much for the insight, Tom!

Finally, here are a couple of links provided to us by Norman Camou---look on them as a Christmas present of sorts:

http://www.ghspaulding.com/guadalcanal.htm

https://m.youtube.com/watch?v=taVgb1ejumc

Both links will take you to short films on YouTube; the first is about Guadalcanal, while the second one illustrates the 365 FG's activities over Germany in their P-47s during the waning days of the Second World War. Both are well worth a look, and our thanks go out to Norm for hunting down these clips for us.

That's about it for this time. We'll try to present a more productive blog for you next year but in the meantime, be good to your neighbor and we'll meet again soon!

phil

Sunday, September 3, 2017

Going Back a Few Years, Things Didn't Improve With Age, One More, Good CGI, So Near and Yet So Far, USMC Phantoms, and Brother Rat

How Much Do We Care?

Boy, is that ever pretentious sounding, but hear me out on this one, please!


The original Eduard Me109G family was, to put it mildly, somewhat hosed, a gorgeous kit that was, in more ways than one, too big for its britches. It was, as the manufacturer told us, the ultimate kit of the ultimate Second World War fighter but at the end of the day it was so badly flawed as to be useless to any but the most casual of modelers. Or was it?

Then there was the Eduard Tempest, the only decent 1/48th scale kit of the very best British propeller driven fighter of the Second World War, flawed by a fuselage that was entirely too short to be of use to any serious modeler.

Go back a few years, or maybe a whole bunch of years, and take a look at Revell's P-51B in 1/32nd scale, advertised as The Next Great Thing at the time of its release but woefully misshapen and virtually useless as an accurate representation of any sort of Mustang.

In 1/72nd, that itty-bitty scale that I honestly can't see all that well any more, we had Revell's Tempest Mk V and P-51D, along with any pre-Airfix Mk V Spitfire kit, and a host of others.

And the beat goes on. It seems like something new is being released almost weekly these days, and there are literally thousands of old kits still out there as well, which means the chances of some manufacturer messing up their tooling and producing an inaccurate model are pretty darned good. We've already discussed Perfection and its complete and total unachievability (a word I may have just made up but still a word when all is said and done!) and have had that discussion more than once. To me it's one of those Basic Truths of our times---you can't fix Stupid, nor can you have a perfect model airplane. You can, however, have a pretty darned good model airplane if you do your part in the ongoing drama and that takes us to a quandary of sorts.

Let's say your own personal skill sets are pretty good, and you can reliably turn out high-quality model airplanes on a fairly consistent basis. You've become a silk-purse-from-a-sow's-ear kind of guy or gal, and you can make almost anything made out of polystyrene or resin look good. That's more than commendable and makes you a superior modeler of sorts, but it's only half the battle. The other half is scale accuracy, which means it's time for a brief journey down Philosophy Lane.

Just how accurate is accurate? Can we define that in any measurable way, or is it just something we discuss when we're around other modelers? It's a question that's almost Shakespearean in its nature, because there's a big old rub hiding in there!

At the risk of repeating myself, and realizing that mere risk has never stopped me from doing that very thing before, I have to say that ours is a subjective hobby at best. Yes; there are engineers and artists out there, and most modelers are a combination of the two, but in every instance the modeler is more of one thing than of the other. The engineers want Polystyrene Perfection, and the artists want a viable representation of the real thing that's pleasing to the eye. It's one of those deals where nobody's right and nobody's wrong or, to put it another way: I don't know art, but I know what I like.

So here's the point: I personally won't waste my time on a known bad kit unless there's just nothing else out there to work with and my life can't go on without a model of the whatever-it-is on my shelf. The problem is that our previously aforementioned Life is just too darned short, ya'll, and for some of us it's getting shorter with every passing day. Does that mean I've finally sold my saddle and gone over to the Don't Really Care side of the hobby? No; not at all. What it does mean, at least to me, is that I can now let some things (not many, but some) that would have made me bat-poop crazy a few years ago slide or, to put it another way: If it walks like a duck, talks like a duck and looks like a duck, then there's a pretty good chance it really is a duck. The current Eduard Fw190 kits walk like, talk like, and look like Fw190s when they're completed, but they aren't all that accurate as scale models even though they really and truly do look the part sitting there on the shelf. They're an anomaly that helps to prove a rule. If the kit is reasonably to scale (and that's by your definition, not mine) and reasonably accurate (again, by your definition and nobody else's), and if you're happy with it as it sits in your collection, then it's probably a pretty good model.

There are no perfect kits out there, and there never will be. There are some pretty good ones, and a great many adequate ones, and some really bad ones too, but there are no perfect ones. That gives you an opportunity to pick and choose, and to do the best you can. Should you listen to others while you're doing this? Absolutely! Should you care about what others think of your work? Yes you should, but with a huge caveat.

This is a hobby and, most important of all, this is your hobby. I have personal standards and I truly do try to raise the bar a little each time I build a kit, but at the end of the day I'm building for my own personal pleasure and gratification. I enjoy the time I spend at my bench and I feel pretty darned good when something comes out the way I wanted it to when I began the project. If someone else likes it too then that's gravy, but at the end of the day I'm building for myself, because it's my hobby. Good enough can sometimes actually be good enough, even on an old or obsolete kit. Perfection isn't in the game at all.

That's my story, etc., etc...

Farther On Down the Road

Let's take a brief ride in the Wayback Machine today and take a look at a photo we could've/should've but didn't run way back in our second print issue when we profiled Stanton Smith.

Those of you with long memories, or maybe just a good collection of primordial scale modeling publications, may remember the piece Jim and I ran on Stanton Smith way back there in the early 70s. Stanton began his active duty Air Force career with the 80th FG flying out of Burma, and I don't think we had this particular photo at the time we ran the original article---Jim came across it years later while doing weapons research---but it's the P-40N assigned to Stanton and thus deserves a place on these pages. A lot of folks aren't aware of it but the P-40N was configured to carry underwing stores, one hardpoint per wing, and could haul either gas bags or ordnance there. This photo shows the ground echelon bombing up Stanton's aircraft prior to a mission and illustrates the high-tech equipment available to the ordnance folks assigned to the Burma Banshees back there in The Bad Old Days. We're always talking about how rough things were in the SouthWest Pacific, but conditions honestly weren't any better in the CBI---lousy is lousy, no matter where you are.   Wogstad Collection

Many thanks to Jim Wogstad for discovering this photograph and realizing that I couldn't live without it!

The Same Old Song and Dance

Stanton Smith's P-40N, shown immediately above, was photographed during the 1944 time frame, as was the shot we're about to show you. The airplanes and places are different but there's a common thread here:

These B-25J gunships are undergoing heavy maintenance at Lingayen and they're sitting out in the open, on Marston matting, while it's happening. You might think that maintenance facilities for the 5th AF would have improved with the passage of time but by 1944 the war was moving so fast that it was all the AAF could do to keep up, which leaves us with the these 17th RS Mitchells sitting out in the open while they're being serviced. At least there wasn't any mud to contend with that day...   Fred Hill via Gerry Kersey and Bobby Rocker

While we're on the subject of photographs taken by Fred Hill, it's come to our attention that a lot of people are running his photographs on the Internet, or printing scans of them in print publications, without bothering to provide attribution for their source. That bothers us, and it ought to bother you as well. Right is right and wrong is wrong! Just sayin'...

A Final One From '44

We received this shot from Gerry Kersey a few weeks ago and it's so unique we had to share it:

"F.O.E" sits on the ramp waiting for another mission. She's in pretty decent shape as A-20s go, but she's still showing the effects of a hard life. There were no easy days.  Kersey Collection

Goin' to the Movies

It's not at all unusual for you to find links to videos on this site; thanks to the generosity of Norm Camou we've been able to run some truly unique footage for you from time to time. Today's movie isn't from Norm, though, but rather from Rick Morgan, who found this little gem on FaceBook a couple of weeks ago:

https://www.facebook.com/537638236363545/videos/1299090646884963/

The clip is 10 or 12 minutes long and is about Nationalist Chinese Curtiss Hawks engaging Mitsubishi G3M-1 bombers during the Sino-Japanese War. The CGI is nothing short of spectacular, and the airplanes behave the way real airplanes do in flight---none of the exaggerated aeronautical miracles found in recent movies are present here and all the action is extremely believable.

We do, however, have a couple of criticisms of the clip. The first is a technical glitch---early on several of the Hawks show backwards side numbers, either an editing glitch or a deliberate ploy to catch Picture Pirates. The second problem is more one of taste in that the clip is just too darned short! The CGI is breathtaking and the clip appears to be from a real movie which we think may be called "The Bridge", although we aren't certain of that---there are real non-aviation actors in parts of the clip, however, so it almost has to be from a greater work.

This is a must-see if you're an aviation enthusiast. Many thanks to Rick for sharing it with us all!

Missed It By That Much...

I am, of course, talking about the recently released Airfix P-40 B kit in 1/48th scale. It's a model who's release was greatly anticipated; one that fueled storms of discussion and debate even before it became available for examination, much  less actual building, and that debate terminated at least a few friendships and caused a couple of people to be dismissed from various on-line forums. It was, and perhaps still is, a kit that arouses considerable passion in the hearts of those who choose to build it.

That's not for discussion today, however. I've always admired the airplane as an example of aeronautical art and, like a great many people, I've also bemoaned the lack of a 1/48th scale kit of the type that might prove to be a significant improvement on Monogram's seminal but distinctly long in the tooth 1964 release. The New Airfix has been doing good things in my opinion, which made their P-40B well worth investigating so, with all the reviews and tooth-gnashing in mind I called a local shop and asked them to hold a copy of the kit for me as soon as their stock arrived. What follows is what I think of the kit after building it, but I'm going to go ahead and tell you right off the bat that I like what Airfix did for the most part, and I honestly think most of you will like it too. Keep in mind, though, that this site doesn't do kit reviews, so you're not going to hear what color the parts are or how many of them are in the box---you probably don't need me to tell you those things anyway, right?

Anyhow, there is one caveat regarding this kit that almost everyone who did actually review the model has mentioned; the fit. A lot of folks say it's too good, and too precise, and and they aren't awfully far from being right. The tolerances for this kit, and almost all of Airfix's recent releases for that matter, are incredibly precise and you need to pay attention to what you're doing if you plane on building a decent model. This is not a kit for the novice or ham-fisted. Some modeling skills and a little patience are required, and if you don't possess those things your chances of a harmonious outcome are slim at best. With that as a baseline, let's move on to the things that will matter to you when you build this kit.

First off, and stating the obvious yet again, the kit's panel lines are somewhat overstated, or maybe a whole lot overstated. They seem to lie somewhere between contemporary and 1970s Matchbox offering in execution and they manage to detract from the finished model in a significant manner. Yes; there's a school of thought out there that says they will disappear under a coat of paint, but I'm here to tell you that ain't gonna happen unless your paint bottle says Sherwin Williams on the side. If you want to reduce that scribing you'll have to do the old-fashioned manual Fill, Sand, and Rescribe thing. My personal nature runs towards the lazy side of the scale so I'm not about to do that, although you can if you'd like. (I have to admit it looks less offensive the longer the model sits on the shelf, so maybe it doesn't matter all that much but that's a cop-out, isn't it...)

Once you get past the scribing there's not much to dislike about this kit, but you might want to know the following:

You can build any of the long-nosed P-40s from this kit but you'll have to reconfigure the landing gear and address a couple of other issues if you want to build one of the early P-40-CUs. The other American variants (the B, C, and G) can be built from what's in the box, as can the Hawk 81 family, which was the primary export version. My model is of a P-40B so we're going to talk about the American versions here, along with some basic, and minor, corrections to the kit.

Let's get aftermarket out of the way first, though. Eduard makes an interior and canopy masks, and their Brassin' line line includes a set of exhaust stacks, while UltraCast offer a couple of different prop and spinner configurations and Master make a set of gun barrels. There's also a new "Nun's Hat" fairing in resin out there, or at least there was at one time, but I honestly don't see a need for that particular "correction". The others are pretty much optional in my view too, although I consider the prop and spinner replacements to be fairly essential. You pays your money, etc, etc...

As for actual construction, it's all pretty easy. If you're doing the American version you'll want to use the seat with the rounded back and the appropriate seat frame, as well as the straight pitot tube, but that's almost the only thing you really have to watch for. With that out of the way, the basic corrections you'll need to make are basic indeed:
  1. The kit represents the external rudder hinge on both sides of the rudder, but it's only on the port side on the real airplane so you'll need to remove it from the starboard side. You might also consider removing it from the port side and replacing that one with fine wire should you be so inclined---it'll look a lot better if you do that.
  2. That rudder has a trim tab in it, and the guys at Airfix only molded it in the starboard side of that part. It's easy to scribe it in on the port side too and you really want to do that.
  3. All of the long-nosed P-40s have a landing light in the lower side of the port wing and the kit gives you provision for it, but the instructions don't tell you to open up the hole and install the lens provided with the model. The solution to that one should be obvious...
  4. The parts breakdown for the nose of the model is extremely effective in dealing with the complex shapes found up there, but I think there's an easier way to do the resulting assembly work. I added the side panels that live just above the exhaust stacks before the fuselage was assembled, applying Tenax from the back-side to lock them in place. It was easy to do and it worked, although you might prefer to follow the kit's instructions there. The choice is yours.
  5. I did the same thing for the wing fillets, adding them while the fuselage was in halves. It made things a lot easier for me, but you might not be comfortable doing it that way either.
  6. There are a couple of small access hatches that live in the port wing fillet. Airfix forgot to put them there (and I did too!) but they're easy enough to scribe in place and you really ought to do that.
Everything else was done per the instructions and worked out just fine, thank you. The completed model really looks like a P-40B too, and some of the details (formation and navigation lights, gear doors, etc) could serve as an example of how to do that sort of thing for the other manufacturers out there---they're petite and very much to scale!

This view shows how the fuselage panels were inserted prior to assembly. If you're careful here it will simplify things later on and remove the possibility of sanding and puttying around the nose from your life. 

The wing root fillets were done the same way. It's easy to install them at this stage of construction, but things might get a little tougher once the fuselage is buttoned up, although I didn't try it that way so I honestly can't comment on it. This is also a good time to install the radio compartment hatch, once again cementing from the back side.

A picture that's worth a bunch of words! Do your installation a half-inch or so at a time and things will line up perfectly, while a "hot" solvent such as Tenax will ensure those fillets stay where they're supposed to!

The interior appears to go in much the same way as it does in the Hasegawa P-40 family, but in this case it needs to go in before the fuselage sides are joined together; you can't slip it in afterwards. Yes; that's a messy nose seam. It's easy to fix with sandpaper and Mr. Surfacer. Note. Chuckle. Move on...

It's beginning to look like an airplane now. I usually build these things in a modular fashion nowadays, but it was easier to do this one by sticking all the big pieces together the old-fashioned way. It's really starting to look like a P-40B, isn't it?

Here it is with all the big pieces attached and the decals applied. There's a ways to go yet but you can tell Airfix did their homework, can't you?

It's on its legs now and pretty much complete except for the prop and spinner, which had yet to arrive from the good folks at UltraCast when this photo was taken. That shoulder harness probably shouldn't be in there but it was in the Eduard interior set and got itself added by me without a second thought, which was a major clanger on my part. I could tell you I'm going to fix later it but that would be a lie...

And this is where I'm going with the project---a P-40B from the ill-fated 20th PS of the 24th PG as stationed in the Philippines at the start of the war. I'm liking it so far.

So let's summarize. Is the Airfix P-40B the ultimate kit we all wanted it to be? In all truth, it is not, but it isn't that far away from it either. The major issue with the kit are the overdone panel lines it's festooned with; most of the kit's detail, including the interior, is excellent, petite, and very much to scale. The prop and, to a lesser extent the spinner, is a clanger, but that's easily fixed by the use of an UltraCast replacement (presuming it bothers you enough to make you want to replace it). The decals are perfectly usable, as are the clear parts, and the engineering of the overall kit is impressive indeed. As for that "nun's hat"---somebody's going to have to provide a lot more evidence than we've heretofore seen before I decide it's a serious enough problem to require my attention, but you may well choose to do it.

On the other hand, that impressive engineering we just mentioned is also a major pitfall if the modeler doesn't have the skill-sets or experience necessary to work with them. I meant it when I said the kit's tolerances are on the tight side---every single piece on the almost-completed kit you see above fit perfectly, but every single piece was also carefully trimmed and dressed before attachment to the model. I personally enjoyed building this thing and, thanks to the largess of an old friend of mine, have a second kit waiting in the wings that will probably be built sooner rather than later.

I like this kit, except for the panel line treatment, and I like it a lot. Your mileage may vary...

Bugsuckers From the Corps

Ok; ok. We like the McDonnell Douglas F-4 Phantom, and we like it a lot. So does Jim Sullivan, and thanks to his kindness we're going to share a few images with you that he took back in the 1970s:

You can't beat this for pretty! BuNo 151420, from VMFA-321, sits on the ramp at NAF Washington in clean configuration on 23 April 1974. It's hard to remember how brutally efficient the Phantom looks when she's not encumbered by pylons and stores; this photo is a reminder. As pretty as she was, this bird led a somewhat difficult life---she suffered a runway overshoot at NAS Whidbey Island and took a dip in Puget Sound, then followed that adventure with an unspecified (to us, anyway) ground accident in 1976. She's still a pretty airplane, though...     Jim Sullivan

155528 was with VMFA-312 when Jim shot her at MCAS Cherry Point on 25 July, 1974. An F-4J, she's in relatively clean condition with just a pair of gas bags marring her classic lines. Her anti-glare treatment is a trifle unusual but otherwise she's a pristine example of her breed. She ended up going to AMARC in 1987.    Jim Sullivan

VMFA-251's 153896 was sitting on the ramp at MCAS Beaufort on 14 June, 1976, when Jim took this gorgeous portrait of her in near-clean condition, with only a pair of pylons cluttering her lines. She was built as an F-4J but survived long enough to become an F-4S prior to her delivery to the boneyard in 1985. Modelers take note of those Sidewinder rails, which are Insignia Red on their inner surfaces. The Devil's in the details!   Jim Sullivan

That same June day in 1976 saw VMFA-122's F-4J 153825 sitting on the Beaufort ramp. The anti-glare treatment on this bird is particularly tasty, we think. Like several other aircraft in this photo essay, 825 was slated for F-4S conversion and, like the others, ended up going into storage in 1985. She sure was pretty when she was in her prime, wasn't she?   Jim Sullivan

153889 was a survivor. Built as an F-4J and converted to an F-4S, she ended up being preserved at MCAS Kaneohe Bay. In this 10 July 1979 photo she's still on active duty with VMFA-333 and shows considerable evidence of a recent trip to Corrosion Control; her airframe is liberally festooned with patches of Mil-P-8585Y zinc chromate primer. We're guessing a re-paint is right around the corner, probably at the NARF, but who are we to say?   Jim Sullivan

Thanks as always to Jim Sullivan for his talent with a camera and his willingness to share both with us!

A Proud Tradition

Those of you who follow this project are well aware of the way the history of things threads through our lives. Here's a case in point:

This image is from the collection of the St Louis Air and Space museum and came to us through the diligence and kindness of Bobby Rocker and Gerry Kersey. It shows a B-25 from the 3rd BG in flight shortly before its transfer to the 345th BG in 1943, but there's more to it than that. The nickname on the side of the airplane is "BROTHER RAT", which was the title of a late-30s movie starring Ronald Reagan. The name goes much deeper, however, being a nickname the students of the Virginia Military Institute have called each other from Civil War days right up until this very moment, which makes us believe that someone on the aircrew, probably the pilot, was an alumni of VMI. It's truly interesting to see that tradition carry down through the generations and, unfortunately, from one tragic war to another. Funny how the circle is a wheel...    San Diego Air and Space Museum via Bobby Rocker

While we're on the topic, do any of you hold any other imagery of this airplane in your collections? If you do, we'd surely like to see it! Our e-mail address, all gomed up to try to fool the Spam Clan, is replicainscaleatyahoodotcom. (We're always interested in photography of any other American military aircraft as well, of course, but today we've got a particular interest in this one! Just sayin'...)

Under the Radar

While we usually take a look at older books and monographs in this section of our project, today we're going to take a somewhat different tack and boldly jump, with considerable trepidation, into the wonderful world of 21st Century digital publishing:

F-102 Delta Dagger, Bert Kenzey and Rock Roszak. Detail and Scale Publications, 2017, Electronic monograph, heavily illustrated.

We recently came by this title through as a result of a series of e-mails with one of its authors, Rock Roszak, a correspondence that caused us to jump headfirst into the wonderful world of electronic books. There's a story behind D and S's conversion to that medium, of course---one that we'll save for someone else to tell---but the books are here and in a format that many of us would not normally use or seek out. That could be a mistake on our part.

Most of us are well familiar with the old Detail and Scale series, a family of books who's history stretches back a great many years. They're so familiar, in fact, that we aren't going to describe them for you since pretty much every aviation enthusiast on the planet knows what they are, but rather jump straight into a look at the current presentation.

In the most basic sense the D and S electronic volumes are no different than the print books that we're all so used to yet they are, in the same breath, considerably different and much improved. Everything that endeared the old print edition works to us is still there; a brief history of the aircraft in question plus pages of detail photography of the actual aircraft slanted at the modeler are an essential part of the books, but in many respects that's where the similarity ends. These newer, digital editions, are much more comprehensive in terms of squadron usage than the old print editions could ever be, and the presentation of both photography and printed material is far better than before, and considerably more comprehensive (even to include pilot's narratives in this particular edition). The page layouts are improved and the overall product is quite impressive. Add to all that a substantial reduction in cover price and the books begin creeping towards the Must Have category of references. The volume we examined, that for the F-102, also included a comprehensive selection of photography covering every unit known to have flown the "Deuce".

That said, we do have one reservation, albeit a personal one. While the electronic format truly does broaden the scope of possibilities with these books, it also limits access to them to those with a computer, I-Pad, or similar. In a similar but completely different vein, it also eliminates the tactile experience gained by having and reading a "real" book of the old-fashioned print variety.

Our experience with this particular title makes us think there's a lot to be said for the format and presentation, as well as the sheer amount of material that can be presented for a substantial reduction in cost to the consumer, and there's little doubt in our minds that E-Books are the way of the future.That said, your humble editor is what some folks might call a curmudgeon, one who likes holding a real book and turning its pages. Still, the writing's on the wall, isn't it?

And that's about enough for all this philosophical rambling. If you have an interest in the "Deuce" this volume is well worth having, and we think you'll enjoy it. If only it were made of paper...

Review sample courtesy of Rock Roszak and Detail and Scale

The Relief Tube

It's been a while since our last edition (and Yes; we really do have A2F and SB2C photo essays in the works, we promise!), but we've got a couple of comments to share with you today so let's get to it!

First, from Richard Bebb regarding a "Scooter" photo we ran a while back:

Sir , 

In your August 2016 issue you have a picture of a brown camouflaged Aggressor aircraft (an A-4E or A-4F from VA-126) for which you have no further information. It is in fact an A-4F, and here is some further info on the aircraft: 

 Variant: A-4F Unit: VF-126 (Also listed as VA-126) BuNo: 154181 Modex: NJ-620 Date: c1983.  Description: right front view of VF-126 Skyhawk BuNo 154181, NJ-620, parked on the ramp. Location: NAS Miramar (as indicated by the NC-8A in the background). 154181 was assigned to VF-126 as NJ-620 (or NJ-625) between 1978-92 when it was retired to AMARC. URL to complimentary Photo http://a4skyhawk.us/content/154181-vf-126-photographer-unknown-g-verver-collection-4102 Hope this is of some help. 

 Regards,  Richard Bebb

Many thanks, Richard!

Here's a clarification we're delighted, absolutely delighted, to receive regarding a photograph of an unusually configured SBD/RA-24A we ran several issues ago. Scott Diamond found our article and was coincidentally researching the airplane in question at the time---here's what he has to say about it:


Mr. Friddell: 

 This is regarding the picture of the SBD-5/RA-24A with the mystery gear on and under it. This is indeed the QF-24A-DE drone aircraft the USAF used for testing in the late '40's. I found the picture on your site while I was looking for information on that particular craft because I met the man who "flew" it during test in the Air Force. I'm currently building a commissioned B-25 model for this gentleman an he told me all about his career in the AF and the odd turn it took after he completed flight training on the B-25J gunships to be sent to the South Pacific for the Air Apaches. Because of Navy concerns about the security of ships in the area where the planes were due (we had been temporarily chased out by Japanese forces) they cancelled the shipment until the area was under Navy control again. By that time this gentleman was sent to assorted temporary duties and when the planes finally left the US he was bust at Wright Field with something else. Because he had been a radio enthusiast before the war and was still tinkering with them to try to make remote control planes while in the service he was tapped for a position in the new high-g program where the AF was testing new types of G-suits for our crews to use in combat. The newer planes were giving crews a lot of problems in dogfights and the AF was using a drone to help figure out the solution. They needed someone to help work out the kinks in the drone and then fly it during the tests. My customer was it. He told me today that he flew in a B-25 in the nose compartment with his radio gear while test pilots wearing the various g-suit designs would ride in the Dauntless. He didn't remember the number for the SBD (he is 98 years old, and while sharper than I'll expect to be he is fuzzy on those kinds of details) he did remember it was the only one the AF had. Apparently the USAF had chosen the Dauntless for this task because it could pull so many hard g's and still hold together, as well as be easy to control and recover. So the test crew would be strapped in with pressure bottles for the suit bladders, then EC (his initials...I haven't asked if he wanted to be named yet since I just found this article) would fly the drone through the test maneuvers as the crew would note the effects of the suits and perform various tasks to see how alert they were during the same. By using the drone the USAF hoped to avoid crew casualties from blackouts that couldn't be recovered from in time to avoid a crash, especially during multiple maneuvers in succession to simulate combat. The problem of making it through a high-g recovery in a dive bomber was considered top of the list, since our side didn't have the sort of recovery device the Germans had on Stukas for that, and the Helldiver and Dauntless could pull even more g than that plane did. EC told me the SBD had cameras inside and out to record the tests, and extra radio gear for backup, but was pretty much just a stripped down SBD-5. He remarked on the perforated dive brakes and how well those worked at holding the plane's speed down in a dive before he pulled them in and yanked the drone out of it to try to black out the crew. Sounded like a hard dollar for those guys to me! EC also flew hands-on drone planes that were used for evaluation of remote feedback of the instruments during remote flight. This would eventually allow operators to fly the drones out of visual flight range and was the first steps in early remote guided missiles and recon craft like the Vietnam-era Quail. Nowadays he lives in Washington just 3-4 hours from me. So there it is, the story of your Mystery Bird! It really floored me to see this picture on your website right after getting the model commission and interview with the man who "flew" it. 

Regards, Scott Diamond

Scott, thank you very much for sending this to us and helping to clarify the mystery regarding that airframe!

On a final, but necessary note, I'm pretty sure this issue of the project is later than, or at least in contention for that honor, anything we've previously published. To those of you who have contacted us with concern, please don't worry---all is well and we're chugging right along over here. My wife and I have been heavily involved in moving her ailing mother from Florida and establishing her in Texas over the past several weeks and the activity has consumed a LOT of our time. In theory things are back to normal now---fingers are definitely crossed on that one! We're also extremely fortunate in being far enough west of the Texas coast to have missed almost all of the bad weather that's been so much in the news of late; thanks very much to those of you who have asked about us and our well-being over the past week. We're ok, but we'd like to give a heartfelt thank you to all those who were concerned about us and ask you to turn your thoughts to the folks who actually did get slammed by that storm.

And that's it for this highly delinquent issue! Be good to your neighbor and we'll meet again soon!

phil

Saturday, June 24, 2017

Rags to Riches, and A Very Special Home Movie


Who Came First?

The year was 1969, or at least I think it was, and I was standing behind the counter at Dibble's Arts and Hobbies in San Antonio one dismal, rainy afternoon, when I heard a rumbling from the parking spaces in front of the door. The sound was that of an American V-8 engine, and a healthy one at that, but the only car in our lot was an old Jaguar XK-150 drop-head coupe that had just pulled up. A tall, thin guy with glasses, probably about my age, got out and came into the store and introduced himself, which is how I came to meet Al Orvedahl, a college student who had only recently moved into San Antonio to go to school. (That V-8 rumble had well and truly come from his Jaguar; he'd decided shortly after purchasing the car that it lacked performance, so he shoe-horned a Pontiac 389 into its engine bay and began a career surprising Corvette Stingrays, or at least he was doing that when the car wasn't overheating due to the retention of that itty-bitty Jaguar radiator, but that's a story for another day.)

The next surprise came a couple of months later, when he brought in a completed 1/32nd scale Revell F4F-4 he'd been working on for the past several months. The kit was an absolute revelation and featured impeccable bodywork, a paint job that was well above average, and decals that looked as though they'd been painted on, but those things weren't the cause for our amazement; that came from the details he'd added to the model.

Take the cockpit, for example. Al had gone in and added all of the details Revell had missed when they tooled the kit, scratch-building them from sheet styrene and stretched sprue, and he'd manufactured a set of lap belts for the seat he'd made. We take those things for granted nowadays, except that nowadays most people use resin or photo-etch instead of hand-crafted styrene, but almost no one was doing it in 1969.

Then there were the seams where the wings and horizontal stabilizers joined the fuselage, which were immaculate, with no lost rivet detail. It turns out Al had used white glue to fill those seams, wiping away the excess to allow a perfectly filled joint. That's also a common trick these days, but it wasn't back then. He'd used that white glue to make the insulators on the antenna wires he'd stretched from sprue as well---other people were using stretched sprue back then, including me, but nobody was making insulators out of white glue at that time, at least not that I was aware of.

Al also discovered Hasbro Light-Brite pegs and their usefulness for making colored lenses and transparencies for models, and other things as well, and the list went on and on.

Some of you have been using those tricks for decades, I know. I've been using them too, as well as writing about them, or at least I was as soon as I picked them up from Al. Since that time, I've seen all of those tips, and many others from "The Day", periodically repeated as "new" techniques in various magazines and internet "publications" and forums. I even ran the Hasbro lens idea in an early edition of the original Replica in Scale. I learned several of those tricks from Al, and I'm reasonably certain he picked them up from somebody else, which takes us to today's Lesson in Humility.

There are plenty of new ideas and techniques out there in The Magic Land of Modeling in which we dwell, but in actuality most of them had their origins back in the 60s and 70s, way back when our hobby was really beginning to take off (no pun intended!). Those ideas and techniques have been passed down, perpetuated, and improved upon for decades, and precious few of them are truly new. The origins of most of them are lost in the polystyrene mists of time, which leads to their periodic rediscovery and transmission as new ideas and techniques.

There's nothing wrong with any of that, of course. The important thing is that we learn, and by learning become better at what we do within the hobby. Technology (laser printing, for example) is rapidly passing by certain of those old techniques and rendering them obsolescent,  but even that is creating its own mythos of who came first. At the end of the day we all learned from somebody, and there's considerable validity to that old notion that everything old is new again. I think somebody even wrote a song about it!

Let's go build a model, then, and maybe give a thought to those old guys who figured things out for us so we wouldn't have to. They're the reason we can do some of the things we do and, for the most part, we don't know who they really were with any degree of certainty. That's worth thinking about, at least in my world!

And the Beat goes on...

An Apology to Jules

Bringuier, that is. As you all surely remember, Jules Bringuier was the guy responsible for Classic Airframes and the wonderful and eclectic range of kits that fabled company brought to us only a few short years ago. Long on imagination and daring, the company was, at the end of the day, a purveyor of short-run kits of unusual subjects, which is another way of saying that precious few of their offerings were easy to build, particularly for those new to the hobby or possessed of limited skill sets. The gorgeous box art on each and every one of those kits, coupled with that aforementioned eclectic subject matter, seduced more than one modeler into attempting one of their kits, and those attempts often resulted in an indifferent result or even outright failure. Classic Airframes kits were a tough date, pure and simple.

With that as a largely unnecessary introduction, let's you and I go back to 2004 or so. That year was one in which my own personal world was being rocked by fractuousity of a familial nature, as it were, and I desperately needed something to take my mind off the tragedies of the moment. That particular Something came to me one dismal Saturday afternoon during a visit to the now long-defunct but fondly remembered Village Hobbies in Austin, where I spied a Classic Airframes P-6E sitting forlornly on the shelf. I've always had a thing for that prettiest of the Curtiss Hawk family and plastic is plastic, right?, so I grabbed it and almost ran to the counter to pay for the thing and get it back to the house so I could begin work. Things were looking up!

All of Classic's kits were of the mixed media variety, a game I'd never played before, and that P-6E was a gentle introduction to the genre for me. Some of the "normal" styrene parts were a little bit on the clunky side, but any plastic model ends up being the sum of its parts and the parts I was examining looked perfectly usable, so I dove in. There were some burps and hiccups along the way but nothing insurmountable, and in a few short days I had a completed airframe that required only the addition of the upper wing before it could be deemed Finished.

My own personal modeling karma has always included a big chunk of good luck where things with multiple wings were concerned, and I'd never had an issue getting a biplane of any sort together in a tidy and workmanlike manner. True, you have to be careful during assembly, and pre-planning doesn't hurt either, but at they end of the day they're generally an easy thing to build. Generally.

This one, however, was one of those rare biplane kits that fought back, and successful completion wasn't in the stars for that project. Try as I might, I just couldn't finagle that accursed upper wing into the correct position---it simply wouldn't go on there properly! At that point in the festivities I decided to consult the collective wisdom of the entity known collectively as The Internet, where I found a literal plethora of information from the two or three people who had resolved the strut issue by trimming said components so I gave that a shot too, which provided me with yet another opportunity to duplicate my previous failure at attaching that darned wing to the airplane, which I proceeded to do. Duplicate my previous failure, I mean.  Phooey!

There was a temptation to throw the kit into the trash at that point but I didn't do it; instead, I put everything back in the box and kept that P-6E in storage for the advent of a better day, the precursor of which came at a local model show a couple of years ago when I ran into an old friend of mine, Richard Ng, who was attending that very same show and offered to sell me a couple of new-in-the-box Classic Airframes P-6Es on the cheap. It was an opportunity of sorts, or maybe even an omen, and who was I to say no? What harm could it do, right?

Anyway, and to stop rambling and more-or-less get to the point, I decided to resurrect the project a couple of weeks ago and had the good sense to photograph the festivities along the way, almost a first for me! What follows is how things shook out:

Here's where the project was at the time of resurrection. The model had been decalled at one point and there were some paint blemishes to deal with as well, but the basic construction was sound and it looked like the significant parts of a P-6E! Who could say no?

There was a time when I annotated the instructions of the models in work on my bench. It's not a bad thing to do if you're inclined towards that sort of thing, and it can actually help you to pay attention and maybe even avoid a mistake or two as you go along your merry way, but that's not the point here. Look on these as some sort of whacked-out public service announcement, if you will---feel free to consult them if you think they'll be of help to you, or don't do that at all if you don't. Either way will work out just fine in the end!

It's true that we're all used to seeing this sort of parts breakdown on the instruction sheets that come with our kits, and it's equally true that a great many of us ignore them, but it's a good idea to at least give them a once-over if the model is of the mixed-media and limited-run variety. If you look carefully you'll find there's no way to actually attach the propeller to the finished airplane because no kit part is supplied to allow you to do it (an odd omission, that, although that's easy to fix), and there's no optical collimator (another word for "gun sight" back in the 1930s) provided with the kit either. Both omissions are easy to deal with and are of little or no consequence to the project. We're modelers, right?

The kit's first few steps allow us to assemble an interior and stick the exhausts into the fuselage halves. It's simple work but care is required, particularly when working with the rudder pedals. I've now got three different kits of the P-6E and they all, each and every one of them, came with pre-broken rudder pedals. They're easy enough to rebuild but you might want to plan for a rework when you purchase, or finally decide to build, the kit. The interior is a little short on detail as well, but the cockpit opening isn't very large so you can get by with what the kit provides; no harm, no foul. The exhausts are a no-brainer---paint them and stick them in place before you stick the fus together. I suspect I used some sort of cyanoacrylate on them back in '04, but it could just have easily been a 5-minute epoxy. The important thing is to make sure they'll stay in place once you've buttoned up the fuselage because there's no second chance if you fail on this one!

Steps five and six get you to a completed basic airframe. My recollection is that everything fit together fairly well, but you could benefit by drilling a couple of holes and pinning the wings and horizontal stabs to the fuselage with brass rod or cut-down insect pins---besides assuring those components stay where they're supposed to, the pins also help in setting dihedral on the lower wings, which is one of several critical operations on this model. You'll also want to note that the gun barrels provided by the model are too great in diameter and won't fit properly into their troughs in the fuselage halves. Look on that as an excuse to buy a set of Master .30 cal Browning barrels and move on or, conversely, omit the guns entirely if the airplane you're reproducing is one of the blue and yellow birds, since the type was painted in those colors fairly late in its service life and was often unarmed by that time. Omission of the guns will also save you from scratch-building the optical collimator later on, although that's simple enough to do if you want an aircraft with armament. The choice is yours, etc., etc.

And here it is folks; the step that will make or break your model. There are all sorts of comments out there in Internet Land talking about cutting struts, repositioning mounting points, and such, but none of that is really necessary, or at least it wasn't for me. What I did may or may not work for you, but here's how I dealt with this step on my own model. First, you'll want to do some assembly out of sequence and install the landing gear first instead of in steps 9 and 10. Be really careful of the main gear's alignment and then, when you're satisfied with same, allow the model to sit overnight so the undercarriage can set up permanently. Once that's done, go in with a drill and clean out each and every one of the strut mounting points. I used a number 66 drill for the task but there was no magic in its selection; it just happened to be what was in that particular pin vise when I picked it up. The thing is to drill the hole just a bit larger than the "pips" at the end of the struts---that's so you'll get a good, secure anchor when you glue them in place. When all that's done, carefully cement the struts into their respective places on the upper fuselage and lower wings, set them according to the diagram provided in the instructions (which also conveniently shows you how to set the dihedral on the lower wings), and leave them alone for a day or two. Finally, once you're absolutely certain those struts are firmly and permanently locked into place, drill out the mounting holes in the lower surfaces of the upper wing using a drill that's a little larger than those infamous strut "pips" and carefully mount the wing, starting at the cabane struts and working outwards.

Here's your starting place before attaching the upper wing. The undercarriage is in place and everything that can be pre-painted is pre-painted, thus theoretically stacking the odds in your favor. You'll probably notice there's a bit of overspray here and there, but that will be corrected prior to installation of the wing.

Next up are the cabane struts. I used Tenax throughout the model's assembly, both then and now, but almost anything will work as long as it dries with a strong bond. If your weapon of choice is cyanoacrylate you'll probably want to use one of the slower-drying ones so you can set the angle properly on those struts but, regardless of what you use, and to repeat myself once again, let everything dry overnight and make certain you have a good, strong bond before doing anything else.

Once the struts have cured and are solidly in place you should be able to do this without any sort of undue movement of the model whatsoever---if anything does move, your bond isn't good enough and there's a pretty good chance this whole project will collapse when you mount the upper wing, thus causing you to say many colorful words in a loud and forceful manner. I'm not saying you need to turn your own model upside down and do this, mind you. The point to be made here is that the cabane strut-to-fuselage mount is critical to the assembly of this airplane and a weak joint in any one of those strut locations may well doom the project for you. The extra time is well worth expending!

Step 11 has you add the aux tank and some smaller bits and pieces to the lower fuselage. This is a job for cyanoacrylate and, in my world at least, one that's easier to deal with before that upper wing goes on. It's your choice, of course, but I stuck those bits and pieces on prior to mounting the upper wing and was glad I'd done it. Your mileage, however, may vary...

A photo that proves the point! The wing is just sitting there, not permanently attached in any way, and the cabane struts are carrying its full weight. Everything is in proper alignment too, so we're just about ready to fix the cabane struts to the upper wing and then---ta Daa!---attach the interplane struts and mount that wing, but first...

Let's paint any trim and apply the decals. That may seen somewhat counter-intuitive to you at first, but the objective here is to avoid excessive handling of the model once that upper wing has been installed and it can thus constitute being A Very Good Thing in your own personal modeling world. This would also be a good time to scratch-build and install that collimator as well, if you plan on arming the model. While we're at it, the instructions would like for you to mount the windscreen before you mount the upper wing, but it sits far enough aft of the wing cutout that you can do that afterwards, which was my own preference. It works out ok either way so the choice is yours!

The interplane struts go on next and, once again, need to have their mounting angle carefully set and then be allowed to sit unmolested overnight. This is a key joint and it absolutely positively has to be done properly!

And here's where you should be except, of course, that you want both interplane struts mounted to the lower wings rather than just the one I've shown. I know. I know...

Here's another view to confirm what you're trying to do. If your model doesn't resemble this, you might want to double-check the kit's instructions regarding strut angles and take another shot at it! Once you're satisfied that everything is aligned properly and firmly glued into place (notice how I keep repeating that part?) you can drill the strut mounting holes in the lower side of the upper wing a little over-sized so the wing can "float" a bit in regard to the strut location once you begin the mounting process. That sounds somewhat drastic at first but it's really quite logical since there's a flare at the base of each end of the interplane struts that will cover the enlarged holes once the wing has been installed, and the larger mounting holes will provide you with the wiggle room necessary to mount that wing properly and without drama!

And here's the money shot! Everything has been aligned, cemented in place and allowed to dry thoroughly (overnight!), and the model is being held a foot or so above my modeling desk by grasping the upper wing alone. The model isn't fragile at all, and I routinely handle it this way---those wings are locked in and are rock solid! All you have to do to get to this point is build slowly, make certain that everything has been securely mounted, and follow the kit's instructions to the letter regarding strut angles and lower wing dihedral!

Note how incidence, gap, and stagger are all correctly set? That's entirely a function of the kit's design and its instructions and nothing else. The only thing not specified in the kit was my decision to drill the holes in the upper wing's lower surface a bit over-sized. Everything else you need to do the job correctly has been provided in this model, but you've got to follow those instructions to the letter and use a little bit of care and forethought as you build or some degree of disaster may well ensue!

One thing about the older Classic Airframes kits (and nowadays there's no other kind, so we're talking about the chronologically earlier releases here) are the pre-yellowed vacuum-formed transparencies, one of which can be seen in the corner of this photo just to the right of the model's rudder. It wasn't usable for the model but served quite well as a vacuum-form mold to enable the creation of a decent, and actually transparent, windscreen. You might also want to note the aileron actuation tubes between the wings---the kit provides them but they're thick and clunky and are best replaced with .020 Evergreen rod, which was what was done here. We're in the home stretch now, and this thing really looks like a P-6E!

There's a little more to do before we can call the project done, of course. There's rigging to be done, and three radio antenna masts plus antenna to be added, and then the prop and a tiny bit of paint touch-up here and there, but the model is far enough along to prove the point. A great many modelers of my own personal acquaintance, including some exceptionally talented ones, have long been of the opinion that the Classic Airframes biplane kits were poorly designed and virtually unbuildable. I thought that too, and had the notion drummed rather forcefully into my head back in 2004 when I first began the model you see before you. My problem then was simple---I thought I knew better than the kit designer did when it came time to mount that upper wing, and in consequence I tried to rush the assembly of that most critical of biplane components. The end result was a badly built, and presumably unbuildable, model airplane that sat in its box, partially assembled, for some 13 years before I finally decided to give it another try.

Yes; it's true that Classic Airframes kits were of the limited run genre and suffered all the failings of that sort of thing, but the manufacturer tried really hard to provide a first class product within the confines of a somewhat limiting medium. Take the painting guides provided with each kit, for example. This is a page from the P-6E (kit number 440) that I began all those years ago, and it's a first-class effort, easily on a par with anything anybody provides even now.

This is the other scheme provided with that kit. The decals were by MicroScale and were (and still are, for that matter) superb. Printing was excellent and the decals were as thin as anything you can buy today. A lot of thought went into those Classic Airframes kits, and they were probably as good as the existing short-run technology of their time would allow. Every one of them presents its own unique challenge to the modeler, but they're all buildable. All it takes is skill and patience!

The model isn't finished yet, although it soon will be, but the simple act of following directions and building slowly turned the trick and produced a pretty good looking model airplane for my collection. That brings us back to that whole apology thing, because Jules Bringuier had it figured out way back then and it turns out his kits weren't the problem, or at the very least this one wasn't. Nossir, in this instance the problem was me, pure and simple. A new day, and a new attitude, produced a result far better than the one originally achieved. That unbuildable kit was entirely buildable right from the box, just as its designer had intended. Yes; Classic Airframes kits can be a handful to work with and it still seems as though every one of them presents its own unique set of challenges to the modeler, but some fine model airplanes have been produced from those kits over the years. For that we owe Mr. Bringuier a hearty thank you, albeit a somewhat tardy one, for being willing to produce kits that no one else would have ever touched. Classic Airframes was obviously a labor of love, and I for one am grateful that he was willing to invest his time and treasure in that dream.

It ain't what you do; 
It's how you do it!

The J Geils Band said that a very long time ago and it could be the theme song for this, or any other, short-run kit, which takes us right up there into The Wonderful World of Patience and Forethought.

I shall serve no model airplane before its time...

A Movie You HAVE to Watch!

Norman Camou spends a lot of time searching out historical aviation pieces on YouTube and the like, and sent this to us yesterday---a home movie shot in New Guinea back in The Bad Old Days! It's a personal document of sorts so there are things in there other than airplanes, but there are airplanes to be seen! It's a little over half an hour in length so get comfortable and prepare to be amazed!

https://unwritten-record.blogs.archives.gov/2014/11/03/home-movies-from-the-war-front-the-first-fighters-in-new-guinea/

Many thanks to Norman for sending this treasure to us!

And in late-breaking news: Norman found and has sent along yet another version of the movie. It's the same film and the exact same length but is from YouTube and is of much better quality than the first one. We've left the original link up there too, as a just in case. Thanks again to Norman for sending along this remarkable film!

https://m.youtube.com/watch?v=F53Mo374edg

The Relief Tube

In last issue's New Guinea Blues article I mis-captioned a photograph of a crashed P-38 that was actually sitting on a runway in the Solomons and not on a beach in New Guinea as stated. The error was mine and mine alone and has been corrected---thanks to Bobby Rocker for noticing it and keeping me honest!

And Now For a Special Message

This issue is late. There's nothing new there, of course---it would be entirely appropriate to re-name the project Late r Us at times---but the project has had to take a back seat to some recent and significant  issues that have, gratefully, been resolved, and is very very late in consequence. Nothing terrible has occurred and there's certainly nothing to for any of our readership be concerned about, but issues of a time-stealing nature conspired to put any sort of schedule right down the old plumbing, a Defecation Happens sort of thing if you get our meaning.

This VF-11 F-4B hulk (152305) photographed by Bob Lawson at MCAS Cherry point in April of 1971 pretty much sums up the way things have been going around here of late but there are sunnier days ahead, we promise!   Jim Sullivan---Please note that I mis-credited this image to Bob Lawson, but Jim took it!

Anyway, our next issue should be a good one: There are Grumman Guardians in the wind, along with post-War Helldivers, and the photography shared with us on both aircraft is remarkable, but it's going to take a little time to finish up watermarking and captioning the photos (thanks again, Picture Pirates!) and we wanted to get something in print in the meantime so you'd know we were still alive and kicking!

This pair of Fighting 92 F-4Js on the prowl over the Gulf of Tonkin during 1973 hopefully portend where we're headed with with project given just the tiniest turn of luck. Watch this space and cross your fingers!   Lawson via Sullivan Collection

Please accept our sincere apologies and maybe we'll be able to get something else published in a couple of weeks.

Until then, be good to your neighbor. We'll meet again soon!

phil