Give Me Your Money, Please
Not me, ya'll. I don't want your money, but I'll bet I got your attention, didn't I? Now that I've
got it, let's talk about the guys that really do want your money---the folks who produce those plastic kits that we all enjoy so much.
They come in two flavors, those guys that produce the kits; the ones that only sell what they design and make themselves, and those who will market pretty much any plastic kit they can get their hands on, because money is money and tooling ain't cheap. That those guys in the second group use the business model they do can be a good thing for the consumer, but it can also be a trap of the highest magnitude for the unwary. Allow me to explain.
A whole lot of plastic kits have been released by companies all around the world since the dawn of the hobby, and some of those kits were pretty darned good in spite of themselves---the recently Internet-maligned Hawk F4U-1
Corsair comes to mind in that regard since it was, for many years, the most accurate of all the 1/72nd scale "Hogs" available to the serious scale modeler---while others, such as the original 1/72nd scale Revell P-51D of the early 1960s, was a dog when it was new and has remained a dog ever since. When we factor in the reality that a few of those older kits were the only ones of a particular subject ever released in polystyrene (or the only accurate ones in terms of shape and outline), then the industry practice of buying or leasing someone else's molds to produce "new" models makes perfectly good sense on a number of levels and is, in fact, a good thing, at least up to the point where you're misled regarding the contents of a given kit's box.
One case of that sort of thing is presented by Revell, who happen to own the old Matchbox tooling and occasionally release the kits they mold from them in shiny new packaging, with little or nothing on the box to indicate that the modeler is purchasing a kit originally designed and tooled in the early-to-mid 1970s. That's almost an ok practice as far as we're concerned, since Revell's prices have always been reasonable in the extreme and many of those Matchbox offerings are the still the only ones available to us of certain subjects. (Don't believe me? Go find yourself a
Siskin or
Heyford in polystyrene, from permanent tooling then. I dare you!) It
would be nice if they told you what was really in the box like they once did in their heritage re-releases, but it's still ok; those kits are inexpensive enough and generally good enough that little harm is done.
The higher-end kits can be an entirely different kettle of fish, however, because of economic impact (both perceived and real) to the modeler. Take, for example, that Czech company that recently went through a tremendous amount of angst over the release of a Second World War German fighter that wasn't quite the end-all and be-all it was advertised to be. In addition to their own kits, said Czechs also re-box and market other people's kits as limited editions, and they generally do an excellent job of that, providing as they do decals of superb quality and aftermarket accessories of their own manufacture, both of which are generally done to an extremely high standard. I mention that particular manufacturer as an example only, because the high end is capable of creating problems all their own---those guys recently released a Vietnam War-era A-4E/F kit that included the excellent Hasegawa A-4E/F, an excellent decal sheet, photo-etch and masking materials from their existing accessory line, and a resin ejection seat, at a US retail cost of some ninety bucks. I bought that kit and don't feel badly used for having done it because I knew what was in the box when I did it, but for the price there could've/should've been more included, like maybe some aftermarket ordnance for that kit of an attack bomber that spent its combat career carrying same. I was also funded for the purchase so it wasn't that big a deal to me, but for some folks it would've been
.That high-end thing gets even worse when the re-boxed kit being offered was a dog in the first place (that A-4 wasn't, thank goodness) or was good when it was originally released in the 60s or 70s but has suffered from the passage of time since its salad days.
The point I'm trying to make here is a simple one. I think it's perfectly fine for manufacturers to re-issue other people's kits, but I really wish they'd tell us where the kit came from if it's older, or maybe what's really in there and where the plastic originated. That's not unreasonable, and I truly believe it's a way for everybody to walk away with a smile on their face.
Wasn't that strange;
Wasn't that strange
Indeed?
Now give me your money, please!
WHY Do They Do It Like That?
It's no secret that I read everything I can about our hobby, and that I go to a bunch of those scale model-oriented web sites almost daily in search of both wisdom and inspiration. In the course of that searching, I've read a great many descriptions of misery submitted by people who attempted to build, and were ultimately defeated by, the Eduard Bf109E in 1/48th scale. I happen to like the kit, inaccuracies and all, and I also happen to think it's easy to build, but that's probably because I don't follow the instructions to any great degree when it comes to sticking the engine in the model---that's because all the internet-borne complaints about the upper cowling not fitting correctly are 100% true! Fortunately, it's also a condition that's easy to fix. Read on:
European modelers, and more than a few American ones too, seem to enjoy opening up the various access panels on their models to display the wonders that lie beneath them, often doing this to excess. It seems that the guys at Eduard bought into that whole notion with certain of their kits, their Fw190s, Bf109Es, and Bf110s coming to mind in that regard, and the resulting over-complication has probably frustrated a lot more modelers than it's pleased, particularly among those who are still developing their skill sets. The 1/48th scale Eduard Bf109E is particularly tricky in that regard: The instructions tell you exactly what needs to be done and how to do it, but not clearly enough to make sure everybody understands what's required if you want to build your model in a buttoned-up state with the cowling installed. I lucked out and figured it out for myself when I built my first one (of three so far), but I also happen to think those instructions can be substantially improved upon. How? I thought you'd never ask!

I tend to build the Eduard 109Es in a modular fashion---the design of the real airplane and Eduard's treatment of the kit makes this extremely simple to do which in turn makes it really easy to make things work out the way they're supposed to. The first thing you want to do is omit
everything that goes on the top, back, or sides of that engine, then install the pieces on the front that are necessary for the attachment of the propeller. Next you'll need to take a coarse file or sandpaper and put a bull-nose on the upper front of the engine block, and I mean a
severe bull-nose, extending it well back towards the rear of the engine. Once you've accomplished that you'll want to lock the exhaust stacks in place, preferably with tube glue, Tenax, or something else equally strong, and then leave everything alone and let the plastic cure out overnight. Install the stuff for the oil cooler into one side or the other of the fuselage (it doesn't matter which one), but don't cement the two halves of the lower cowling together yet. Things will be a little easier if you leave off the upper fuselage deck until later but I didn't do that and everything worked out just fine anyway, so that choice is yours. Just remember that all you have to do is be patient, be gentle, and take your time when you stick the engine in there. If those are things you can't or aren't willing to do, you might want to forego the Eduard kit in favor of one from Tamiya or Airfix! (Remember, though; if you do it the way I'm describing in this article, you run a modest risk of destroying your model too. It ain't my fault if you break something! Forewarned is fore-armed,
etc,
etc.)
After those exhausts have thoroughly cured,
gently spread the nose apart and work them into place in the openings provided in the cowling for them. They're a tight fit and even the thinnest coat of paint will tighten things up even more, but it can be done! As I mentioned in the previous caption, this is easier to accomplish if you leave off the upper fuselage decking until after the engine is installed but I didn't think of that until it was too late to do it and it honestly didn't make that much difference to the process---yes; I'm repeating what I said a minute ago, but it's really important that you know this! Just take everything slow and easy and it'll all work out!

Once the engine's safely in place, all that's left to do is mate up the halves of the lower nose and flood the seam with the liquid cement of your choice, then let things dry and do your final bodywork. As you can see, I chose to do all of this after the fuselage was painted and decalled---it meant there was a little bit of touch-up on the paint, but only a little bit because I took my time in getting everything to fit and was careful when dressing the resulting seam. Once all of that was done the upper cowling dropped into place and fit perfectly, and all that detail that Eduard provided for an opened cowling display was never missed.
Once upon a time I thought the Eduard kit of the Bf109E was the way to go in the wonderful world of
Emil-dom, but I've since changed my view in favor of the substantially more accurate, if somewhat more difficult to build, Airfix kit. That said, I wasn't inclined to throw away the extra Eduard kit I had sitting on the shelf, and this simple modification to the assembly process made everything far easier than it would otherwise have been, at least for me. This method is honestly best avoided by the novice and the clumsy, but it's also a good way to accomplish something that can otherwise ruin a fine, if moderately inaccurate, kit and is a good way to grow as a modeler and add to your skills.
You Gotta Do This!
That's right; we're back on Hasegawa P-40s for a minute, and we're about to reinforce something you pretty much have to do to the kit if you want it to be accurate. That "something" we're referring to is the nasty little clipped forward corner present on the canopy of all of Hasegawa's 1/48th scale P-40 kits. We've discussed this before, I know, but it's a topic that can certainly stand repeating since the correction for the problem is simple and will give you a better finished model for an absolute minimum of effort.
Here's as graphic an illustration of the problem as we can present to you. Take a look at the canopy on this model, and allow your eyes to shift to the far left-hand side of said canopy. See that white triangular-shaped piece that's sitting there? That's what you have to do to correct the canopy on the Hasegawa P-40s, because they're all clipped in that corner whether the kit be an E, an M, an N, or some flavor of
Kittyhawk. They're like that because Hasegawa didn't understand that the triangular doubler at the aft base of the P-40's windshield was just that; a doubler that rested outside of the canopy
per se when everything was buttoned up, and they took things from bad to worse when they clipped the canopy corner to make it "fit" said misunderstood doubler. This photo pretty much duplicates one we showed you on a P-40E a couple of issues ago, and once again shows how to fix the problem, but this time on an "N".
All that's necessary is to add a triangular-shaped piece of styrene sheet or strip, blend it into the canopy, and paint. That's it, nothing else, and you don't even have to remove the doubler under the windscreen if you're building an N.
And here's what you end up with after sanding and painting. Don't forget to paint the inside of the lower canopy frame too, even if you don't paint anything else inside there, so you don't have the garish white plastic you used to fix the problem staring through at you This model is almost finished and only needs an antenna wire and a little more weathering (and some of that ubiquitous last-minute touch-up!) in order to be called Complete. Doesn't it look better with the canopy corrected?
Texans in the NAV, The Yellow Years
There are certain things that are seminal if you're a scale modeler of a certain era, and chief among those things for those of us who happen to be children of the 1950s are the Aurora AT-6 and SNJ
Texan kits in more-or-less 1/48th scale. The SNJ kit was particularly appealing to a kid (or at least to me!) since the box art, and the plastic contained within said box, were yellow, while the AT-6 was molded in a boring and mundane silver plastic. It was the same kit, of course, but offered two different ways, and the simple act of building it established a love for yellow airplanes that extends until this very day, and causing a subsequent search for pictures of yellow
Texans of any flavor. Helping in the quest, Doug Siegfried over at
The Tailhook Association was kind enough to provide some photography of a few SNJ-5s in that particular livery and what he's provided is really something, so let's take a look!
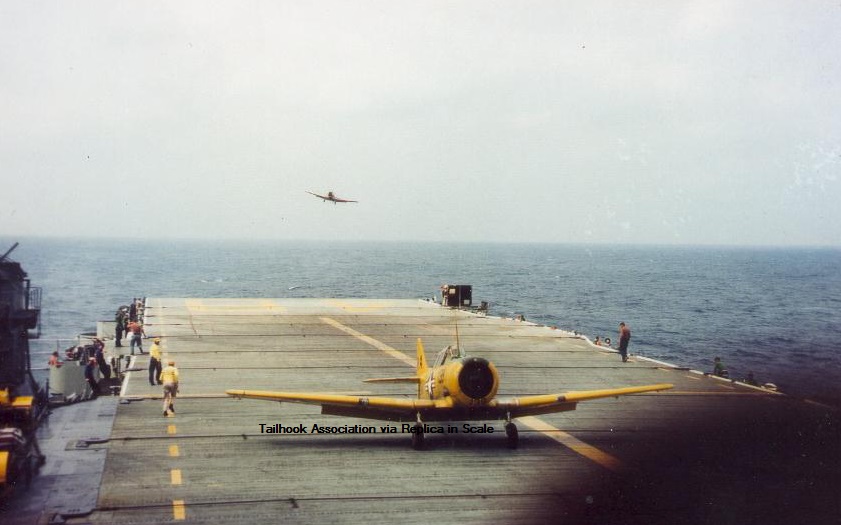
OK, it's not yellow, but it's a good way to start this piece anyway. The SNJ and sibling T-6 were confirmed ground-loopers, and would perform that particular bit of magic at the drop of a hat. They were also a little touchy when taxiing, which made a taxi trainer for the type an extremely good idea!This particular specimen was operated out of Corry Field in the early 1950s and is resplendent in what we presume to be yellow and red checkerboards, with a green anti-glare panel. Note the skids under the wingtips, placed there to prevent damage during the inevitable SNJ ground loop festivities, and the wheel just aft of the propeller that was placed there to help the novice
Texan driver avoid a prop-strike or headstand if too much power was applied to the aircraft during taxi. The wheel covers are painted with a design we can't quite make out, (surely they aren't some sort of commercial wheels, are they?), and the unlocked tailwheel has castored around and is now sitting "backwards" on the aircraft. NMNA via The Tailhook Association

You may recall, at least if you read our quick guide to the T-6/SNJ variants several issues ago, that the carrier-capable SNJs were designated by the appendage of the letter "C" to their designation. This SNJ-5C is taxiing out at NAAS Barin Field in 1954 and shows a degree of wear and tear we don't normally identify with naval aircraft of the period. BTU-5's BuNo 51842 is absolutely filthy and reflects the hard and constant use experienced by the type in service. The anti-glare is matte black on these aircraft, while the canopy stack remains unpainted and is in natural metal as are the wheel covers. It would be extremely difficult to duplicate this finish on a scale model, but what a looker it would be if someone could do it correctly! Roger G Smith via The Tailhook Association

Another BTU-5 Barin bird, this SNJ-5C sits on the ramp during 1955. She's a whole lot cleaner than Modex 113 immediately above, and has a green anti-glare panel and yellow-painted canopy frames. She's also lacking wheel covers of any kind, and the wheels have been left in natural aluminum. Those TraCom SNJs were well-used and you can see evidence of that around the aircraft's tailwheel and arresting hook, but overall 122 is a clean machine. The Tailhook Association Collection
This
Texan is from an earlier era and was assigned to NAS New York during the late 1940s. She's a straight SNJ-5, not a -5C (note the lack of arresting gear) and carries a modest amount of service wear, but she's far from worn or dirty. 51776 also carries her original-fit tall antenna mast, a throwback to an earlier day. The anti-glare panel is black and the wheel covers are in natural metal. Those orange bands on her fuselage signify her status as a Reserve bird, along with the "NEW YORK" identifier under her "NAVY" fuselage marking. Dick L. via Rich Dann via The Tailhook Association

NAS Pensacola has long been a hotbed of naval aviation in this country, as typified by the section of SNJ-5s in flight near that facility. In all likelihood the photo dates to the early 1950s, while they aircraft are assigned to the Instructor Basic Training Unit (IBTU) there. The airplanes are clean and carry natural metal canopy framing, along with that by this time archaic antenna mast. What beautiful airplanes! The Tailhook Association Collection
And another beautiful SNJ-5 from P'Cola. 85077 may or may not be from the IBTU but she's gorgeous, although we can't imagine any radial-engined airplane remaining that way for long! Note that here normal antenna fit has been supplemented by a whip aerial aft of the cockpit. The tailwheel strut and tailwheel are in natural metal, a point to pay attention to if you're planning on modeling this particular aircraft. Mike Kolasa/Warbird Resources via Rich Kolasa via The Tailhook Association

Up close and personal, SNJ-5 85090 formates for the camera near Pensacola. The T-6 family was always flown from the front seat if only one aircrew was present due to center-of-gravity limitations for the type, although you can see part of the bag for instrument work folded up under the aft-most canopy. Of special interest is the under-fuselage antenna fit and the stencilling evident under the vertical stab. It's hard to imagine there was ever a time when an American military airplane wasn't covered in stencils, but the T-6 family were simple airplanes in simpler, and less highly-regulated, times. Mike Kolasa/Warbird Resources via Rich Kolasa via The Tailhook Association

Here's an SNJ-5C on the boat, in this case from BTU-5 at NAAS Barin Field, during the 1954-55 time period. She's working hard on one of the NAV's CVLs doing carrier qualifications and is absolutely filthy, a classic reminder of just how dirty those round engines could be during periods of extensive usage. Modex 110 is chocked and running up with her flaps deployed prior to taxiing forward for a launch, and it's not at all difficult to Walter Mitty ourselves back to a time ten years earlier when the Fleet was filled with radial-engined airplanes fighting in The Big War. Note that this particular aircraft has yellow wheel covers and unpainted canopy framing. and that the side number is repeated on the lower lip of the cowling. The Tailhook Association Collection
Side number 637 from a CQTU out of Barin Field shoots a touch and go aboard the
USS Monterey providing us with yet another way the SNJ could appear in squadron service---in this case she's got open wheels (no covers) and no landing gear covers, while her canopy framing is yellow. She's also carrying the full antenna suite including that early
Texan antenna mast just forward of the canopy. Neither this aircraft nor any of the other SNJ-5Cs we've seen today were armed; time was rapidly passing the SNJ by and the NAV's one-time advanced trainer had become a basic trainer inching her way towards final retirement. 637 is another dirty bird and will remain that way until the conclusion of the CQ period, after which she'll receive a much-needed cleaning. Jack Cook via Warbird Resources via The Tailhook Association
Here's how it looks when you do it right: One bird from CQTU-4 out of Correy taxis away from the wire on the
USS Saipan during quals in the Fall of 1956 while another SNJ-5C rolls in to recover. THIS is how you're supposed to do it. The Tailhook Association Collection
And this is how it looks when things go wrong! This shot was taken aboard the
Monterey during 1956 and shows one SNJ-5C after recovery and prior to taxiing forward while another takes a wave-off. Since nobody seems particularly excited we have to presume that what we're seeing is all part of the day's festivities, but carrier quals during the 1950s could be hairy enough that this episode just wouldn't rate very high on the drama meter since no sheet metal ended up getting bent---we may never know! Robert Lawson NAM Collection via The Tailhook Association
CarQuals were a never-ending cycle, and these spotlessly clean SNJ-5Cs are
en route to another CQ period, in this case aboard CVL-26 (
USS Monterey) in 1955. The airplanes are from NAAS Barin Field, flown in some instances by instructor pilots who had cut their teeth in the shooting war that had ended only ten short years previously. The Tailhook Association Collection
It's worth remembering, as we look at these wonderful images of The Yellow
Texans, that a great many of the student pilots shown training in these aircraft would be engaged in yet another conflict less than eight short years away. Things were already beginning to heat up in SouthEast Asia and those guys would be ready when the call came to launch for real. That's something worth remembering---let's raise a glass... The Tailhook Association Collection
When People Bought Them Cheap
That's a relative statement, of course, but there was a time when it was possible to purchase a used, or even brand-new-still-in-the-crate, World War II-vintage airplane for next to nothing. (All those P-51Ds the RCAF surplussed out, still in their original packing crates, for $1200 USD each during the late 1950s/early 1960s come to mind in that regard). Those days are long gone, and the present cost of purchase coupled with horrendous operating expenses combine to make warbird ownership an expensive proposition indeed, but there was a time, long ago and far away, when a modified warbird was a great way to get yourself a corporate aircraft on the cheap. Take, for example, these images from the Bill Burgess collection and provided to us courtesy of Mark Nankivil and the Greater St Louis Air and Space Museum:

Here's how they all started out. N5426E started life as a TB-26C-45DL before putting on her glad rags as a civilian bird in 1968, and it doesn't take particularly sharp eyes to detect her previous identity as painted on the aft fuselage and vertical stabilizer. The
Invader experienced wing spar failures during the latter stages of their military use in SEA, but few private pilots would ever abuse them the way they were wrung out in combat, and a great many of them survive until this day. RA Burgess via Mark Nankivil/Greater St Louis Air and Space Museum
N6840D could easily be the poster child for civilian conversion of the A/B-26 family; she's extremely typical of the breed as used for executive transport. There was a time (this photo was taken in 1972) when it wasn't at all unusual to see an
Invader parked on the ramp of a municipal airport, awaiting her next business trip. That's a sight you don't see much nowadays, because the airplane, as with all warbirds, has assumed a mystique that's guaranteed an astronomical value on the re-sale market. There was a time, however... T Gibson via Burgess Collection via Nankivil/Greater St Louis Air and Space Museum
Here's what 44-34624 looked like after the Confederate Air Force painted her to to resemble the A-26s used in the ETO during the Second World War. Built as a B-26B, she was registered as N6101C when she posed for this photo in 1972, a rarity in the world of flyable
Invaders because of her pseudo-military plumage. The paint job was a mediocre representation of the real thing, but gave the public a rare chance to see a classic airplane fly. RA Burgess via Nankivil/Greater St Louis Air and Space Museum
In contrast, here's the first of a pair of A-26s flying as executive transports during the same year; 1972. First up is N240P in a classy blue and white scheme... T Gibson via Burgess Collection via Nankivil/Greater St Louis Air and Space Museum
followed by N142ER, also photographed during 1972. The heck with your turbofan-powered 21st Century executive jet; I want one of THESE! T Gibson via Burgess Collection via Nankivil/Greater St Louis Air and Space Museum
Kraft Metal Products had N256H on charge the following year, shown here torn down for maintenance. It wasn't particularly easy, nor was it inexpensive, to keep a twin-engined Air Force attack bomber in flying shape, but those who made the investment thought the expense well worth while. T Gibson via Burgess Collection via Nankivil/Greater St Louis Air and Space Museum
N320 was another survivor on the books in 1973. The
Invader was quite a step up from the other aircraft flying as executive transports during the early 70s, and several were damaged or lost in accidents. The A-26 was, and still is, a hot ship. T Gibson via Burgess via Nankivil/Greater St Louis Air and Space Museum
It's not often that an airplane gets to star in a major Hollywood motion picture, but a few years back the
Invader was center stage in the movie "Always", flown as a fire bomber. That movie role mimicked real life to a great degree since the A-26 has seen extensive service in that roll, even if the producers didn't understand quite how airplanes actually work. That said, here are a few examples to illustrate the type's service as a fire bomber:
B-26B/N9402Z, May, 1967, RA Burgess via Nankivil/Greater St Louis Air and Space Museum
B-26B 44-35552/N5544V, June 1972. T Gibson via Burgess Collection via Nankivil/Greater St Louis Air and Space Museum
B-26C 44-35562/N7954C, February 1974. T Gibson via Burgess Collection via Nankivil/Greater St Louis Air and Space Museum
B-26B 44-35497/N3426G, June, 1976. BR Baker via Burgess Collection via Nankivil/Greater St Louis Air and Space Museum
And our last fire-bomber for the day, Lynch Air Tankers' B-26B, 44-34121/N4805E, sitting on the ramp during 1977. K Buchanan via Burgess Collection via Nankivil/Greater St Louis Air and Space Museum
If my childhood hero "Sky King" had owned this "Bluebird" instead of his UC-78, there's no doubt the entire show would have been somewhat faster-paced and a whole lot classier to boot! 44-35562/N7079G was photographed on a civilian ramp in 1974 and was almost certainly the best looking airplane there! The
Invader was, and is to this day, a darned good looking airplane! T Gibson via Burgess Collection via Nankivil/Greater St Louis Air and Space Museum
This is the part where you get to humor me while I indulge in a passion for red airplanes! 44-34165/N9146H was a CalSpan-modded bird and was as pretty as they get (and as clean!) when she was photographed in March of 1977. She's a fitting bird with which to conclude today's essay on the civil
Invaders! D Ostrowski via Burgess Collection via Nankivil/Greater St Louis Air and Space Museum
Many thanks to Mark Nankivil for sharing these wonderful images from the RA Burgess collection with us!
Courage on the High Seas
Every once in a while we get a photograph that is remarkable for its depiction of courage and dedication. This is one such photo:
When I was a kid my dad would on occasion (very
rare occasion) tell me about his experiences during the Second World War in the Pacific. One such experience involved a typhoon he rode out on a troop ship while
en route to the Philippines. This shot may or may not be from that particular storm, but it shows us that the Japanese weren't the only enemy that had to be faced in a war that proved terrible for all who fought in it. These F6F-5s are identified as being aboard the
USS Kwajalein and those guys from the V1 Division could provide us with a definition of guts. Check out those weather conditions and that sea state if you don't believe me; it's dangerous enough to dump an airplane over the side by hand when the ship is sitting in an anchorage in calm water. To attempt it in that sort of weather could define the courage of a generation. It had to be done. They did it. Think about that for a minute, because their sons and daughters, and
their sons and daughters, are still out there, in all weathers and all conditions, bucking the odds so we can lead the lives we have. Call it courage. Call it devotion. Call it guts. I do believe some thanks are in order... Rocker Collection
And while we're thanking people, Bobby Rocker has spent a lifetime collecting images of the American military, largely during the years of the Second World War. This incredible image is from his collection and says it all in a way simple words cannot convey. Thanks for sharing it, Bobby.
A Couple of Classy Shooting Stars
Back a few months ago, when I was hip-deep in building that Monogram F-80, Doug Barbier sent along a couple of photographs that I've been meaning to run but have never quite gotten around to. Today's the day I do it, folks, and I'm going to let Doug explain what's going on in the photos:
P-80A 44=85041, #5 (really an upside down "2") is shown at the 1949 Cleveland Air Races. That single digit unit code on the tail tells you it is from the HQ flight, even though it has the 61st squadron badge on the nose. A dummy practice bomb is hung on the wing tip - that was a weapons station too, not just for fuel. Nose, fuselage band, winged pilot's name stripe and tail stripe are red. Squadron badge has a medium blue background. Barbier Collection

Fox Able 1 P-80A 44-95242 is from the 63rd FS and still has the red nose and fuselage band. There's a blue tail band and the tip tanks are red forward and blue aft - GLOSS - paint. Note that both the wing tips and horizontal stab tips are also painted. But what really shows here is the yaw stripe on the anti-glare panel on the nose. All T-birds and P-80s had a yaw string that was attached at the front end of the stripe - no need for an instrument on the panel when all you had to do was look out the front. Lots of big screws around the upper plenum doors on the fuselage and you can see the spring loaded "suck in" doors as well. At high power settings on the ground, the air intakes were not large enough to feed the engine, so they put spring loaded aux air doors on the upper side. Not exactly sure what the red dots on the upper main wings were, but note that the fuel tank fillers did not have the red circle at this time. You can also see where a tail number has been stripped off and a new one painted on the vertical fin. All of the squadron markings, etc, were hand painted and there were wide variations in sizing and colors. The 56th FG emblem was usually, but not always, carried on the right side of the nose. Ditto on the sizing of the flags which were painted on in Germany. Tiny little JATO hooks, no "bang" seat and a couple of funky VHF antennas right in front of the speed brakes were the order of the day. Barbier Collection
All of the 56th FG Racers arrived in the Lockheed "pearl gray" but it weathered poorly and they had a work party one weekend and stripped all of the a/c down to bare metal and then repainted all of the markings. Back in the day, there was no EPA and all of the stripper, thinner and paint just went down the drains, which is why the base is an EPA 'hazmat' hazard and commercial developers want no part of it anymore...
Thanks for sharing those images with us, Doug. Now, if we only had a modern, state of the art kit!
The Relief Tube
Not today, folks! Once again I've allowed myself to get to the point where it's time to stop writing and publish, and that's what we're going to do!
Be good to your neighbor, and we'll meet again soon!
phil