Saturday, November 21, 2015

Things You Seldom Think Of, An Unexpected Display, Progress on the F-80, Stranger in a Strange Land, A Few More Voodoos, and A Dirty Bird


A Perfect Storm

It happens to us all from time to time: We start on a kit with the intention of making it one of our very best, a showpiece in the collection as it were, and then things go wrong and that special project turns brown and smelly, and then goes south in a manner worthy of the headline news. All our time and effort goes gurgling down the drain, and we're left with little of substance to justify our labor. Don't try to tell me it's never happened to you because I don't believe it; not for a minute. It's Confession Time, boys and girls, and I'll go first!

The kit that I've compromised in this, the most recent iteration of an ongoing passion play, is the venerable (and venerated) Monogram AT-6 Texan, a polystyrene offering from the 1970s that is, up to and including the present day, the best available kit of the type available in any scale. It represents an iconic airplane too, one that's served in many air forces and navies, and which is flying in the hands of a myriad of private owners right up to and including this very minute. The airplane, and the Monogram kit of it, are classics.

To be perfectly honest about things, however, those venerated and classic old Monogram kits are, for want of a better term, somewhat cranky to build. It's not a case of bad dimensions, at least not most of the time, and it's not for lack of detail (some of those old Monogram kits have better and far more accurate detail than the very latest of modern wunderkits, so there!). It's not even the raised panel lines, that bane of modern civilization, that causes the Monogram kits to suffer. No; it's all in the fit of the big pieces, and nothing more. Treat any model from The Big M with the same sort of respect that you'd give to any of the more recent Known Bad Actors in our hobby, and I'm specifically thinking of Classic Airframes and similar ilk here, and you won't have any problems with your project. That is, of course, unless you induce those problems yourselves, which takes us to what may eventually become The Point of this discussion.

If you have a good memory, a handy tool to possess considering my current frequency of publication, you'll remember that I started a Monogram T-6 several editions or so ago, and you'll also remember that I promised to keep you abreast of the progress, or lack of same, of said edifice. After that things pretty much went quiet on the T-6 front even though the big pieces all got stuck together, puttied, and sanded, and the resulting semi-completed airframe has been sitting on the shelf, patiently awaiting its turn to be completed. Then, a couple of weeks ago, I more-or-less rediscovered the hulk and decided it was time to finish the model, which is pretty much when things started to go painfully wrong.

For starters, there's the paint. I'd wanted either a post-War SNJ or a T-6G of the same flavor, and I wanted it to be in that deep yellow that, to me at least, typified the Texan family during the '50s. As things turned out I'd accidentally purchased the perfect paint out of the closeout bin in a local hobby shop; a bottle of Floquil CNW Yellow that was not only the right shade of yellow but was also glossy; it was the dream paint for T-6s, SNJs, and Navy T-28s of that era. It was also a Floquil product, which meant it had been discontinued several years before, but I'd found a bottle! Good Fortune was smiling on my project, but not for long.

You might be inclined to think I'd pooched the paint-job, given the overall tone of this missive, but that wouldn't be the case. No; the paint was darn near perfect, even if I do say so myself. Disaster lay in other, post-paint directions.

Let's start with the landing lights, where I'd carefully installed a set of MV lenses, followed by careful blending of the transparent covers that went over them. I still, to this day, don't know why those covers frosted over on the inside like that, but they didn't do it for the months the model sat after they were installed. Instead, they waited until the model was painted, and then they frosted. Colorful language ensued, followed by the-adult-thing-to-do decision to leave well enough alone and move on to the decals. Those would be easy. What could possibly go wrong?

By this time I'd decided that the model would represent a post-War Air Force bird, since I had seen more than a few of them when I was a kid, but for whatever reason I changed my mind, choosing instead to build the SNJ-5 offered in my kit's decals. They seemed thin enough, the markings were accurate, and a yellow Navy bird with orange stripes could be just the ticket so I plunged ahead, starting with the fuselage band---the logic was that it would set the pace for everything else and that it could be easily removed if things went wrong during its application. It seemed like a good idea and it would have been, too, if that orange band hadn't been undercoated with white when it was printed, a process that really popped out the color but made the band more than a little thick, which required multiple applications of Solvaset in order to get it to lie down properly. Said decal solvent was working though, right up to that part where I decided I wanted an Air Force bird after all. The decals were still partially wet, so it would be a simple matter to put a piece of tape on them and just yank them right off of there. That's when I discovered that the aforementioned Solvaset had partially melted the decals right into the model's paint and they weren't going to come off! Sandpaper and a partial re-paint fixed the problem, but if you hold the model up to the light, squint, and hold your tongue just right, you can still see where it says "NAVY" under that pretty yellow. More colorful language ensued, and the increasingly adult Phillip counted his losses and moved on to The Next Disaster, which came as part and parcel of the anti-skid strips on the wings.

Anybody who's ever seen a photo of a real (as opposed to a Warbird) T-6 knows that those anti-skid strips are goofy, because they look like they're on there backwards. I knew that too, so I made careful plans to ensure they went on the right way, side for side, and made a list, checked it twice, and then put them on. That was when I discovered that all my careful planning was for naught and I'd managed to accomplish the very thing I'd planned so hard to avoid. Remember that colorful language part? Ok, 'nuff said.

I'd finally gotten to the part where I had to concede defeat to the model. It had won and I had lost, a status that made my discovery that the post-War T-6 family wears it's wingtip-mounted nav lights on the end of the wingtip rather than on the tops like the kit gives it a moot point.

The kit will be finished, although I'm guessing quite a few of you had surmised that it wouldn't be. It'll be a three-footer, my first in quite a few years, but it'll be on the shelf just the same. Smirking, I'm sure...

Sound of the Beatles' "I Should Have Known Better" playing in the background. Fade to black...

And here it is in all its yellow glory: The Texan That Could Have Been. It doesn't look all that bad at first glance, but check out that badly frosted (from the inside; of course) landing light cover. It isn't horrible in and of itself, but it's just a tiny portend of things to come. If you look just to the right of the fuselage corcarde you can see the painted-over remains of the kit decal that now lives there---every single thing I did to remove it didn't do that and sanding wasn't an option since I wanted to preserve the kit's rivets (the T-6 family are absolutely covered in universal-head rivets and it's part of the airplane's personality).What you can't see in this view are the backwards anti-skid walkways on the wings. That shiny yellow paint looks good, though...

In the truest sense of I'm nothing if not honest, here's a slightly different shot that shows that gomed-up walkway. It also shows the kit's tailwheel, which should have been replaced by one off a P-51D and which will be someday, and also shows the NM-finished back-sides of the MLG wheels, which should be yellow. On the plus side, and I guess there had to be one, this shot gives a slightly better view of the black-painted ADF "football" found on the fuselage spine of some USAF and ANG T-6Gs. That particular component came from a 1/48th scale Hasegawa P-40E and is perfect for updating a Texan. This view also allows you to see those inappropriate-for-a-G nav lights on the wingtips. It's not too late to fix them but I'm not going to do that, at least not anytime soon. In theory I just need to paint and attach the canopy stack and a radio antenna mast and this one's done, but I'm just the least bit apprehensive about doing that given everything else that's gone wrong with the project. This is the part where I'd normally tell you to watch these pages for photos of the finished model, but that may not happen this time! Big sigh...


They Were Never Far Away

The American war effort during World War 2 was a manly thing, fought in an era when relatively few women were in the service and even fewer, not counting those astoundingly brave members of the medical corps, were anywhere near the front lines. That's true, right? Right?

Well, maybe not. There were WACs and there were WAVEs, There were USO performers and there was Rosie the Riveter, and then there was the American Red Cross. While it's true that their activities were removed from the front to a great degree they were still there, making life a little less miserable for the guys on the sharp end of things. This photo was taken on Morotai during 1945, which means that the young woman serving the coffee is in relatively little immediate danger from the Japanese, but her very presence meant the world to those guys; a tiny bit of home in a crummy place. I'm willing to guarantee you that everyone of those guys was having a better day because she, and everything she represents, was there to help and to bring them a little bit of Home. Kindof makes you think twice about things, doesn't it?

Thanks, as always, to Bobby Rocker, a man who's taken the time and made the effort to collect photography covering all aspects of that war, and who's continued willingness to share that collection has made our understanding of the conflict a little easier.                 Official via Rocker Collection

This Ain't the Way It's Supposed to Happen

Or, to put it another way, sometimes it goes wrong no matter how good you are. A friend of mine sent me the link below a few years back---it's off a shooting forum but is 110% aviation, and is worth a read. You may even recognize the name of the guy who wrote it...

http://www.rugerforum.com/phpBB3/viewtopic.php?f=1&t=169272

Shooting Star Redux

It must be Monogram Time around here today, because I've got a couple of photos of yet another product of Morton Grove to share with you!

Looking very much like a completed airplane, here's that F-80 we began an issue or so ago. Finished it's not, but it's not all that far away from it either, so let's take a look at it. First up is the airframe; by far more accurate than that of any of the other 1/48th and 1/32nd scale kits of the type---I haven't looked at any of the current crop of kits in 1/72nd so I'm leaving those out! That ancient Monogram kit builds up quite nicely, thank you, and there's nary a seam to be found if you're careful during construction. At this juncture the model is very nearly done, needing just a gun sight, canopy/windscreen, and under-wing hangies to be considered finished. Markings are from an old AeroMaster sheet and the red paint on the nose cap that mostly matches the red of the fuselage flashes is from one of those little square-bottle Testor enamels. The gun barrels are from a Tamiya P-47D and just need to be painted, and I've got to come up with a set of stretched Misawa tanks, having temporarily abandoned my notion to arm the thing with a quartet of 1,000-lb GP bombs. There's also some minor paint touch-up to do but I might ignore that since sloppy trim paint seems to have been a hallmark of Korean War-vintage F-80s. We shall see...

Here's the other side for your perusal. There's not much to say about this side that's not covered in the caption immediately preceding, except that the port side of the airplane wasn't adorned with nose art so there's nothing much to see here that we haven't already looked at. The photo does, however, point out how clean the F-80 looked, and what a beautiful airplane it was. We can only hope that those guys who are doing the new 1/48th scale T-33 will have the good sense to kit a state of the art (and accurate) F-80 as well! Hope springs eternal!!!

Guess Who's Coming to Dinner?

A couple of weeks ago a group of my internet friends began a somewhat lengthy electronic discussion fueled by the last flight of the last flyable Avro Vulcan, an event accompanied by a very public (and, we're equally certain, very illegal) barrel roll as the final hurrah to the end of a most remarkable flying career.

All that discussion, a thread of e-mails and responses that lasted over a period of several days, reminded me that Jim Wogstad and I had made a trip to Randolph AFB back in 1979 to witness the arrival of a Vulcan B Mk 2 from 50 Squadron RAF. Its arrival from its home drome (RAF Waddington) caused quite a stir in Texas and resulted in a unique photo opportunity, a portion of which I'd like to share with you today.

The Vulcan is a relatively small airplane as bombers go, but still big enough to make quite an impression the first time you see one for real. Here's XL387 recovering at Randolph during a rare moment of sunshine on that Spring day. The deployed speedboards are noteworthy and no, Virginia; I don't PhotoShop my slides (although I do clean them---honest I do!). You'll have to live with the dust this time!   Friddell

Someone must have figured that a British airplane needed to be greeted by the cheerleaders from an American high school named after an Englishman, which is the only reason I can think of to have XL387's crew greeted on the transient ramp by the Churchill High School cheerleader squad. In spite of that tiny bit of incongruity there were smiles all around as the somewhat bemused flight crew got out of their airplane for a quick round of grip and grin with the Colonials. It probably seemed like a good idea at the time.   Friddell

One of the first things that grabs you about the Vulcan is its size, or relative lack thereof. It's a bomber, and one that was designed to cross a continent to deposit a thermonuclear device on The Bad Guys, but a great deal of the airplane is comprised of wing. Those people standing under the nose of XL387 give a good idea of scale; the cockpit is tiny and cramped and the entire airplane is mission-oriented. There's nothing there that isn't required to get the job done.   Friddell

See what we mean? There's a whole lot of wing platform there and the airplane sits tall on its landing gear, but Big the Vulcan was not, and it was extremely difficult to detect when performing the Low/Low mission it was tasked with during the latter portion of its career. That ability to hide in plain sight, plus the extreme professionalism of the RAF's aircrews, made it a tough nut to crack and gave Great Britain a viable manned nuclear deterrent for far longer than anyone would have thought possible.   Friddell

The view from inside that claustrophobic cockpit was marginal to say the least, but it was adequate for the task. This view provides us with a look at some of the aircraft's many NATO-standard stencils and definition of the sharp demarcation of the camouflage paint.   Friddell

Here's a view of the Wing and Squadron markings on XL387. Modelers should note that the airplane is minimally weathered and clean. While we've got no doubts that the aircraft used in the Black Buck strikes during the Falklands War got more than a little scruffy during the course of the conflict, this is the way most of the Vulcan force looked most of the time. Those aircraft were old, but extremely well-maintained.   Friddell

The Vulcan's aircrew were all accommodated in a relatively small space in the nose. This view shows the crew hatch and boarding ladder to what aviation enthusiasts once called "advantage". The airplane was most assuredly not designed around crew comfort!   Friddell

 The nose gear leg was a beefy and relatively simple structure and was painted black, at least on this example. Note how the aircraft serial is repeated on the nose gear door.   Friddell

And here's one of the main mounts. This structure is somewhat more complicated than the nose gear and could be a detailer's dream (or nightmare!) on a scale model. Opportunity, as it were!   Friddell

This photo was also taken at Randolph but is not XL387 and was shot somewhat later in time, during the early '80s. but it provides us with an excellent view of the planform and and the size of the bomb bay, as well as the lower camouflage demarcation. It's a good way to end this essay, we think.   Friddell

Just When You Thought It Was Safe to Come Out...

We've been running an informal series of McDonnell F-101 Voodoo shots over the past several issues and we're not done yet! Thanks to Mark Nankivil and the Greater Saint Louis Air and Space Museum, here are a few more photos of the bird for your perusal:

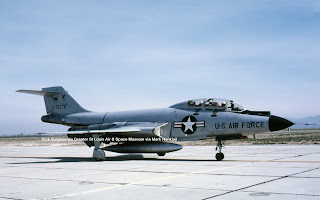
57-0320 was an F-101B-90-MC from the 87th FIS, and is shown here while on display at a McAir open house during 1964. A relative failure as a tactical fighter in any guise, the Voodoo shone as a photo recon platform and, in the B-model, as an interceptor. The B got a rotary-doored internal weapons bay (as well as the ability to mount air-to-air weapons to that door's external surface) and had the legs to go with the mission. The Voodoo's internal volume allowed for the fitment of a second cockpit, and ADC (as well as the Canadian Armed Forces) ended up with a fine interceptor as a result. 0320 was eventually converted to TF-101B status but was still a straight-up interceptor when this shot was taken.   RA Burgess via Greater St Louis Air and Space Museum via Mark Nankivil

May of 1967 caught 57-0278 (an F-101B-85-MC) taxiing out for a sortie. She was a relative "Plain Jane" at this point in her career (a time period that Jim Wogstad once referred to as ADC's artistic "Neuter Period" in terms of markings) but was an active service bird all the same. She's only carrying one gas bag, which is somewhat of an anomaly for the type, and is beginning to get a little bit shop-worn. This photo shows the red insides of her landing gear doors to advantage, and also provides us with a good view of her IR sensor. She survived her AdCom career to end up at Davis Monthan in 1976.   RA Burgess via Greater St Louis Air and Space Museum via Mark Nankivil

56-0235 was an F-101B-40-MC and was on the ramp at Wright Pat on September 17, 1971, when Doug Slowiak took her portrait. Assigned to Systems Command, we suspect she was involved with some sort of developmental work but have to admit we don't know anything about what the project might have been. We do know that she's missing her IR sensor, which would have been standard fitment at the time, so she's not 100% up to interceptor configuration, but beyond that your guess is as good as ours!   D Slowiak via Greater St Louis Air and Space Museum via Mark Nankivil

Here's an early shot of 57-0272 in full ADWC markings while involved in the ATAR Mod program at Tyndall. Of interest in this shot (aside from that TISEO sensor hanging under her nose) are the red interior gear door surfaces and the identification light beneath her aft cockpit. That light was fitted to the B-model to allow the positive identification of unidentified aircraft at night---the Voodoo would formate on the starboard side of the bogie and illuminate it allowing determination of type and, presumably, intent. That sort of nocturnal intercept must have been quite a ride, all things considered!   F McSorley via Greater St Louis Air and Space Museum via Mark Nankivil

Not everything is quite as it seems in the world of military aviation, as exemplified by this particular aircraft. 57-0272 was built as an F-101B-85-MC but was in F-101F configuration when this photo was taken on 25 April, 1974 on the ramp at Tyndall. That's a TISEO sensor mounted under her nose, and she's assigned to the ADC (check out the badge on her tail). That "0" in front of her serial number means that the airframe is over 10 years old and does not signify that the airplane is obsolete. The two-seat Voodoos were, in many respects, the most successful of their breed.   D Ostrowski via Greater St Louis Air and Space Museum via Replica in Scale

A somewhat well-used 57-277 (an F-101B-85-MC) survived ADC service and was last seen in Florida, hopefully under restoration for display. She was still on active duty in 1976, though, when Tom Brewer snapped her portrait on 12 September. She's only carrying one aux tank, much like 57-0278 above---it's a point worth noting if you're a modeler and plan on building a replica of this aircraft.   T Brewer via Greater St Louis Air and Space Museum via Mark Nankivil

We've run more than a few images of 111th FIS/147th FIG Voodoos during the course of this project, so you might wonder why we're showing you yet another one. The reason is simple if you look at what's hanging off that weapons door; it's an AR-2 Genie air-to-air missile! 57-0347 was built as an F-101F-91-MC, and was at Tyndall AFB participating in a William Tell competition when this photo was taken in 1976. You don't often see illustrations of Genie actually attached to an aircraft, making this shot somewhat unique.   LB Sides via Greater St Louis Air and Space Museum via Mark Nankivil

The "Texans" of the 111th FIS are one of the first units we think of when somebody mentions the F-101B, but "The Happy Hooligans" of North Dakota's 178th FIS are another of the outfits that almost always come to mind when talk turns to the "Bravo" Voodoo. 57-0252 (an F-101B-80-MC) ended up in a museum at Hill, but was very much on active duty in May of 1977 when this photo was taken at a public display---note the brown wrapping paper taped over her intakes!   RA Burgess via Greater St Louis Air and Space Museum via Mark Nankivil

We've got quite a few more Voodoos to share with you, but that's going to have to be an adventure for another day. Many thanks to Mark Nankivil and the folks at the St Louis Air and Space Museum for sharing these images with us!

And the electrons were scarcely dry on the page when I received this comment from Doug Barbier:

That first Voodoo is from the 87th FIS at Lockbourne AFB, OH. You are right, since the Genies were carried internally, you rarely saw one hung on a -101. Just like pulling the plastic safety caps off of the Falcons on the Six - as soon as the load was complete, the last thing that happened was that the caps came off and the rails were retracted. Or the rotary door spun. Made it hard to get photos. Woodoos could not launch any armament with external tanks on, so they gave up most/all of their range when sitting alert. That and it turned them into a real slug, speed wise. Even a Deuce could outrun a Voodoo carrying tanks. Not allowed to jettison tanks on the home country you know....... a single tank configuration was quite common with them - it was the best trade-off between range and drag. Kind of like the 2 bag vs 3 bag F-16A. The c/l tank was empty before you got airborne, so if you carried one, it was merely drag for the entire flight. The only advantage was if you were going to be aerial refueled, it would help from that point on. But the drag vs fuel made it a real close thing even then.  Doug

All Beat Up

And really dirty to boot! this shot, once again from Bobby Rocker's collection, shows us how beat to snot an airplane could get in the SWPAC:

This grungy-looking P-38G was assigned to the 9th FS/49th FG at Dobodura in 1943, and is of interest to the modeler because it defines the way the upper surface paintwork wore through at the back end of the aircraft's center section, where the pilot and maintenance crew mounted the aircraft to get to the cockpit. That wear is there all the time on the OD/NG P-38s, and needs to be on your model too. Note also the covers over the boom-mounted turbochargers and the propellers, which are plain black without yellow tips. You might also note the general condition of that "hardstand" the aircraft is parked in. There were no easy days in the SWPAC...   Rocker Collection

The Relief Tube

Letters---we get letters...

But nowadays they aren't all what they seem to be. Not a day goes by that we don't receive a half-dozen or more spam e-mails. Most are from folks who want to sell us ball-bearings, or want us to send money to our new best friend who resides in Name-the-Country, or something else equally silly and obvious. Those things are a nuisance of the highest order and get deleted without being read; everybody who operates a web site gets that sort of thing. It's just part of the cost of doing business, electronic junk mail, as it were.

Lately, though, The Spam Clan have been taking a new approach, using relatively normal (to us, anyway) names and with subject lines that directly relate to something we've previously published in the blog. It's a clever approach, because it's sometimes hard to tell if it's a real communication or just more electronic mischief. It's also potentially dangerous to the site and to the project, since it's impossible to know what sort of malware, spyware, or other nastiness might be embedded in the message. Bad Pookie, as it were, and it's gotten to the point where it has to be dealt with, SO:

Beginning right now this minute, and continuing for as long as I deem it necessary, unless you're a long-time Replica correspondent you need to be really, really specific in your subject lines if you want me to open or respond to your e-mails. Make certain that I know, beyond any shadow of a doubt, that you're a real person (and are who you say you are) writing a real e-mail having to do with something germane to the purpose of this blog. If the subject matter or the name seem at all questionable, the message is going to go straight to the trash can, or whatever they call that sort of thing on a computer. I hate to do it but it's necessary, at least for a while. Be patient!

And that's it for today. Keep those properly-identified electronic cards and letters coming, and we'll meet again soon!

Be good to your neighbor (but don't send them spam!).
phil

Saturday, September 12, 2015

Another One That Deserves a Better Kit, A Cool Cat, On The Boat, and Ready to Rumble,


Tales of Misawa: The Scaredest I've Ever Been

As you all may remember (and Lord knows you should, since I've told you about it often enough!) I spent a considerable portion of my high-school days at Misawa AB in northern Japan. It was, all in all, a teenage boy's dream come true; no responsibilities other than school to worry about, a foreign country to explore, a motorcycle to explore it on, and, perhaps most importantly lots and lots of airplanes to look at.

Misawa during my time there (1962 until 1965) was home to the 39th Air Division and was charged with the protection of that end of Japan, among other duties (we aren't going to discuss the Other Duties the 39th performed that caused F-100Ds of the 531st TFS to rotate deployments out of South Korea on a regular basis), and until late 1964 the place was literally swarming with airplanes. The JASDF was there of course, with T-6Gs and C-46s from time to time, while the 39th was mother to the 4th FIS (F-102As), the 45th TRS (RF-101Cs), and, for the greater part of 1964, their very own pair of F-100D squadrons (the 416th and 531st TFSs). Add in a hefty dose of transients and you can well understand why a teenage kid who was hooked on military aviation and enjoyed building model airplanes was quite literally living the dream!

There was a serious side to it, though, since there was only one reason why we were there at all. The Cold War was ever-present, and a thermonuclear confrontation with those bad guys was quite literally just the push of a button away. My dad's assignment to Misawa began in October of 1962, and I'm going to presume I don't have to explain the significance of that particular month and year. We dependents led a relatively carefree life, but our fathers were quite literally on the front lines of The End of the World. Sometimes that reality came crashing home to us and gave even the most frivolous of us something to think about. At that point in my life (and in most others as well) I was frivolous, quite possibly to the extreme, but one night in 1964 came the closest to changing things away from frivolity that I've ever personally experienced.

Now that the stage is set, and before we get to The Good Part, I probably ought to explain that Drama is often in the eye of the beholder and/or participant, and one person's drama may well be another's amusement or, quite possibly, boredom. You get to pick whichever you prefer once you've finished reading, but I'm going to tell you right now, and without embarrassment, that I was scared that night; the most scared I've ever been in all my years on the planet. Here's what happened:

If you grew up on Air Force bases during the 1950s and 60s, you grew up with a phenomenon known as The Alert. That didn't mean all that much on training bases, but on a SAC, TAC, ADC, USAFE, or PACAF base it was an event often accompanied by high drama because of the ever-present possibility that the alert wasn't for practice but was in fact The Real Thing (I've personally seen people, women and children, nearly trampled when the alert horn went off in the BX on a SAC base), and there was no way to know which one it was, at least for a dependent, until after the whole thing was over and done with. It was a normal part of life.

That particular normalcy was an ongoing thing at Misawa in those days. Vladivostok was an easy flight away, as was North Korea, and alerts were an ongoing part of the adventure until that one night when the base siren went off in the wee hours. My dad, along with every other service member on base, responded to the sound by jumping out of bed, throwing on his uniform, and running out the door to get to his squadron area. All the racket woke me up, of course, and I lay there listening for The Good Part, because the 39th AD often launched the duty pair of "Deuces" when such festivities occurred and it was fun, if you liked airplanes, to listen to them get off the ground. That night wasn't a disappointment, but on that occasion there was a whole lot more to it than just a couple of F-102s getting into the air.

If you're around airplanes very much at all, you soon begin to recognize different types simply by their sound. The F-102s were unique in that respect, as were the RF-101s, and nobody who's ever heard a "Hun" launch can forget the sound it makes when it goes into burner, so it was relatively easy to figure out what was getting in the air that night, and when.

The 102s got off the ground first, as to be expected, and then there was a lull. It was just another alert, or at least that's what I thought until eight or ten minutes later, when a pair of "Huns" launched, followed by another pair, and then another, and then another. The air around the base was filled with jet engine noise as fighter after fighter was started, run up, taxied, and launched, mostly F-100s but with a 102 or two in the mix, along with at least one "Voodoo", and it quickly became abundantly clear that everything capable of getting airborne that night was being launched. It took a few minutes for the significance of it all to settle in, and I didn't go back to sleep until I heard the first aircraft recover an hour or so later.

My dad didn't come home the next morning the way he normally would have, but returned to our quarters around midday, for lunch. I was there too, and I asked what was going on the night before; his response was "you don't need to know". One of our neighbors was an armament and electronics type assigned to the 4th FIS, and he was the next adult I ran into as I left our house on my way back to school. My question to him got pretty much the same response I'd received from my dad, and he looked spooked when he told me not to ask about it. Similar questions to other GIs in my acquaintance got me pretty much the same answer and I still, to this day, don't know what happened that night. I do know that it brought home The Cold War, and my dad's part in the whole business, in a manner that nothing else short of nuclear conflict could have.

Why am I telling you this? Easy; because the incident drove home, to me at least, the reason those airplanes existed in the first place, and it brought clarity to the reason my dad, and all those other men and women, were standing on the wall every night ready to protect us all. That night clarified, as nothing before ever had, what those plastic models I loved to build actually represented. It was a wake-up call of sorts.

Let's raise a glass...

Kickin' It Old School Just One More Time

It's easy to get really spoiled with this hobby of ours, and it seems like not a week goes by without some new wonder kit hitting the shelves, or some new decal sheet, or some amazingly-detailed resin or photo-etched bits. It's all there, it's all for us and it's mostly all new. All we have to do is buy it, often for a pretty penny, but it's all worth it because it's new, right? Well, ok; maybe it's a re-issue and not exactly new, or maybe it's new but not exactly good---the current generation of UberKits come in all sorts of flavors, don't they? Today's flavor isn't a brand new kit, though. It's an old friend, at least to some of us: Monogram's 1/48th scale Lockheed F-80A. Originally released in 1977, it's a dinosaur to a great many of today's modelers, and a virtually unbuildable dinosaur at that; a kit characterized by poor fit and difficult assembly. It's a model totally unworthy of our attention, right? WRONG!

As things turn out, that ancient old F-80 from Morton Grove just happens to be, Right Now This Very Minute, the most accurate F-80 kit available in any scale and guess what? It's perfectly buildable too! Yep; all those pieces that allegedly don't fit each other go together just fine, thank you very much; all you need to get the kit together is patience and a little bit of basic modeling ability. Just watch and see!

The first thing you'll need to do is deal with the fuselage halves, which are broken into right and left sides and forward and rear sections. The kit's designed that way so you can pull the fuselage apart and display the back half of the engine, which was once considered to have state-of-the-art detailing. That was Then---this is Now, and that engine just won't get it done any more, so let's ignore it as a display item and use it as a piece of structure instead. Assemble those fuselage sections front to rear, and make sure they're properly aligned with straight, flat mating surfaces. Let them dry thoroughly, and then sand them smooth (but don't putty the seam since there's one in that exact place on the real airplane!). Once all that's done, cut the tailpipe at the place shown in the photo above, assemble what's left of the engine, and glue it into one of the fuselage halves. Which one doesn't really matter very much; just make sure it fits and make equally certain those halves will go together without a gap. You may have to knock off some of the combustion chamber detailing on the engine in order to do that but it's nothing to be concerned about, since we're only going to use the engine to locate the tailpipe within the fuselage anyway---you won't be seeing anything of that powerplant this time!

See what I mean? The tailpipe you see is a piece of K and N brass tubing cut to length, using the now-removed kit part as a template for length. Cut your brass tube a little longer than it needs to be, treat it with some sort of brass-blackening solution (I used a model railroad product called "Blacken It", but pretty much any product of that nature will work), then wipe 5-minute epoxy inside the kit engine, shove the tailpipe up in there, and secure it until it cures. Make sure you've got that brass tube properly aligned (top-to-bottom and side-to-side) while the epoxy is setting, make sure the right amount of it projects outside the fuselage, and you're golden. One thing to watch for with this step---those brass blackening chemicals are all way past Nasty and can cause considerable harm to living beings, so read the instructions that come with them and follow them to the letter. Be especially sure to keep them away from short people if you have any of those in your household, and away from pets too. (A workaround for that particular product would be to airbrush the brass tube inside and out with some sort of metalizer meant for hobby use, and we heartily recommend that course if you have even the least concern about using the other stuff.) Fore-warned is fore-armed!

Monogram's F-80 is reputed to be a confirmed tail-sitter, but it's honestly no worse than any other tricycle-geared model airplane, and nowhere near as bad as any P-39 is to deal with, so let's get that out of the way next. See that little clear rod laying just behind the kit's wing? That particular doohickey is a prop that the manufacturer included for the modeler to use if they couldn't figure out how to get weight in the nose. We aren't going to need it, so turn it upside down and glue it into the appropriate hole from the back side of the wing (that's the part as shown, for those of you who tend to get confused by such things). When it's dry, clip off most of it so it won't hit the bottom of what's left of the engine, and clean up the other side of the wing---there won't be much to do there if you're careful, so be careful! Next you'll want to drill out those pylon holes in the wings, at least if you're doing a Korean War bird, and carefully dress the mating surfaces at the front and back of the wing center section. That area is one that's allegedly hard to make fit correctly, but it just ain't so IF you're careful with your cleanup and basic assembly.

At some point you're going to want to ballast this thing so it'll sit on its nose gear, so let's take a look at one way to do that. The first thing you'll want to do is build up the interior, because you're going to need it for component alignment in a few minutes. Correct the angle at which Monogram has you seat the instrument panel into place since it's not slanted back like that on the real airplane, and cut away all of the structure on the inside of the left fuselage nose---it's there so you can display the kit's poorly detailed gunbay, and we're not going to do that. (At least I'm not. You can do it if you want to, but you're going to have to figure out how to ballast it yourself if you decide to do things that way.) Glue the forward part of the interior into place since it also serves as part of the cockpit floor, and install the resulting assembly into the model once you've got things detailed the way you like them. Next, take the ballast agent of your choice and put it into place using 5-minute epoxy, making certain that you don't foul the depressions that are intended for your gun barrels! I used a .495 diameter lead round ball, with a .375 diameter ball added just to be sure, and watched over the whole thing while the epoxy set, just to be certain nothing shifted while the stuff cured. Next you'll want to deal with the gun barrels. The kit provides a set, sortof, but they're done with 1970s technology and aren't all that good. I had an extra set of 1/48th scale Tamiya P-47 blast tubes laying around from a recent project (I used Master Barrels on that particular "Jug" so the kit barrels were spares) and they proved to be perfect for use on an F-80---they were the right diameter, could easily be cut to length and, most importantly, already had a hole in each end thanks to Tamiya's use of slide-mold technology on that Thunderbolt kit, so there were no holes to drill! With all of that done, the fuselage could be assembled. Progress, as it were!

It's time to start putting the big pieces together and getting this thing to look like an airplane! In my personal world opened panels on models generally aren't (shown opened, that is), because I prefer the completed projects to look somewhat like a real airplane would appear when sitting on a ramp, so that gun-bay panel that Monogram so thoughtfully opened up for us has been closed and sanded smooth. Four of the six .50 machine guns (those Tamiya barrels) have been installed; the last two, the ones at the very front, will go in after the sanding of the nose is completed and any unit markings are painted. The kit's somewhat lumpy and inaccurate gun sight is now gone, to be replaced later on in the project with a resin component, and the fuselage halves have been carefully fitted together and assembled with Tenax---doing it that way means minimal sanding and a little bit of polishing, which will simplify your life considerably. So far only a tiny bit of putty has been used, and the only reason for its use has been to repair things that I gomed up as I was going along. The only thing that really bears watching is making certain that everything that needs to be inside the model is actually there before you close up that fuselage. Oh, and the interior is slightly modified from the one supplied by the kit. I could've done more (an Eduard Zoom set intended for That Other F-80, for example), but it's not a big cockpit and I wanted to try an Old School build on the thing. So far, the only items used that weren't in the kit to begin with are the tailpipe, the guns, and the ballast weights.

Here's the other side of the assembled fuselage, mostly to show you what that side looks like. There's a tiny L-shaped pitot-thingy molded up under the nose and so far it's still there. We'll see how long that lasts, I suppose, but for now everything is pretty much where it should be. It's beginning to look a little bit like a Shooting Star, isn't it?

The horizontal stabs and elevators really show their age on this kit, but there's nothing there that's insurmountable. Each part has a pair of sink marks that require filling and sanding, and the port-side piece has a copyright mark and the letters MMI that need to be sanded off, but that's about it. Clean 'em up, polish 'em, and set 'em aside for a while!

Here we have an assembled wing, painted, sort-of, and in some respects ready for installation on the airframe, even though we aren't going to do that just yet. Instead, we're going to let the paint (Floquil Old Silver) dry for a few days to make sure it's good and hard, and then polish it out with a soft cloth. Once that's done it'll be time to go back with low-tack masking tape (or, more likely, Post-It notes), and mask the few areas of the airplane that are in contrasting shades of natural metal so we can address that part of the painting process. The holes for the kit's wing pylons have been pre-drilled but the pylons themselves won't go on the airplane until after the under-wing decals have been applied, since the pylons were installed over the markings on the real airplane. Doing things this way will simplify life as well as reduce the profanity level in your workshop. One more thing before we leave the bottom wing assembly; Korean War F-80s often had an additional set of pylons inboard of the "normal" ones to allow rockets to be fitted to the aircraft in addition to bombs or napalm. The kit doesn't provide them so you'll have to decide for yourself whether you want to scratch-build a set or not---they're not always there, but they're really obvious when they are. One final note: Those little doohickeys on the aft center-section of the wing are supposed to represent the hooks used to mount RATO bottles to the aircraft. It's entirely likely that this particular model will have those bottles attached (stolen from the F-84 kit of my choice) and that simple act will hide the fact that the kit's hooks really aren't, but if you're after a super-detailed F-80 and don't plan on mounting RATO, it might be worth-while to replace those little bumps with actual hooks. That's your choice, isn't it?

And this is what we've got after ten or fifteen hours of on-and-off work on the F-80. The wings still aren't attached since I haven't painted the anti-glare panel or nose markings yet and life will be far easier if I don't have to contend with a set of wings sticking out of the sides of the airplane when I do that. The paintwork looks pretty crummy in this shot but in theory it won't be that way for long since everything will be polished with the afore-mentioned soft cloth once the paint has completely cured, after which a handful of selected panels will be painted in a contrasting shade of metal (or maybe treated with Rub-N-Buff, who knows?) before the anti-glare panel, radar cover, and unit markings are applied. The horizontal stabs have been pre-fitted and will not require putty, so they've been painted too and will go on the airplane once all the other paint-work and decaling have been completed. It's beginning to look a little bit like an airplane, isn't it?

Let's take a break from the modeling side of things and take a look at a couple of real F-80s, just to keep your interest up! 49-1849 was built as an F-80C-10-LO and was in her prime in Korea when this photo was taken in 1952. The ID on the original photo says she's from the 49th, but the style of nose marking makes it far more likely she's actually from the 25th FBS of the 51st. She's got Misawa tanks under the wings and a command stripe on the aft fus, while her wing pylons are carrying 500lb GP bombs. We suspect the photo was taken fairly early in 1951, but reader comments are welcomed (as is additional photography!).   Kerr Collection

Here's another view of 1849, probably shot on the same day and showing her taxiing past a T-33A from the 16th FBS. The flaps are lowered in this view and she's probably just about ready to turn off onto the active, although we have no way of knowing for sure. It's a murky shot, but it gives a feel for the operational conditions encountered by the USAF during that Spring of 1951.   Kerr Collection

Speaking of murky shots, here's another one that's absolutely tantalizing from the collection of Bob Esposito. 49-0739 is another F-80C-10, this time from the 25th FBS/51st FBW. She was damaged by ground fire in March of 1951 (always a threat to F-80 operations) and could possibly be undergoing repairs here, although we doubt it. A couple of things of note in this photo include her empty gun bays and resulting "sit", her extensive mission markers, and her name, which appears to be "Night Take Off". If you've got clarification or additional photography to share, that address is, once again,  replicainscale@yahoo.com   .  Spammers need not apply!    Esposito Collection via Kerr

Just How Cold IS It?

Plenty cold, at least if you take this image into account:

The squadron is VP-41 and the place is the Aleutian Islands, where we find this PBY-5A being bombed up prior to another mission. P-5's paintwork and markings place her solidly into the 1942 time period and she's heavily secured to what passes for the ramp in this shot, and there's no doubt that this is anything but desirable duty! One thing of interest, and yet another question for our eagle-eyed readers: If you look carefully along the leading edge of her port wing (that's the one on the right in this photo) you can make out what appear to be a series of red and white poles sticking upright out of the ground and extending up above the wings. We've never seen this particular thing before---maybe you have?   National Archives via Rocker Collection

At any rate, this photo could be THE photograph describing the hardships our guys faced during the Second World War, particularly since things are obviously so lousy and they aren't even in combat! It makes you think, doesn't it? Many thanks to Bobby Rocker for the image, and to those guys in the picture for being there when they were needed the most. Let's raise a glass!

One Man's Camera

Jim Sullivan is an old friend, one that's been around since the very beginning of the original print Replica in Scale project. Mostly you've seen photos from his collections of  historical Navy and Air Force images (they don't call him Mister Corsair for nothing!), but it's a known fact that he's also a superior photographer in his own right, as these images prove:

It's January of 1989 and Jim's aboard the USS America doing photography. The object of his affections (and considerable talents) is an F-14A of VF-33 coming aboard in a textbook trap. Like all military aircraft, the Tomcat eventually got old and became a little bit of a maintenance pig in the process, but she was in her salad days when Jim took this photo. Fly Navy!   Jim Sullivan

That same shoot offered Jim this gorgeous shot of VA-85's 161231 taking the wire aboard the America. 231 was a well-used Intruder, and her wear and tear make her an ideal subject for the scale modeler, but wear and tear has relatively little to do with capability. The A-6E underwent significant upgrades and improvements throughout its service life and was capable right up until the end.   Jim Sullivan

The Bad Thing on the Block

Every neighborhood's got a tough guy, the junkyard dog you just don't mess around with. When Scott Wilson sent this photo a few months ago there was no doubt that it portrayed that junkyard dog thing to a tee:

Some airplanes just cry out for a theme song, and in this particular case the song probably wouldn't be a nice one (Rose Tattoo's Butcher and Fast Eddie comes to mind in that regard, but who are we to say?) Scott caught F-4E 67-0250 from the 347th TFW taxiing out in March of 1982, armed for the air-to-air mission and apparently carrying at least one live AIM-9. It's probably just the mood we're in today, but everything about this photograph seems to say "come on if you think you can"! It's quite possible that the F-4 was never the best at anything, but it was always a great deal more than Good Enough for every mission it was given. Scott caught her minutes before she crashed to destruction on the 19th of March, 1982, over the Panamint Valley. The crew got out safely, but as for the airplane, well...  Scott Wilson

Sometimes even the tough kid can't pull it off. 0250 entered an unrecoverable spin to the left and went in hard, writing off the aircraft. The aircrew ejected safely, but there wasn't a whole lot left of the airplane. Nobody ever said it was safe...    Scott Wilson

And, to put the wrap on the story, here's Scott's account of the incident:

Right after I went on active duty in February 1982 and was assigned to George Airplane Patch in California, I found a road alongside the taxiway where I could park and get a few photos of jets taxiing out. I shot one of 67-0250 on a cold blustery day. I actually threw this slide in the garbage because I didn't think it was worth keeping, but heard that day that 250 had crashed so I fished the slide back out of the garbage. A week later the accident investigation was completed and I was "volunteered" to help clean up the wreckage. When we arrived at the site I immediately took some photos of the wreck. 

  A couple years ago someone sent me a scan of a photocopy of the accident report which confirmed a rumor I'd heard. The rumor was that a C-141 navigator from Norton AFB had been camping in the desert near the accident site. The site was on a hillside in the Panamint Valley between China Lake and Death Valley. It was many miles to the nearest town, way out in the desert wilderness. Anyway, I'd heard he got photos of the jet coming down and talked to several people who claimed to have seen them. I never saw them, but a composite of his photos was attached to the accident report. It's very difficult to pick out the airplane as it spun in and the parachutes at the top, hopefully you can find them. (We aren't running the accident report here, and Scott's right about the poor quality of the photos.)

Happy Snaps

It's been quite a while since we've run anything in this department, which means it's time to break the fast!

A-7B 154452, with VA-203, in flight over the Dry Tortugas on 12 August, 1981. The Bravo model of the "Fruit Fly" wasn't too far from obsolescent when Rick shot this photo, but it was still a viable platform for the basic attack mission even at that. Photos like this one tend to belie the true purpose of the airplanes depicted, but flight is flight and this is a beautiful image. Thanks as always to Rick Morgan for sharing it with us.

The Relief Tube

Letters; we get Letters:

First off, in the We Shoulda Known Better Department, comes a letter from Ken Holston regarding a photo we ran a few years back of an Air Force A-1E pilot who was unknown to us at the time. As it happens, the individual in the photograph was a remarkable aviator and warrior, and you need to know more about him.

This isn't the photo we originally ran, but it's the same guy; Earl Trimble. Let's let Ken, and a couple of other folks, explain it for us:

I'm a retired modern-era (1990-2012) USAF C-130H pilot whose passion is USAF Skyraider history.  I came across the photo of the unknown pilot in your June 2010 blog and got this answer from the Skyraider Assoc:

"The Skyraider pilot was identified as Earl Trimble.  One of the guys who recognized him was at Udorn with the 602nd in '67."
You might enjoy these links:

http://valor.militarytimes.com/recipient.php?recipientid=50263

http://skyraider.org/skyassn/classpics/afclasspics/e34.jpg
Ken Holston
Atlanta, G

Thanks, Ken, for helping provide us with insight on an amazing individual. A quick visit back to June of 2010 (use the little-known "search" function at the bottom of this page) will show you the original photo.           USAF Photo


We ran a really neat air-to-air shot of a late-1940s Navy Reserve Corsair an issue or two back and received this comment from David Collier, a man who was there:

You comment on the rocket rails shown on a VMF-323 Corsair. The Corsair was equipped with rocket launching capability during late WWII. The photo shows the an early rocket launcher mounted on the Corsair, officially known as the "Aircraft Launcher Mk 5 Mod 1". The rail is actually part of the "Adapter, Aircraft Launcher Mk 6", which is attached to two post rocket rack. The adapter allows the aircraft to carry and fire the 2.25" Sub-caliber Aircraft Rocket used in training. The bare metal showing on the bottom side of adapter was the the lower half of the rail that was made of stainless steel. The metal was kept coated with a light coat of grease since a rocket being jammed on the rail after firing could spoil your whole day.

Having worked on the F4U-4 for a couple of years i can tell you that it was a hard plane to keep clean, in fact I think this aircraft's Plane Captain was doing a great job.

Notice #6 A/C behind the moving plane has a some paint missing from the forward edge of its right wing just above the landing gear. That is because most of the ground crew would get up on the wing by standing on the tire and then boosting themselves onto the wing. The climb up to the cockpit involve using the cutouts on the right wing flap and fuselage but the climb up the oily wing incline was usually avoided by those fueling the aircraft or working on its wing guns. 

Thanks, David, both for your comments and for your insight into a remarkable era of American military aviation!

And that's it for this time. In theory we'll be a little further along with that F-80 project the next time we convene and there's lots of other neat stuff waiting in the wings as well, so stay tuned! Be good to your neighbor until we meet again!

phil

Sunday, August 9, 2015

Flying!, Something Out of the Ordinary, Pirates, Hold That Tiger!, Charlie in Kentucky, and Some Scary Days


Tighten Up!

You'd never know it just by looking, but in theory this project is one heavily related to scale modeling, so scale modeling is what we're going to talk about today, or at least we're going to talk about one aspect of it---getting better at doing it.

Scale modeling is one of those learn-as-you-go things. No amount of reading the modeling boards, buying the overpriced how-to-build-the-whatever-it-is books, or buying the most expensive kits and tools can make up for a lack of basic skills. Nope; the only way you're going to learn how to build good models is to build until you acquire the skill-sets necessary to get you where you want to go. As a corollary, you're going to have to build "crummy" kits, or short-run kits (often the same as "crummy", in case you were wondering about that) as well as the latest whiz-bang marvels from the "good" manufacturers in order to develop the skill sets necessary to become a journeyman or expert modeler. There's no substitute for time in the saddle on this one---you have to put in the time to become a good modeler.

That said, here's a little trick that will help you more than you can possibly imagine in your ongoing search for improved skills: Change your modeling philosophy! That's right---change the whole way you look at the hobby.

To get to the point, most of us build unified models, for want of a better word, detailing them as we go along but always working on the philosophy that the model is the model and everything else goes into it or on it. It's one. It's a Whole. It's a model, but what's that model made of?

What if, instead of building a model, one each, of the object of your affection, we built a whole bunch of little models instead, and then put them all together in the big model? What if we made the cockpit a model, a project in and of itself, and then did the same thing for the gear wells, the gear doors, the landing gear, the wheels and tires, or anything else that's part of the greater assembly that becomes what you see on the shelf as a completed project? What if we built up a pair of 250lb GP bombs for our P-47 and made them models in and of themselves, stand-alone bomb models, properly assembled, painted, decalled, and weathered and capable of being added to said Thunderbolt, laid on the ground beside it in a diorama, or just displayed separately?

What if, instead of building an interior, we made the seat a stand-alone model that could be displayed outside the aircraft if desired? What if we did the same thing to the control stick that goes in that interior?

What if we did that with each and every subassembly of the model, in essence creating a scale model made up of many smaller scale models? Holy cow! That's revolutionary! Then again, maybe it isn't.

The simple fact of the matter is that those guys and girls who win the contests, most of them anyway, use that technique and pretty much always have. There's a reason those folks build models that look better than yours or mine; they're putting in the time to build up everything that's going to be seen when the model is finished and they're doing it one step at a time, as a series of mini-projects. You can call it super-detailing, and a lot of people do, but at the end of the day all those folks are really doing is building up a bunch of little models to the highest standard they're capable of and then installing them in the object that will become the completed model. That's it. That's all there is to it.

Of course, you're still going to have to learn all the basic skills in order to do things that way, and that takes us right back to the learning curve we were obliquely discussing at the beginning of this ramble. There's no getting around that one. On the other hand, that simple change of approach we just discussed will make things happen a lot more quickly for you as you progress with the hobby. It'll make you a better modeler, and it'll make you better faster than any other way we can think of. It's a win/win, if you catch my drift.

I rest my case!

Just For the Fun of It

Our first image for the day comes from Rick Morgan, who sent it out to a consortium of people with the comment that there was once a time when a military aviator could, within reason, jump into an airplane and just go flying.

And here's what that looks like! The airplane is a well-worn Reserve F4U-4 from Los Alamitos, the time period is 1948-49, and the pilot is to all appearances just enjoying the day! To be fair about things, it would appear that there are practice rockets on the wing stations so it's entirely reasonable to presume that he's heading out to the range to make smoke and noise, but we wouldn't be too surprised if he didn't have a cigarette en route or maybe on his way back to the home drome while enjoying a gorgeous day in the air. In any event, this photo is one of those that embodies the spirit of flight and we're grateful to Rick for sharing it with us.   Navy via R Morgan

A Little Known Invader

A while back we ran a couple of B-26C images from John Horne's collection that were of a variant unknown to a lot of folks; the RB-26C. Some 46 aircraft of that sub-type were available to the USAF's tactical recon wings at the start of the Korean conflict and were used extensively for night reconnaissance work therein, and more than a few went in hard in that most dangerous of occupations. The antenna suite of those aircraft make them unique among the Invader family, and John's been kind enough to mark up a photo of an 11th TRS bird to help us understand what's going on there.

 The airplane is 44-35825, built initially as a straight A-26C-50-DT and subsequently converted to RB-26C configuration. The 11th TRS was operating her out of Kimpo when this image was taken, and it depicts the aircraft's antenna suite in sufficient detail to allow us a pretty good idea of what's happening in that regard. Also of interest is the exhaust staining on the aircraft's nacelles; it's very typical of the A-26 and therefore an essential component of an accurate scale model of the type.   John Horne Collection

Here, also from John's collection, is a shot of the AN/APA-17B:

Many thanks to john for taking the time to dig up the AN/APA-17B image, and for marking up that view of 44-35825, so we could better understand the airplane.   John Horne Collection


I Wish We Knew

As has been mentioned a great many times before, Bobby Rocker is a constant contributor to this project. Most of the photography he provides to us is well-documented, but every once in a while he comes across images that aren't. That's the case today, as we look at several PB4Y-1 Privateer shots. Bobby doesn't know the unit or location, although we suspect they're stationed somewhere in or near Morotai or the Philippines in early 1945 (although that's an educated guess!). If you know what's going on, we'd like to hear from you! That address is, as always (just ask any of those spam dudes!) replicainscale@yahoo.com  .

Let's start off with "Doc's Delight". Besides that classic artwork, check out the names of crew member's wives and sweethearts painted adjacent to their respective locations in the aircraft. A nice touch, we think!   Rocker Collection

And here's "The Snooper" for your edification. Also of interest in this shot is the internal detail of the bomb bay doors, the aux fuel tank in the forward bomb bay, and the extraordinarily coarse tread on that nosewheel tire. The background information on this photo says "Morotai" so there's a good chance that where it was taken, but then again maybe not. Bobby wasn't any too certain so we're not either!   Rocker Collection

And here's "Reputation Cloudy". The artwork is a little rowdier on this aircraft, and there's a fair amount of over-painting of side numbers on her nose.   Rocker Collection

Here's our final image, "Rugged Beloved". We get another look at the forward bomb-bay fuel tank installation in this shot, as well as an exceptional depiction of the way the bomb-bay doors rolled upwards on the Privateer and Liberator families of aircraft. We all know about the exploits of the PB4Y-1's younger brother, the PB4Y-2, but the -1 did yeoman service in the Pacific and is well worth investigation and documentation.   Rocker Collection

Thanks again to Bobby for his unselfish sharing of the images of one of the most remarkable periods in our history!

Shark Mouthed Cats

Those of you who are fans of naval aviation are probably well aware that VF-21 flew the Grumman F11F-1 Tiger operationally before becoming the East Coast RAG for the type. Rick Morgan recently came by a couple of fascinating photographs courtesy of naval aviation photography and historian Bob Lawson, and is sharing them with us today. Here are his comments about the photos:

Phil- a couple of shots for the blog. I got these through Bob Lawson; they show VF-21 F11Fs on Forrestal during a 3-month period with CVG-8 in Forrestal (CVA 59) off the East Coast in 1958. They were filling the ‘day fighter’ role within CVG-8 for this at sea period with VF-82, flying F3H Demons, holding the ‘night fighter’ slot. Within a few months the “Mach Busters” would be moved to the new Replacement Air Group, RCVG-4 and become a training squadron for east coast F11Fs and redesignated VF-43.

Pretty maids all in a row! Bet you've never seen this many Tigers on a boat at one time, have you? The F11F was a gorgeous airplane no matter how you looked at it, and Fighting 21 flew the prettiest markings (as well as the most aggressive!) of them all.  Lawson via R Morgan

The F11F was unique in so many ways, it's easy to lose track of them all. One look at this photo shows one of the more obvious anomalies; the wings folded downwards instead of up and, if memory serves, they were manually folded. The vertical stab had a small fuel cell in it to facilitate taxiing without having to use up precious JP-5 from the main tanks (few 1950s jets could boast of much in the way of range, and the Tiger was quite possibly the worst of them all---video killed the radio star and short legs did in the prettiest of the Grumman fighters), and the arresting hook folded forward into the fuselage, upside down, rather than aft. It was an innovative design to say the least!   Lawson via R Morgan.

There's so much more we could say about the Tiger, but today's not going to be the day. Stay tuned, though; you just never know what might show up on these pages!

And We Thought We Had It Figured Out

It wasn't all that long ago that we were showing you a couple of straight up F-101C Voodoos that were serving with the Nevada ANG. That was an amazing thing because Nevada never officially flew the Charlie (their 101s were all of the converted RF-101H variety) and we duly published the photos at hand and moved on, saving another batch of photos for another day. We should've looked a little more closely at the photos, because there was another "real" F-101C lurking in the stack! Without further ado, but with a little bit of embarrassment, is an image of that aircraft:

Holy cow, ya'll! Where'd that come from! Kentucky's 165th TRS/123rd TRW was a National Guard outfit that was tasked with the photo recon mission and that, much like those Nevada birds, never had a tactical fighter mission with the 101, which makes F-101C-40-MC 54-1488 that much more of an oddball. We suspect she was in the same situation as those Reno birds, marked for the unit prior to conversion but never actually operated in the fighter role while there. She's not much for markings, just a pilot's name above the U.S. AIR FORCE logo on her nose and the word "Kentucky" on her vertical, but that state name is enough to make her stand out. She ended up at MASDC in the early 70s, as did so many of her sisters but was around long enough to provide us with a unique image to treasure while she was active.    RA Burgess via Greater St Louis Air and Space Museum via Mark Nankivil

And in the spirit of Better Late Than Never, Doug Barbier was apparently on line when we pushed the Magic Twanger to publish this edition of the blog---he came back almost immediately with an obvious answer to the reason those two ANG units had straight-up fighter variant F-101Cs on strength. Let's let him explain and spare everyone the wait for another edition and its Relief Tube entry!

Phil, If I had to guess, those F-101Cs assigned to Nevada were there for proficiency trainers while the fleet was converted to the H model. The Michigan Guard had half a dozen plain jane F-84F models at Detroit Metro back in the late 1950s for the same reason - there just were not enough of the recces available so they drove the basic fighter versions around just to get some flying time. And speaking of just jumping in and going - that is exactly the way it used to be. In interviewing one of our old Michigan Guard pilots, he told me that in 1949 he came out to interview with the squadron commander, was hired on the spot & the boss told him to go downstairs, grab a parachute, pick out a Mustang on the flight line & get himself current again. No paperwork, no verification, no I.D. badge, no nothing - just pick one & go. Even through the RF-101 era in the early 70s, we used to keep at least one RF-101C parked on the Guard ramp at O'Hare for our airline pilots to fly. Rather than get in off of a trip & have to go over to Detroit, there was a Voodoo sitting there waiting for them. When it was time for the UTA weekend, they flipped a coin to see who got to fly it over to Detroit. On Sunday, maintenance would have another jet ready to go back. It was a different time.... Doug

Thanks, Doug!

Where Were You in '62?

October of 1962 was one of the scariest times in American history, a month in which the Soviet Union and the United States looked each other in the eye, each waiting for the other to blink. There's a lot to that story, far more than we're able to cover in this modest effort, but we can show you a couple of pictures you probably haven't seen before that date back to that time and, more specifically, to The Cuban Missile Crisis. The possibility of Armageddon came in many forms in the Fall of 1962.

 Cocked, locked, and ready to rock, these Boeing B-47Es from the 307th BW sit loaded on the ramp ready to go. The B-47 was such a pretty aircraft that it was easy to overlook its original purpose. The type finished out its career as a weather and ELINT platform, but there were still quite a few bombers around in 1962 that were on active duty when the call came.    USAF via Mark Morgan

That sign in the foreground is telling would-be kibitzers to stay away from the airplanes or get shot. The fate of the world hung in the balance during that terrible month, and the guys in the blue suits weren't taking any chances!   USAF via Mark Morgan

Here's 52-0417 on the ramp, ready to go. The 307th dispersed to various civilian fields throughout the CONUS during the crisis in order to complicate targeting for the other side, resulting in one instance in an aircraft commander of the wing paying for fuel with his personal credit card. A quick visit to the 307th Association's web site (  http://www.307bwassoc.org/  ) can provide some interesting details of this period in the wing's history.   USAF via Mark Morgan

Let's go out the way we came in, with a ramp shot of a 4-ship det from the 307th sitting in the sunshine in what could have been the last days of peace. We can all be grateful to the guys in the wing for being there when they were needed the most, and equally glad that the call never came!   USAF via Mark Morgan

The Relief Tube

We've received several comments of interest in the past few weeks and it's time to share! First up is a clarification from reader Tom Smith:

Dear Phil, I just recently discovered the Replica in Scale blog and could not be happier. I am one of those "of a certain age" who remembers the original magazines as I bought them new at the local hobby shop. Finding the blog is like coming upon a long lost family heirloom. The medium has changed, the content is refreshingly familiar. I spent some time looking through past blogs and came upon a picture that brought a bit of a smile to my face. In the September 16, 2014 blog there was a picture from the archives of John Horne showing an A-26C on the ramp at Iwakuni AB circa 1951, tail number 44-34535. The name on the nose was "Noop Gnat II". Your description referred to the "Gnat". Don't know if anyone else commented on the name but it actually refers to one of the primary sources of inspiration for military men wherever they are (the order of these inspirations change depending on the then current situation). Take the name Noop Gnat and reverse the spelling for each. QED.    Tom Smith

Here's the photo in question:

Thanks for explaining this one, Tom! I'm a little embarrassed to say that you're the first one to catch this, or at least the first to write in about it. It gives a whole different spin to that old National Geographic article "Fun Helped Them Fight"!   Photo via John Horne Collection

Here's a clarification we received a couple of weeks ago regarding that photo of "Little Sir Echo"that might be of interest:

About "Little Sir Echo" - this P-39 was flown in New Guinea by Lyndall Tate, a friend of my father's in the 71st Tactical Reconnaissance Group. I have been editing my father's diary and researching the history around it, and can add this to the discussion: Tate's wife was named Echo. (Back to Greek mythology: Echo was a nymph who was cursed by Zeus's wife Hera so that she could no longer speak except to repeat words. . . . I don't know why she was named Echo, but she was.) This makes the name on Tate's warplane of a piece with the names for the rest of the squadron (Maxine, Ruby etc). Tate may also have had a daughter named for her mother. I have read your blog before, while working on the diary, and it has been helpful. I do not know if the message that I posted (above) made it to your blog page, so if you can put it up, maybe other readers will be interested. The Pacific Wrecks speaks of two victory flags being painted on this aircraft, but I do not think Tate made any such claims or was awarded any victories. The earliest victory for the 82nd Squadron was by Delta Graham, in I think December 1943. (I think you have posted, or Robert Rocker has collected, a photo of Lt. Graham standing beside his P-39, "Maxine.) Tate stayed in the Air Force after the war, and eventually retired as a colonel or lieutenant-colonel. He was on a champion skeet-shooting team in the European area in 1956. In the earlier 1950's, they were at air bases in Texas, and in the 1960's in and around Bakersfield. Tate died in 2008. Echo I have not been able to trace but she may have died much earlier.   Thanks, Allen Boyer

Thanks for the insight, Allen, and for your kind comments regarding the blog!

Every once in a while we'll receive a request for information from a reader that we can't field. Here's one such inquiry, regarding a post-War 49th FG P-51D:

Hi Phillip,.....I'm looking for some photographs of P-51s in the 49th from April 30, 1947 to May 27, 1948. My Dad's P-51 (from the 40th FS, 35th FG) was transferred to the 49th during that time frame. In May of 1948 it was sold/given to the IDF and served there till it was really obsolete. Long story but it is NOW being restored in CA. I visited it a month ago, it's in pieces but about 70% original. I want to give the owner some options of the final markings of his a/c. I have photos of it while in the 40th FS....but none while it was in the 49th FG. I don't know which squadron it was assigned to in the 49th. My Dad was in the 7th FS of the 49th FG from late '48 to early '50 but was flying the F-80 then. Anyway....any assistance or advice you could give would be much appreciated. 


Here's the history card of the Mustang in question.

The comings and goings of any and all of the 5th AF units during the immediate post-War period is of considerable interest to us as well. If you can help, please drop us a line at  replicainscale@yahoo.com  . Spammers need not apply!!!

And one final note before we go: We're constantly on the lookout for previously unpublished F-104 material around here, and have recently had an inquiry regarding testing of the AIR-2 Genie missile on an F-104A bailed to the NAV at NAS Point Mugu. Photos would be great, but any information at all would be of considerable help. By now you surely know the address...

That's it for this thrilling installment, but with any luck we'll see you again soon. Until then, be good to your neighbor!

phil