Let's Talk About the Zero, Then We'll Do Some More Jets
If you're as old as I am, or if you've managed to pick up some copies of the original
RIS as you've traveled through life, you'll remember that we almost never bothered with propeller-driven aircraft unless we were reviewing a kit, which I don't do here. That was a joint decision; nobody was doing much of anything with models of jets Way Back Then and the field was wide open, so off we went to explore a world where the propellers all lived on the
inside of the airframe instead of outside. It was pretty cool because we were the only ones doing it at the time, and who needed to build more models of WW2 fighters anyway? Certainly not us! Nosirree!
Fast forward (my wife once told a hobby shop full of friends that her son played Fast Forward on his college basketball team, for whatever that may be worth---I'm telling you because I think it's funny, although there's no doubt I'll end up paying because I shared it!) to the present. Nowadays I almost never build jets. Almost everything I do has a propeller where it
should be, which is to say on the
outside of the airplane, right out there in the open. I
did build a MiG-17 a while back but that was an anomaly in my world and I did it because I'd waited for 40+ years to get a decent 1/48th scale kit of same. It wasn't, and isn't, the norm around here anymore. If you don't believe me, just look at that accursed A-4 I've been working on since early March. It's a project for this blog, for cryin' out loud, and I've got every reason in the world to finish the thing, but I just can't get inspired so it's still sitting on the bench. Such is life.
What I
can get inspired about is the Hasegawa family of A6M
Zero-Sen fighters in 1/48th scale. They were ground-breaking when they were released in the 1990s, much as their Tamiya counterparts were way back in the early 1970s. They (the Hase kits) have been The Gold Standard since their release, even though that A6M5 that Tamiya gave to us a couple of years ago is arguably a better kit. Still, Hasegawa can provide a model of virtually every
Zero variant ever built, while Tamiya is presently resting on the laurels of that Zeke 52. You have to wonder why, but that's what they're doing, which makes the Hase family my personal kits of choice. (The Tamiya kit doesn't look at all out of place on a shelf full of Hasegawa
Zeros, which is a tribute of sorts to both companies.)
That said, let's talk about those kits for a minute. In simplest terms they boil down into two sub-families, with a common interior and landing gear. Most of the kits contain parts for other variants, and a couple of them even provide extra fuselages and wings, thus providing you with the opportunity to build up a truly eclectic parts bin as you replicate the Japanese Naval Air Force.
As for those families, we're basically dealing with the A6M-1 prototype through the A6M3 Type 32, and the A6M5/7/8, plus the A6M2-N "Rufe". The early variants, as well as the "Rufe", all have a slightly different breakdown of wing components, while the later variants (the A6M5s and subsequent) have a simplified wing assembly but offer the option of dropping the flaps. I've heard a lot of people complain about that early-variant wing assembly, mostly because of the little piece that lives just in front of the wheel wells and makes up the lower forward fus. The complaint is that it doesn't fit, and the kit is difficult to construct as a result. Brothers and Sisters, I'm here to tell you that just ain't true. That little piece has fit like the proverbial glove on every early Hasegawa Zero I've built, and there are presently five of them sitting on the shelf completed. The trick, and it isn't much of one, is to carefully
pre-fit the piece, then lock it in place with a little Tenax or similar. In my experience you don't have to do more than kiss the resulting joint with a piece of really fine sandpaper to make the resulting seam go away. It's that Modeling 101 thing again.
Everything else on those
Zeros is simple and extremely linear. Every single "Zeke" you see in the photographs below (and they aren't
all of the collection by any means) were built in a week or less. One of them took three days from the time the box was opened to the time the model went on display. It's a Builder-Friendly kit.
Here's an A6M-2 built to represent X-183 from the 3rd
Ku in early 1942. I'm not sure those tail codes should be red (as given on the decal sheet I used for the tail markings); they could sure be black too, but the red looks ok and I don't know anybody who can say for certain what the color was. The model has the usual (for me, anyway) Eduard seat belts and shoulder harness, but the rest of the interior is straight out of the kit---there's no reason to do anything else to that cockpit unless you're building for a contest; it's pretty complete as-is. You can get yourself into a fist fight with some folks regarding the color of early-War
Zeros. I used to use a custom mix but now prefer to squirt Floquil "Concrete" thinned about 40% but otherwise right out of the bottle. It seems to match the Ever-Changing Zero-Sen Color of the Day pretty well and is sufficient for my purposes. The
Hinomarus are painted on using masks.
A view of the other side of the airplane. A lot of folks weather the snot out of every Japanese airplane they build, and that's highly inappropriate for most early-War IJN or IJAAF airframes. The early birds were competently painted and relatively well maintained; a model that depicts the paint peeling off in sheets would constitute missing the boat in most cases.
A late-War variation on the A6M2 theme. This time the top color is Testor IJN Dark Green, or whatever they call it these days, while the undersurfaces are nasty old Sky Type S. I've had people who Know a Thing or Two About Japanese Airplanes tell me they really liked that undersurface color (before I told them what it was!); all those old color illustrations in
Koku-Fan count for something! Note that the aux tank is done in a representation of natural metal, a condition found fairly frequently on the early tanks. Note also that I
do tend to weather the props on my Japanese models pretty heavily. Feel free to not do that if you don't like the effect.
Here's the front end of the thing under construction. My lighting makes those yellow ID bands look less orange-yellow than they actually are. Japanese paint was pretty shiny when the airplanes were new but weathered out quickly. This model received a coat of DullCote before it was complete, but it's just received its upper surface decals here and is still one glossy little airplane.
And a close-up of The Dreaded Wing Root Insert. Note the lack of seam; there's no putty there. That NMF gas bag provides a nice contrast and breaks up the monotony of the undersurfaces, I think. Oh yeah, you might also notice the color shift I experienced just by moving my camera and leaving the lighting as it was. There's a lesson there for all the Color Nazis, I think...
And it's done. Very light weathering is evident, and most of the gloss finish is now gone. This 134th
Ku aircraft was three days from start to finish.
This one's going to be Nishizawa's 251st
Ku A6M2 Type 22 when it grows up. It was painted Floquill "Concrete" overall, then airbrushed with a random (but following the existing photographs of the aircraft) overspray of 34079. National insignia and ID bands were painted on using masks, with all subsequent paint going on freehand.
Odd Man Out: The A6M3 Type 32 using kit decals in conjunction with masked
hinomarus. The only addition to the kit was the usual Eduard belts and brake lines made from .006 dia. annealled brass wire. The antenna mast was cut off flush with the top of the canopy per standard
Tainan Ku practice. The Type 32 kit is the last one to feature that insert in the lower wing, not that it really matters.
The nose of the A6M2-N "Rufe". The entire insert non-issue goes away completely in this kit because Hasegawa provides you with an entirely new one-piece lower wing to accomodate the float. This time the undersurface color is ModelMaster Sky Type S, while the upper surfaces are their IJN Dark Green.
And our last
Zero for the day, the Hasegawa A6M2-K two-seat trainer. Building this kit provides you with a complete A6M2 fuselage for your spares box! This particular model represents an aircraft from the
Genzan Ku and provides a striking contrast to the fighter variants. Paint is 34079 over Sky with some brown primer visable in places as well as some light chipping, while decals are a hodge-podge from several sources. As usual there's Eduard in the cockpit and brass brake lines.
We'll save the later "short-winged" Zekes for another day, 'cause I'm guessing you're pretty well sick to death of the subject just now. The point I'm trying to make is two-fold; the kit is really easy to build, what you may have read elsewhere notwithstanding, and Hasegawa have provided the foundation for a truly representative collection depicting an historically significant aircraft. Yes, the Tamiya kit is better, but it's also more expensive and, at least until they see fit to release other variants, somewhat limited in scope. I truly like what Hasegawa's done here, and have even more Zeros in the pipeline. Jim, is it time for another Hog? Frank, maybe another 58th FG Jug? You can never have too many of your favorite airplanes, you know!
That Pesky Fruitfly One More Time
When last we convened I ran a hodge-podge of A-7 photos for you. This is a good day for a few more, I think. Let's not do the obvious, though; let's see a few shots of the least-known operational
Fruitfly, the EA-7L, and then throw in some really tasty ANG A-7Ds as a bonus. It is, I think, the right thing to do on a Saturday.
Coming up on the tanker. This photo, and the three that follow, were shot by Susan Fogarty while she was flying with VAQ-34 during 1987. You can't make out the BuNos, but it's neat photography, I think. Fogarty via Dreggors.
Hooking up. Having never been a naval aviator I'm really not qualified to comment on what's happening here, but things look like they may be getting just a bit sporty. Comments are welcome. Fogarty via Dreggors
I'm thinking there's Drama in that cockpit, although I could be wrong. Fogarty via Dreggors
This may be a little closer to how it's supposed to work... Fogarty via Dreggors
Now let's take a look at some airplanes from Those Other Guys. All of the photos below were provided via Mark Nankivil; many thanks, Mark!
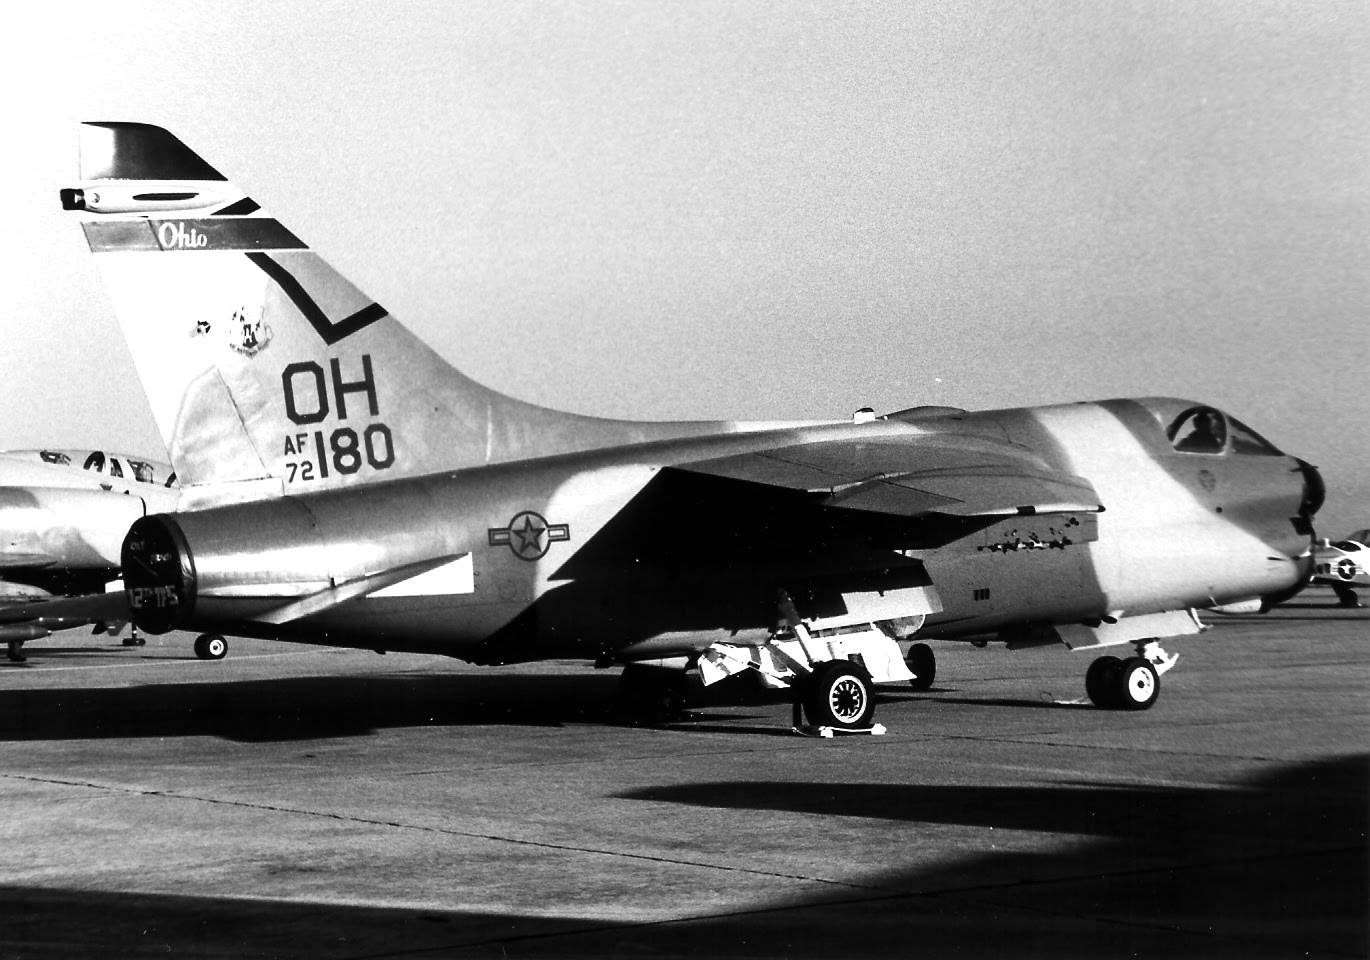
Ever wonder how a high-drag bomb works? Here's a prime example. The SLUF belongs to the Ohio ANG and is in a really spiffy wraparound OD/dark gray scheme. Vought Retiree's Club
A-7D-7-CV, AF70-0966 of the 149th TFS/192nd TFG, Virginia Air National Guard, taxis out out the start of a sortie. Camouflage is the standard SEA scheme but it wraps around the undersurfaces. You don't see International Orange flight suits much anymore. Vought Retiree's Club
A pair of A-7Ds from the 124th TFS/132nd TFG, Iowa ANG, formate over the Iowa countryside. 70-1008 is an A-7D-8-CV, while 71-0327 is an A-7D-10-CV. Modelers, note the difference in application of the camouflage demarcation and that Mil-P-8585Y zinc chromate that's visible in the interior of the aft fuselage. Vought Retiree's Club
71-0330, an A-7D-10-CV of the 152nd TFS/162nd TFG, Arizona Air National Guard, on the way to make some noise! Vought Retiree's Club
Here's the 124th TFS again. Note the white pylons while the camouflage of 72-0258, an A-7D-13-CV, wraps around the undersurfaces. At least nobody'll run into the pylons in the dark. Vought Retiree's Club
What a gorgeous shot! A 5-ship of the 124th TFS formate with a KC-135-BN of the 117th ARS/190th ARG, Kansas ANG. Those boys fly good form! Vought Retiree's Club
Just passin' a little gas. One SLUF's plugged in while the other four fly alongside. This isn't how it's normally done, but it makes for quite a picture! Vought Retiree's Club
A Tiny Sin of Omission
A day or so ago I ran another in our ongoing and highly-disjointed aircraft weapons series, this time on Navy rockets of the WW2/Vietnam eras. As with the other segments of that sometimes-series, the rockets discussed were the ones listed in that 1960 edition of
Aviation Ordnanceman's Manual. That manual, and therefore I, omitted the RAM, an error that was caught by old friend Tommy Thomason. He sent along a drawing and photo of the round so you can have an idea of what it looks like:
The RAM. Same round, different warhead. via Tommy Thomason
And yet another correction---the RAM is shown in the original piece but is titled "3.5-inch rocket". Check out the illustrations and you'll see what we mean. pf 14 Apr 2010
And a drawing that gives a graphic size comparison between RAM and HVAR. Now you're getting all sorts of stuff to hang under those models!
And that's it for today. This installment ran a little longer than normal, mostly to make up for last week's disrupted schedule. Things are going to be a little goofy around here for a while, so please bear with me until next time, whenever that may be. (But
soon, folks; I promise it'll just be a day or so...) Until then, be good to your neighbor!
phil