To The References!
I used to know this guy, way back in the 60s when I was working my way through college at Dibbles Arts and Hobbies, who's most immediate claim to fame was something he said pretty much each and every time he'd come into the store. Someone would raise a question about a new kit, or a way to convert an older kit into a variant other than what the manufacturer had intended, or a new decal sheet, or pretty much anything having anything to do with scale modeling, and Don's first and most immediate comment would be an ardently-presented rendition of his favorite saying: "To the references!" That imperative would cause us to begin pulling books down off the shelves so we could all look up the airplane in question and then either settle, or perhaps prolong, the discussion. Which way things went honestly didn't matter very much because the exercise was a lot of fun in and of itself and we all learned from it.
That was then, and this is now. The references we used some 50+ years ago are still around for the most part, as are countless other books, but for most people the go-to reference of choice now lies within a collection of cold and impersonal electrons known as the internet. It's all there, isn't it? Anything you ever wanted to know about pretty much anything is hiding somewhere on the web, so you really don't need much besides a computer in order to document that new model you're building. Nope---no more costly and largely boring reference books, and no more exorbitant cash outlay to build your very own library. All you have to do is click a mouse and you're there, information at your fingertips as it were, and for free.
There is, however, one tiny little catch to the whole thing. That free information you can drag off the 'net isn't always entirely correct and is, in fact, quite often wrong! Yep, you heard me; a lot of that free information to be gleaned off the internet can be anywhere from a little bit to a whole bunch incorrect, which often places things into a category we might choose to call "useless". Here's why:
Back in the pre-internet days research was done manually, by what we could hope was the exhaustive study of source documents and photographs that were sometimes easily available in a public (or private) library, or were perhaps more difficult to access because they lived in a repose of genuine study such as the National Archives. Serious research could, and often did, take substantially more time than it took to author any of the books that resulted from such a study.
There were, of course, different kinds of authors back then, just like there are today. Some, the good ones, would take the necessary several years researching a book that they were subsequently able to write in several months. The other kinds of authors, and there were several varieties of them, were generally content with using secondary sources in order to gather their information, and their work showed it. That difference is why some of those books have easily withstood the test of time and are go-to references even today, while others from the era are found in the sale bin at Half Price Books.
Let's take that state of affairs, update it somewhat, and apply it to the internet. First, there's a lot of good news out there, because there are a ton of source documents that have been scanned by the agencies or companies that control them and have been placed on the 'net for free, there for everyone to use for research. What we once had to accomplish by making a trip to DC, or Maxwell, or any of the other repositories of knowledge that we utilized can now be done by spending the same amount of time on the internet presuming, of course, that the researcher is willing to take the time to actually read those documents, organize them in a meaningful way, and make use of them. Most people don't do that, because it's a whole lot of work to properly research the docs and then actually make something of that research.
What happens all too often is a quick and dirty search of the most obvious things to be found by means of a computer, and then the regurgitation of the information thus discovered (and often misunderstood) as gospel truth. Sometimes that works but more often it doesn't, because it's no longer the age of print and there isn't a team of editors fact-checking references (presuming references are even given) to make sure everything is as correct as it can be. The sad fact is that most web sites occasionally exhibit sloppy or incomplete research that ends up being published as The Gospel Truth for all to read and assimilate.
There's a huge exception to that, of course: The First Person Account, wherein somebody who was actually there and participated in the event, whatever it was, provides a written account and shares it with us all. That sort of thing is generally treasure beyond compare, because you get to hear what the guy who did it has to say about it. Yes, it's often opinion, but it's first-person opinion and can constitute primary research presuming, of course, that we're savvy enough to read it and compare what was said against what we already think we know.
Here's the point, then. A whole bunch of what you need in order to research that airplane, or those markings, or that flyer's exploits, is indeed out there in Internet Land, just waiting for you discover it and do something with it, but it's masked by a tremendous amount of incomplete and misleading information (which we might want to call "horse poot") and you're going to have to dig a bit in order to make use of it. Very few modelers will actually take the time to do that and will continue to rely on the efforts of others, perpetuating the problem in the process. What are you going to do?
To the references!!!
An Easy Way to Do It
A couple of months ago I purchased a 1/48th scale Eduard Spitfire Mk XVI and actually built it, which was followed by one of the new Airfix Spitfire Mk Vbs, which I also built. That wasn't enough to slake the thirst, as it were, so I'm presently hip-deep in a Pacific Coast Spitfire Mk XIVc, and, after completing two other iterations of the "Spit" family, finally started thinking about what it was I was doing! The primary objects of my concern this time around, and probably yours too at one point or another if you choose to build a Spitfire of any flavor, are those darned wing-walk stripes that usually appear on the upper wing panels on models of Dr. Mitchell's Finest, represented for the most part by really fiddly decals included with the kits that are almost always a royal pain to work with. That pain led me to consider alternatives which drove me back to those halcyon days of 1969, which was when I first figured out how to deal with such things as this.


While we're here and discussing this particular kit, there are a couple of other things I think I ought to mention before we leave the Pacific Coast Spitfire XIVc:
The kit is pretty easy to get together and would make an ideal first short-run kit for someone with modest skills. There's minimal photo-etch and resin, and almost everything fits together pretty well too. What's provided in the kit is largely accurate but there are a couple of tiny issues you should be aware of if you choose to build one for yourself.
The model as given is a Mk XIVc, and the decals that come with the kit are, with one exception, for the Mk XIVe variant. The difference between the two isn't huge but you'll have to relocate the shell ejection ports for the 20mm guns if you choose to model an XIVe and move the fairings on the upper wing surfaces too---those fairings are separate parts so your only difficulty will be in moving the ejection ports. The decals that work for the model straight out of the box, as a Mk XIVc, are for RB159/DW-D from 610 Squadron. All the others are for the e-winged variants which means you really can't use them on a box-stock (unmodified) model. (And a further note for anyone contemplating building Lacey's YB-A; the colors should be grey and green, not dark earth and green, and the airplane did not feature clipped wings. Of course it's a XIVe as well, but we figured you'd want to know...)
While we're dealing with the wings, there should be a small opening in the starboard wing root, up towards the fuselage, to accommodate the gun camera. It's not on the kit but it's a five-minute fix with a sharp drill. To the references!
The airplane's pitot tube hangs off the port wing out towards the tip and the kit supplies that component, but it doesn't provide the small blade for the airplane's IFF gear that lives under the starboard wing in more or less the same location. Another easy fix with a bit of styrene strip.
The kit provides both the early flared and later tubular exhaust stacks in resin. If you're building RB159 you need to use the flared ones.
The Mk XIV Spitfire dispensed with the familiar radio antenna mast located immediately behind the aft canopy transparency in favor of a whip antenna positioned about halfway down the fuselage spine. It's easy to add this with fine wire, stretched sprue, or similar.
If you've got a Tamiya Spitfire Mk VIII, IX, or XVI laying around, you'll want to steal the extra set of bulged gear covers and use them to replace the ones PCM gives you. PCM's are perfectly flat and not appropriate to this variant of the "Spit". While you're at it, and if you happen to be building RB159, you might want to steal one of Tamiya's aux tanks for it as well. There's an excellent photo of that aircraft on page 268 of Profile Publication #246, Supermarine Spitfire (Griffons) Mks XIV and XVIII that presents a 3/4 belly shot of her in flight and defines use of the external tank---the same photo also shows the flared exhaust stacks and IFF antenna! You can also find quite a few photographs of it if you Google "610 sqdn spitfire xiv" and then click on "Images". You'll want to do that too, because the kit's painting instructions only show the left side of the airplane and the other side is different in terms of markings placement. Dare I say it? To the references!!!
There's a bulge under the fuselage, back behind the trailing edge of the wing, that's for something called a "boat antenna". The bulge is correct, but there should be a tiny bit of antenna sticking out the back of it---you'll want to drill a tiny hole in the appropriate place and insert a small piece of stiff wire or similar to replicate it. Not a big deal, but it needs to be there.
The round tube that goes from the back of the pilot's bulkhead to the bulkhead at the rear of the opening for the aft-most transparency isn't given or its presence even indicated on the instructions, but it should be there. Get yourself some Evergreen rod or similar and it's a five-minute fix.
In short, it doesn't take very much work to get a decent model out of Pacific Coast's Griffon-engined "Spit" and it's well worth your time to build one. Just remember that it's a short-run kit so fit twice, fit once more, then glue! Forewarned is forearmed...
A Bright Idea That Should've Worked.
We're all familiar with McDonnell's fabled F-101 Voodoo family, and everybody who's read anything at all about the airplane also knows that it was FAST when in a clean configuration. Unfortunately, the performance degraded seriously when the airplane was encumbered with external stores of any sort and it then became distinctly sub-sonic, somewhat of a detriment if your intended purpose was strategic weapons delivery. McAir addressed that subject early on during the development phase of the "tactical" Voodoos. Here's one result of their experimentation:
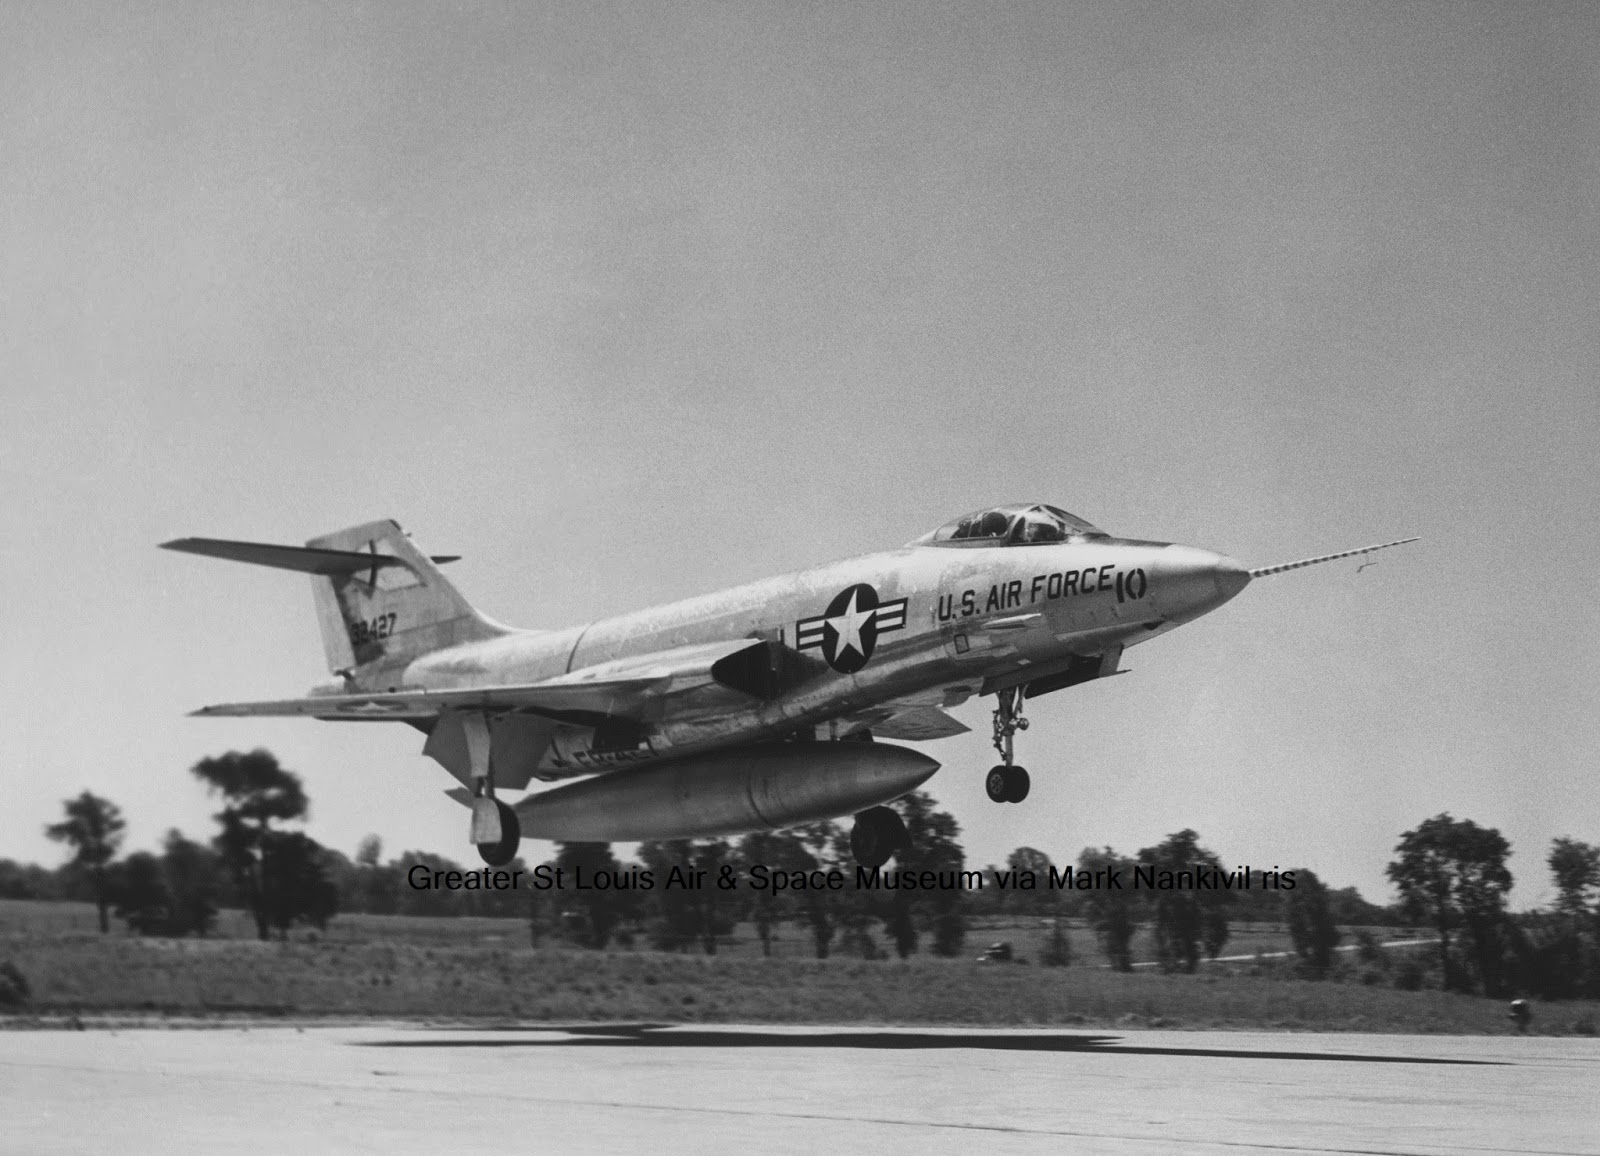
We can only speculate about how well the Model 96 did or did not work in practice, but at the end of the day the Air Force stuck with two gas bags and a Mk 7 for their Doomsday loadout for the Voodoo. Many thanks to Mark Nankivil and the Greater St Louis Air and Space Museum for sharing this unique image with us, and to Jim Wogstad for explaining the technical nuances of the store to us.
A Nifty SNJ
When we ran our SNJ piece a couple of issues ago we inadvertently omitted this photograph, which had hidden itself in a nest of similar black and white shots. It crossed our mind to just move on and not run it but it's such a nifty shot that we couldn't do that---we had to share!

Graduation Hun
Or, in actuality, one of a whole team of Huns. The year was 1968 and the place was Colorado Springs, Colorado, at the Air Force Academy. A young Gary Emery, best-known nowadays as the proprietor of San Antonio's Hill Country Hobbies, was well on his way to becoming an Air Force officer and was already an accomplished photographer, as these images attest:


Gary's photography only got better with the passage of years and acquisition of more capable gear. With any luck we'll be able to show you some more of it in the months ahead.
How Lucky Could They Be
The USO spent most of the Second World War trying to bring a little sunshine to the guys out on the pointy end of things, and every once in a while that effort involved the bringing of prominent movie stars to the troops. One such example was Ann Sheridan, a well-known movie star and pinup girl ("The Oomph Girl") during the war and a movie and television star afterwards, with a stellar career lasting until her untimely death from cancer in 1967. She was apparently a hit with the troops too, at least if this photo is any judge:

Some GSB Neptunes
Those of you with long memories, or maybe just the ability to use the search feature at the bottom of each and every one of our blogs, may remember that we ran a few photos of Vietnam-era P-2 Neptunes some time ago. Whether you do or don't remember is irrelevant to what we're doing today, though, because we're going to drop back even further into the past of a patrol bomber that was there for every minute of the Cold War, performing every mission imaginable and doing it all in the most capable of manners.


Many thanks to Doug Siegfried and Mark Aldrich of the Tailhook Association for sharing these fascinating images with us. Now where's that old Hasegawa kit...
The Relief Tube
We're taking a different approach to things today and telling you about something we're about to do, rather than trying to correct something we've already done! One of our readers, Ed Ellickson (aka "The Real Mister Ed") sent in a series of photographs of a really nice conversion he did on the Hasegawa P2V-7, turning it back into a Korean War-vintage P2V-3 of VP-6, along with some interesting notes and comments. We'll be running those photos and comments next issue, but here's a teaser to wet your whistles while we wait:

phil

No comments:
Post a Comment