Whatever Happened to Doing Your Own Research?
There was a time, and it wasn't all that long ago once you think about it, when those of us who embraced serious scale modeling had a hobby that worked on a number of different levels. We didn't have all that many decent kits to choose from as far as accuracy or even availability was concerned, so our very first task was to pick a subject and locate an appropriate kit in whatever our chosen scale was, a simple chore at first glance until you remember that whole availability thing, because it was as real a problem as real can be. A lot of us learned how to scratch build and do significant modifications back in those "good" old days, because we were largely dealing with "authentic scale models" that had begun life as toys, or maybe basic desk models. The point is, we had to research pretty much everything, and that was back in the days before anyone had invented either the internet or aftermarket. We also learned how to research using the limited tools available to us in that time and place.
That's right, folks; we only had books, magazines, photography and, for an extremely limited number of us, various documents and reports gleaned from archival institutions and museums, as well as from other collectors of such things, to help us in our quest for knowledge and polystyrene accuracy. It was a struggle sometimes, but it was also fun and satisfying as well. We researched our next project and found a kit, or something that could be converted into what we wanted if no kit was available. We found the appropriate paint and, if any were even available, which was most assuredly not a given at that time, aftermarket decals. Perhaps most importantly, although we often failed to realize it way back then, we learned how to research, and how to dig things out of long-neglected archives or, more often than not, books that were inadequately researched and needed help in their own regard. The point is, we learned how to do it. In short, we worked the problem!
Skip ahead to today and it's an entirely different world. Yes, books and magazines are still there, albeit barely hanging on in this age of electronic miracles, as are web sites full of information to be had for nothing, which, unfortunately, is often exactly what they're worth, but that's a topic for another day. The reports, technical papers, and photography that often caused us to make a road trip to Maxwell, or Dayton, DC, or P'Cola back in those halcyon days of long ago, can now be had at everyone's convenience if they only care to look for it in the appropriate places online. The stuff is there, and available to anyone who cares to put the electronic sweat equity into research.
With that said we are, in so many ways, back to a worse place than we were 50 or 60 years ago. Yes; the information is there for the taking, but so are modeler's web sites with public platforms and that, my friends, has given birth to an entire category of modelers who sign onto the forum of their choice and ask questions ranging from "what color should I paint it" to "what markings were used on the airplane I want to make", or even "What should I build for my next model?" Why bother to learn how to research when you can just ask, thus taking advantage of the accumulated communal knowledge and expertise of any number of self-appointed experts, along with the infrequent actual authority, to look things up for them. To some folks (ok, to a LOT of folks) it makes sense to do things that way too, sortof, because it's fast, easy, and free. Of course, anyone who chooses that route tends to miss the most important part of the whole deal, which is learning how to find things out for yourself and validate the information that's discovered. Besides, just because someone has been anointed as an authority on something doesn't mean they actually are, it may just mean they have a good game.
Let's leave this typically mindless ramble of mine with a thought. You obviously have a computer, or access to one, or you wouldn't be reading this blog. You probably go to a number of other sites as well, and read a few, or a great many, of those modeling forums, and you might even ask some of those "why is there air" sorts of questions from time to time. Maybe you should take the bull by the horns and learn how to do those things for yourself instead of asking someone else all the time? Maybe you'd discover you enjoy doing it, and in the process learn how much fun digging for information can be, and then discover the absolute joy of finding what you're looking for even though you didn't think you could? Or maybe you'd prefer to let somebody else do that sort of thing for you and be willing to settle for whatever they produce be it right, wrong, or totally indifferent.
My conclusion is obvious, and it's more than a little bit trite, but the choice is yours and I think you should go for that brass ring!
I rest my case.
A Hog You Might Not Have Seen
I've known Ron Picciani for a very long time, a span measured in decades rather than in years, and I've occasionally run images from his seemingly bottomless collection on this site. He recently contacted me saying he'd come across a fairly unique Corsair that he wanted to share, an offer that simply wasn't to be refused, so here it is!
It's possible that you've seen this one before but we sure haven't! The airplane is a Goodyear-built FG-1D (BuNo 92434) attached to the Navy Reserve component at Columbus. The image was taken by Harold Caldwell and provides us with a fine view of a relatively unusual airplane. Picciani Collection
Many thanks for sharing this one, Ron---keep 'em coming, please!
A Monogram Masterpiece
A few issues back, and well over a year ago, I ran a piece co-authored with Doug Barbier on how to build a model of the North American Aviation F-100D in Southeast Asia during the bad old days of the Vietnam War. In that article we discussed two of the three 1/48th scale "Hun" kits available to the modeler; those by Monogram and Trumpeter---the ESCI F-100D was deliberately ignored due to its relative rarity and overall poor accuracy---and came to the conclusion that the Monogram offering was definitely the 1/48th scale way to go. Allow me to reiterate that right now by saying that the boys from Morton Grove got things mostly right dimensionally and pretty much nailed it from a detail fidelity to the real thing standpoint as well, which we'll get to in just a minute. Further, and quite likely to the utter chagrin of a great many modelers, I'm going to climb out on an extraordinarily short limb and say that the Trumpeter kit, which as I previously discussed over a year ago, is after all largely salvageable, and is a great model airplane but not a particularly good replica of the F-100D. I'm also going to highly suggest that you go back to the September 20 and December 23, 2020, issues of this very blog and become familiar with the F-100D in SEA articles that reside there. In fact, it's actually fairly important to what we're discussing today that you do that, since they laid the groundwork for what you see before you now.
With all that said, it's my intention to completely ignore that Sino effort this time around but let's do it with a caveat: Those guys at Trumpeter have an A-Team that are capable of tooling some incredibly impressive and accurate kits, models that can stand on their own terms with pretty much anything out there. They also, however, have their very own Junior Varsity, a group of individuals who seem to do the research for the kits that aforementioned A-Team are not involved with. The "Hun" was apparently, and quite unfortunately, not an A-Team effort. Feel free to build it if you'd like, but it just doesn't float my boat, so I'm off to see the Wizard and spend some quality time with a dinosaur to boot. Care to join me?
Late in the day and getting ready to rumble, we find a pair of Huns receiving final inspection prior to launch out of Phan Rang on their way to some air-to-mud mischief during 1970. NARA Image
Let's Talk About the Kit---The Basic Offering
Monogram's 1980-vintage Hun kit was as good as it got as far as polystyrene scale models were concerned back when it was released, but that was 44 years ago, give or take, so you could be pardoned for thinking of that edifice as a woefully obsolete reminder of The Age Before Aftermarket. Doing that would constitute a considerable disservice to both the kit and to yourself, however. We'll get into the details of things in a few minutes but first let's take a look at the Big Picture, and let's also presume that you've got yourself an original early 80s white box version of the kit, which is kit # 5416. That particular issue was done in Morton Grove and was pretty much as good as things ever got, Monogram Hun-wise, and it's worth your while to track one of them down because several of the later boxings were done offshore and have some of the flash and fit problems that are often the result of such poorly considered economics. Yes, fit was always an issue with Monogram kits, or with almost any other plastic model done prior to the frequently dubious benefit of computer-designed tooling, but that whole deal gets worse the further you travel from the well, if you get what I mean, so stay with the earlier kits if you can.
We know there's going to be some issues with fit, then, and we also know, or will shortly learn, some of us anyway, that the model has raised panel lines and related details because that's what most of the companies producing plastic kits did back in 1980. We mention that because nowadays people often consider raised details to be a major deal breaker---I don't, and you shouldn't either, but no matter how you feel about raised surface detailing, working with this kit is far and away your best shot at an accurate 1/48th scale F-100D.
We also know, or at least you do if you read that first article way back in 2020, that Monogram's Hun represents a late aircraft sporting the lower wing "bandaid" reinforcements and most, but not all, of the RHAW gear worn by the airplane late in its Air Force, as opposed to Air National Guard, career. If you're building a late-war SEA bird, you'll only need to add the AN/APR-25(V) antenna that lives under the nose just behind the pitot tube mount and you'll be home free with the possible exception of adding a blade antenna or a beacon or two here and there. In any case, looking at photographs of the airplane you wish to model is a seriously good idea. With all of that in mind, let's get started with some actual modeling, and begin with...
Things That Will Annoy You
The Monogram F-100D was birthed in an era where "detail" was often synonymous with "open panels" featuring assorted lumps and bobs hiding behind them and there are two of those to be found in the kit, both on the port side of the forward fuselage and both related to the depiction of the airplane's Pontiac M39 gun installation. One is an ammunition access panel that lives just under the cockpit coaming, and it fits, mostly, but will still have gaps that need to be addressed. The other panel is down on the lower fuselage and covers the guns, more or less, but it won't fit properly; never has, and it never will, regardless of how you try to fix it. You can leave those pesky covers off to showcase the by today's standards totally inadequate detail that lives behind them, or you can enter the wonderful world of Putty/Sand/Scribe and fix the problem. It's your choice. (As an aside, if you decide to close the panels, you won't need to do anything about the inaccurate stuff that goes behind them other than omit them entirely, which is actually a positive when we get right down to it.)
Next there's the kit's basic design, which has lower wing panels connected by a web that fits between the upper and lower fuselage halves, which were designed that way to allow for maximum detail in the landing gear bays and speed-brake well. That mission was fully accomplished and said wells are highly detailed and present themselves well---for a 1980-vintage kit. They're a bit lacking if your experience lies with more modern offerings and will cause the upper fuselage to distort and bit and refuse to fit properly if you build the model per instructions. The solution is a simple if somewhat draconian one: Cut that web and leave a gap in the middle so the two pieces you've just created can no longer touch each other, then build the fuselage without the trapped wing assembly. If you do it that way you can add the wings later, just like in a more normal model but be sure to cut the "pips" off the upper side of the wing tabs before trying to slide them into place since those little bumps no longer have a function and will only make wing attachment a bit more difficult. The the insides of the intake isn't accurate in any way but it's also not overly noticeable unless you happen to be building for a contest and want a full intake trunk in there. I didn't, so I didn't do that, but I did sand off the lugs for the locating pins inside said trunk so their lumps were no longer visible. That's either a compromise or just pure laziness on my part, take your pick. At any rate, be careful with your assembly and either live with the resulting black hole in the front of the airplane, which will provide a great illusion of depth, or steal a compressor face from another kit and stick it way back in there after you do something to extend the intake trunk, once again going for effect rather than accuracy. Oh, and the kit doesn't provide any way to depict the gun-laying radar that lives up there inside the upper nose on the real airplane. You can replicate it or not, depending on how serious you are about the project.
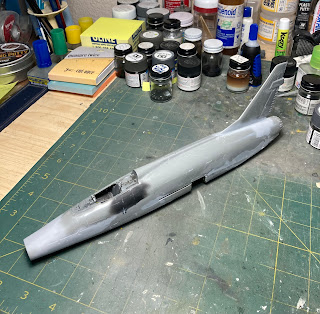
Here's a mostly completed and partially puttied and sanded fuselage for your perusal. The fuselage has been assembled and all the big pieces important to it have been added. The tabs on the wings will go into those slots once all the bodywork has been accomplished and the plastic polished out, and the horizontal stabs have been removed to be replaced later, at the end of construction and painting. This is an earlier model of mine and has the horizontals dropped into the full-down position, although the
Super Sabre I currently have under construction has those stabs still in place and also has far less putty thanks to better knowledge on my part on how to build the model. Let's call that one Learning From Experience...
While we're discussing those horizontal stabs, the same engineer who designed the wing fitment also saw fit to mold the horizontal stabilizers integral to the upper fuselage half. That's no big deal and can be easily dealt with as long as you're careful with your assembly and subsequent sanding, but you may want to display your model with the stabs in their full-down position instead, which is how the Hun was often parked. The kit's position is just fine, however, so you can leave things as they are if you're confident of your ability to properly assemble and sand that area of the fuselage. Otherwise, you can drill a hole straight through the aft fuselage and insert and pot in a piece of aluminum tube (because it's easy to sand), thus making a bushing for the brass rod you'll use to connect the two horizontal stabs to the airframe after all your bodywork is done.
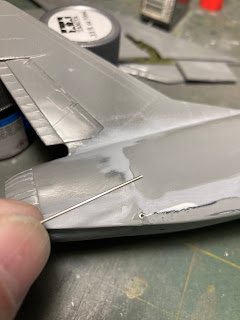
See how easy that was? You might also note all the putty used on the fuselage. Yeppers: She can a putty queen if you aren't careful, but all the work is worth it in the end!
While we're here, and jumping the gun a bit since you still haven't put the interior in place, let's determine what sort of Hun you're building since the kit comes with different afterburner components; the one North American Aviation thought the airplane should have and the more reliable F-102 item that an Air Force crew chief decided was a better mousetrap late in the Hun's service life. Remember, though, that those Deuce ABs were only fitted to Huns in the ANG, and even then not to any of their airplanes that went to SEA. The regular as-manufactured afterburners were back there for the type's entire service in Vietnam.
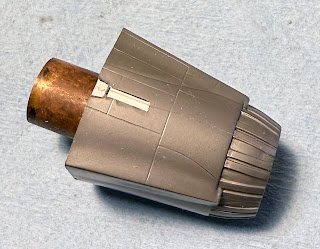
There's at least one bit of aftermarket out there dealing with the "regular" afterburner you'll need for a wartime airplane, but I didn't use it, choosing instead to give the jet-pipe some depth by cutting out the solid back of the exhaust pipe and sliding a piece of brass tube over the resulting flange I'd created. I also cut out the well for the tail bumper and boxed it with a piece of plastic channel to give the illusion of depth back there. It's really simple, and it works.
We Ought to Have an Interior
And the stock Monogram one is just fine, thank you very much! As you might expect, there's an Eduard photo-etch set for the Hun, but it's dimensionally too big to fit the Monogram kit because it's scaled to fit the over-large Trumpeter model. QuickBoost do make a seat that's worth using but you can get to the same place by modifying the existing Monogram offering, which is a polite way of saying that aftermarket isn't required for this kit's interior unless you want to tell your friends you used it, so they'll think you're one of the cool kids. About the only thing you might want to do is figure out what sort of RHAW gear the airplane you're modeling had---that's relatively easy to determine just by looking at the lumps and bumps on the vertical stab of the real thing---and adjusting the black boxes on the top of the instrument panel to match, keeping in mind that Monogram's as-offered kit is accurate in that area as well and provided the boxes appropriate to the kit's RHAW fit. You'll need to do some backdating for anything else, but the kit's gunsight and associated black boxes are entirely appropriate for the late jet that Monogram modeled for us. You can detail all you want, of course, and a little bit of Modeling 101 will go a very long way in this cockpit. should you choose to go that route.
Sticking the Fuselage Together
This really ought to be a no-brainer, but if you're building your first Monogram Hun kit, you're probably going to pooch it and end up re-learning all those words that the generations far more genteel than the one we presently live in once considered to be highly naughty because of all of the fit issues you've just created. It's a bit redundant since we sortof discussed that very thing just a paragraph or two ago, but here's how you can avoid doing that.
First, like we said up there in the beginning, cut that wing web so you can build the fuselage without interruption, as it were. This would also be a good time to carefully (can we say that word all together please: CAREFULLY) cut the horizontal stabs off the upper fuselage half if you intend on showing them in their full-down position. and mark the centers of both the stabs and the fuselage where those stabilators once lived and put a witness mark on the fuselage as well so you can drill a hole there later on. You can also just leave the stabs as they are and work around them, which is perfectly viable and entirely representative of the real airplane, or you can cut them off and butt-join them to the fuselage after all your bodywork is done---it sounds somewhat crude to do it that way but it works as long as you use something like Tamiya's hot-rod super thin super-fast super-duper glue and do it prior to painting. This would also be a good time to improve the appearance of that quartet of GM M39 20mm cannon that live under the nose. Simply drilling the muzzles out will work for most people, or you can drill, chisel, and file out the guns and replace them with blunt hypodermic needles, or even completely rebuild the entire area. The choice is yours, but you really ought to do something down there!
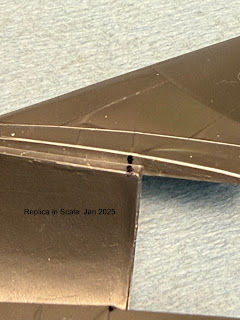
There are different ways to attach the horizontal stabilizers should you choose to remove them from the fuselage either for ease of assembly or to pose them in the full-down position, but however you decide to do it you really ought to consider marking both the fuselage and the stab so you'll know where to drill your mounting holes if that's the path you want to follow. By Guess and By Golly is a technique that works great for some things but not at all if you're trying for any sort of semi-precision alignment of identical things that sit on opposite sides of a fuselage, right? Anyway, extend those markings to the appropriate position and put in a pilot hole with a drill somewhat smaller than your final connecting pin and bushing will be, then deal with it after most of your bodywork is done.
Anyway, get your interior finished, and maybe put a couple of lead weights in front of the instrument panel and on top of the intake trunk; that's a just-because sort of precaution since the kit really doesn't need the ballast but that could change if you decide to hang things made of solid resin under the wings. (CG is a real thing, ya'll, even in plastic.) Stick the landing lights, parts 68, into the lower fus halve per the instructions or not, depending on how you want to depict those landing lights (but keeping in mind that they don't fit very well as given and will require attention no matter what you do), then put the interior in in place in the upper fuselage, taking care to align everything properly. All of this is in preparation for glueing the fuselage halves together, which you should do exceedingly carefully, a little bit at a time, and taking care to align things so the fuselage halves actually fit properly as you go along. That aforementioned Tamiya super-duper cement is your new best friend here, should you choose to use it. Inch your way along, glueing and holding and all the while matching up the fuselage halves until both sides are done, the goal being to minimize your employment of significant sanding and puttying once everything is together. The intake ring goes on next, aligning things as best you can, and then the tail cap and jet pipe. Let everything sit overnight, then sand the resulting seam smooth. If you did it right, you'll end up using a tiny bit of putty here and there and performing a modest amount of sanding; less care at this stage will result in more work to clean things up, but you'll get there either way. Care and precise alignment as described should get you the best result, but that's in your hands, right?

This is yet another earlier Hun of mine and has been glued, sanded, puttied and polished, and is in the process of having its primer polished as well. Note that the fairing for the RHAW gear that lives on the trailing edge of the vertical stab has been substantially reduced in thickness. This model ended up representing an F-100D during its initial deployments to Vietnam with the 481st TFS so the as-built fairing is being represented, and was achieved by simply sanding things down until the appropriate thickness was reached.
Accomplishing those things will get you to a good place airframe-wise unless you want to replicate an early D-model with the original speed brake, a configuration which will require you to modify or rebuild the speed brake panel and, more importantly, the speed brake well. My personal modeling interest in the airplane tends to span the years I spent in Misawa (1962-65) and the Vietnam War so I've never been in the position where such modification was necessary. I've been told that the Trumpeter speed brake will work just fine as a modification set in this regard, since both styles with their wells are provided in that kit, but everything else related to that model seems to be a bit oversized, something to watch out for if you decide to try that particular modification. I've never done it myself so I can only tell you that it's possible.
The Vertical Tail, and Mr RHAW
That subtitle is a bit misleading, of course, because that whole RHAW thing includes not only the vertical tail but ultimately a bit of related chisel-shaped gear up under the nose as well. Monogram provided us with optional aerial refueling probes so we could enjoy a bit of markings variety right out of the box, which means building an earlier configuration jet, but in every other respect the kit represents a late F-100D right down to the wing bandaids, wing beacons, and antennae, and, of course, the representation of the APN/APR-25 RHAW gear on the vertical tail. We'll get to the bandaids in a minute, but you need to be clear on that whole Radar Homing and Warning thing if you plan on modeling an F-100 as used in SEA. (In that respect I'm going to be really lazy and refer you back to my 29 September 2020 issue of this blog, as well as several others scattered throughout this ongoing literary project that have featured the F-100 in one manner or another. That September 2020 issue defines the SEA-era RHAW fit better than I plan on describing it here, and there's no point in repeating everything so let's just go with the basics: A pre or early-War Hun will have the really flat equipment panels back there, just above the rudder, while the later birds, to take in most of the camouflaged ones, while have the bulkier equipment fit, possibly to include the "eyeballs", and the chisel-shaped sensor up under the nose.
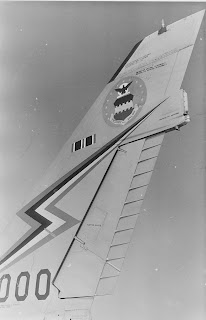
This particular RHAW treatment is what you're after if you're modeling an early jet. Note how "flat" it appears in comparison to that of a wartime bird. The fuel dump is a normal thing regardless of which RHAW fit is on the airplane, as is the anti-static wick and the red and white position lights seen at the back of the fairing. Note the APW-11 antenna sticking out of the top of the vertical stab; it's not that unusual to see it in place pre-1962 or '63 but was almost never seen on airplanes used in Vietnam. This airplane is an early 60s UK-based D-model (the famous 20th TFW "Triple Zilch" now on display at the Late Great Kelly AFB). Ben Brown Collection
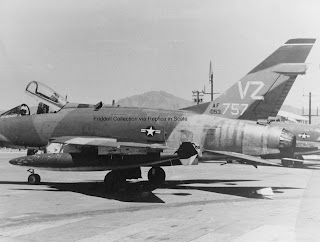.jpg)
This shot was used a couple of years ago, a part of the first significant F-100 piece on this blog, but if you can get past that you'll have a valid comparison between the early (the photo immediately preceding this one) and later RHAW fairing treatments. This fairing is the one Monogram provides molded onto the vertical stabilizer of their kit and it's accurate, albeit inappropriate for an early-War (1965-67) jet. Friddell Collection
That Elusive LWNAVS Thingy
The "PACAF mod" (LWNAVS, for Light Weight Navigation System) is an installation that confuses and confounds almost everyone who discovers an interest in silver wartime Huns. In its simplest form, it describes the installation of a long-range over-water nav system fitted only to those F-100s (Ds and some Fs) assigned to PACAF prior to the war, but there's a catch. Very few if any Huns actually had the mod in the Pacific prior to the mid-Sixties when airframes previously stationed in the United States but tasked with assignment to that watery bit of real estate in the event of war were modified or provided with modification kits. You can tell the jets that were so modified by the large fiberglass antenna panel on the bottom of the aft fuselage and its related cooling scoop, found up at the "kink" in the vertical tail. Keep in mind also that the mods could be performed at the unit level and frequently were, I think both in (Vietnam) and out (Cannon AFB) of theater, but I'm not at all certain of the where and when since I don't have hard documentation supporting it. You may recall that Doug Barbier shared a partial listing of modified jets with us way back there in 2020, which will help in the identification of many airplanes that actually received the mod. In my world that calls for a conclusion, so I'm going to blithely close my eyes, stand way out there on a limb, and say that I doubt you'll find a documented image of an F-100D or F in Japan, for instance, that was so-modified when the Cannon jets began their steady march to the mainland Far East. I'm open to correction here, of course, but only if it's accompanied by a dated photograph---no speculation or assumption allowed, because I've already done enough of that myself! Whew!
The Wings
One of the easier tasks to accomplish with this kit is the assembly of the wings. Most of your time here should be spent carefully trimming, fitting, and aligning the upper and lower halves. Remember that the Hun's slats were deployed on the ground and were not gravity operated, so don't cut those actuator arms off unless you plan on replacing them with something more to scale and closer to the real article.
Most D-model F-100s had a fence that lived on each wing and I've yet to see a photograph of a SEA-based Hun without them, so it's pretty much a given that you'll need to build them. They have a "cap", for want of a better word, that gives the assembly the appearance of a T when seen from the front. The kit doesn't provide any sort of hard location marks for the ones it provides but they're easy enough to eyeball in place. I generally use the kit items as templates and cut my fences out of .010 styrene, but I've also used kit parts in the past and have also omitted adding those tee caps on one model. That was an oversight on my part, but I did it and nobody who's seen the finished model has ever commented on it and I haven't gone back and fixed it, for whatever that means. You may see things differently...
While we're speaking of seeing things, one of the late-Hun features that Monogram included on their wings was the pair of teardrop-shaped lights located out towards the upper surface wingtips. This is very much a late-War thing, and those lights may need to be sanded off depending on the jet you're building. This is the part where I would normally say that photos are your friend, but the chances of you finding a photograph that actually does or does not show the lights on the exact airplane you want to model is highly unlikely. My personal rule of thumb for my own models is no lights pre-1970. That's a guess on my part (I'm honest to a fault) so let those cards and letters roll but beware of the wing lights!
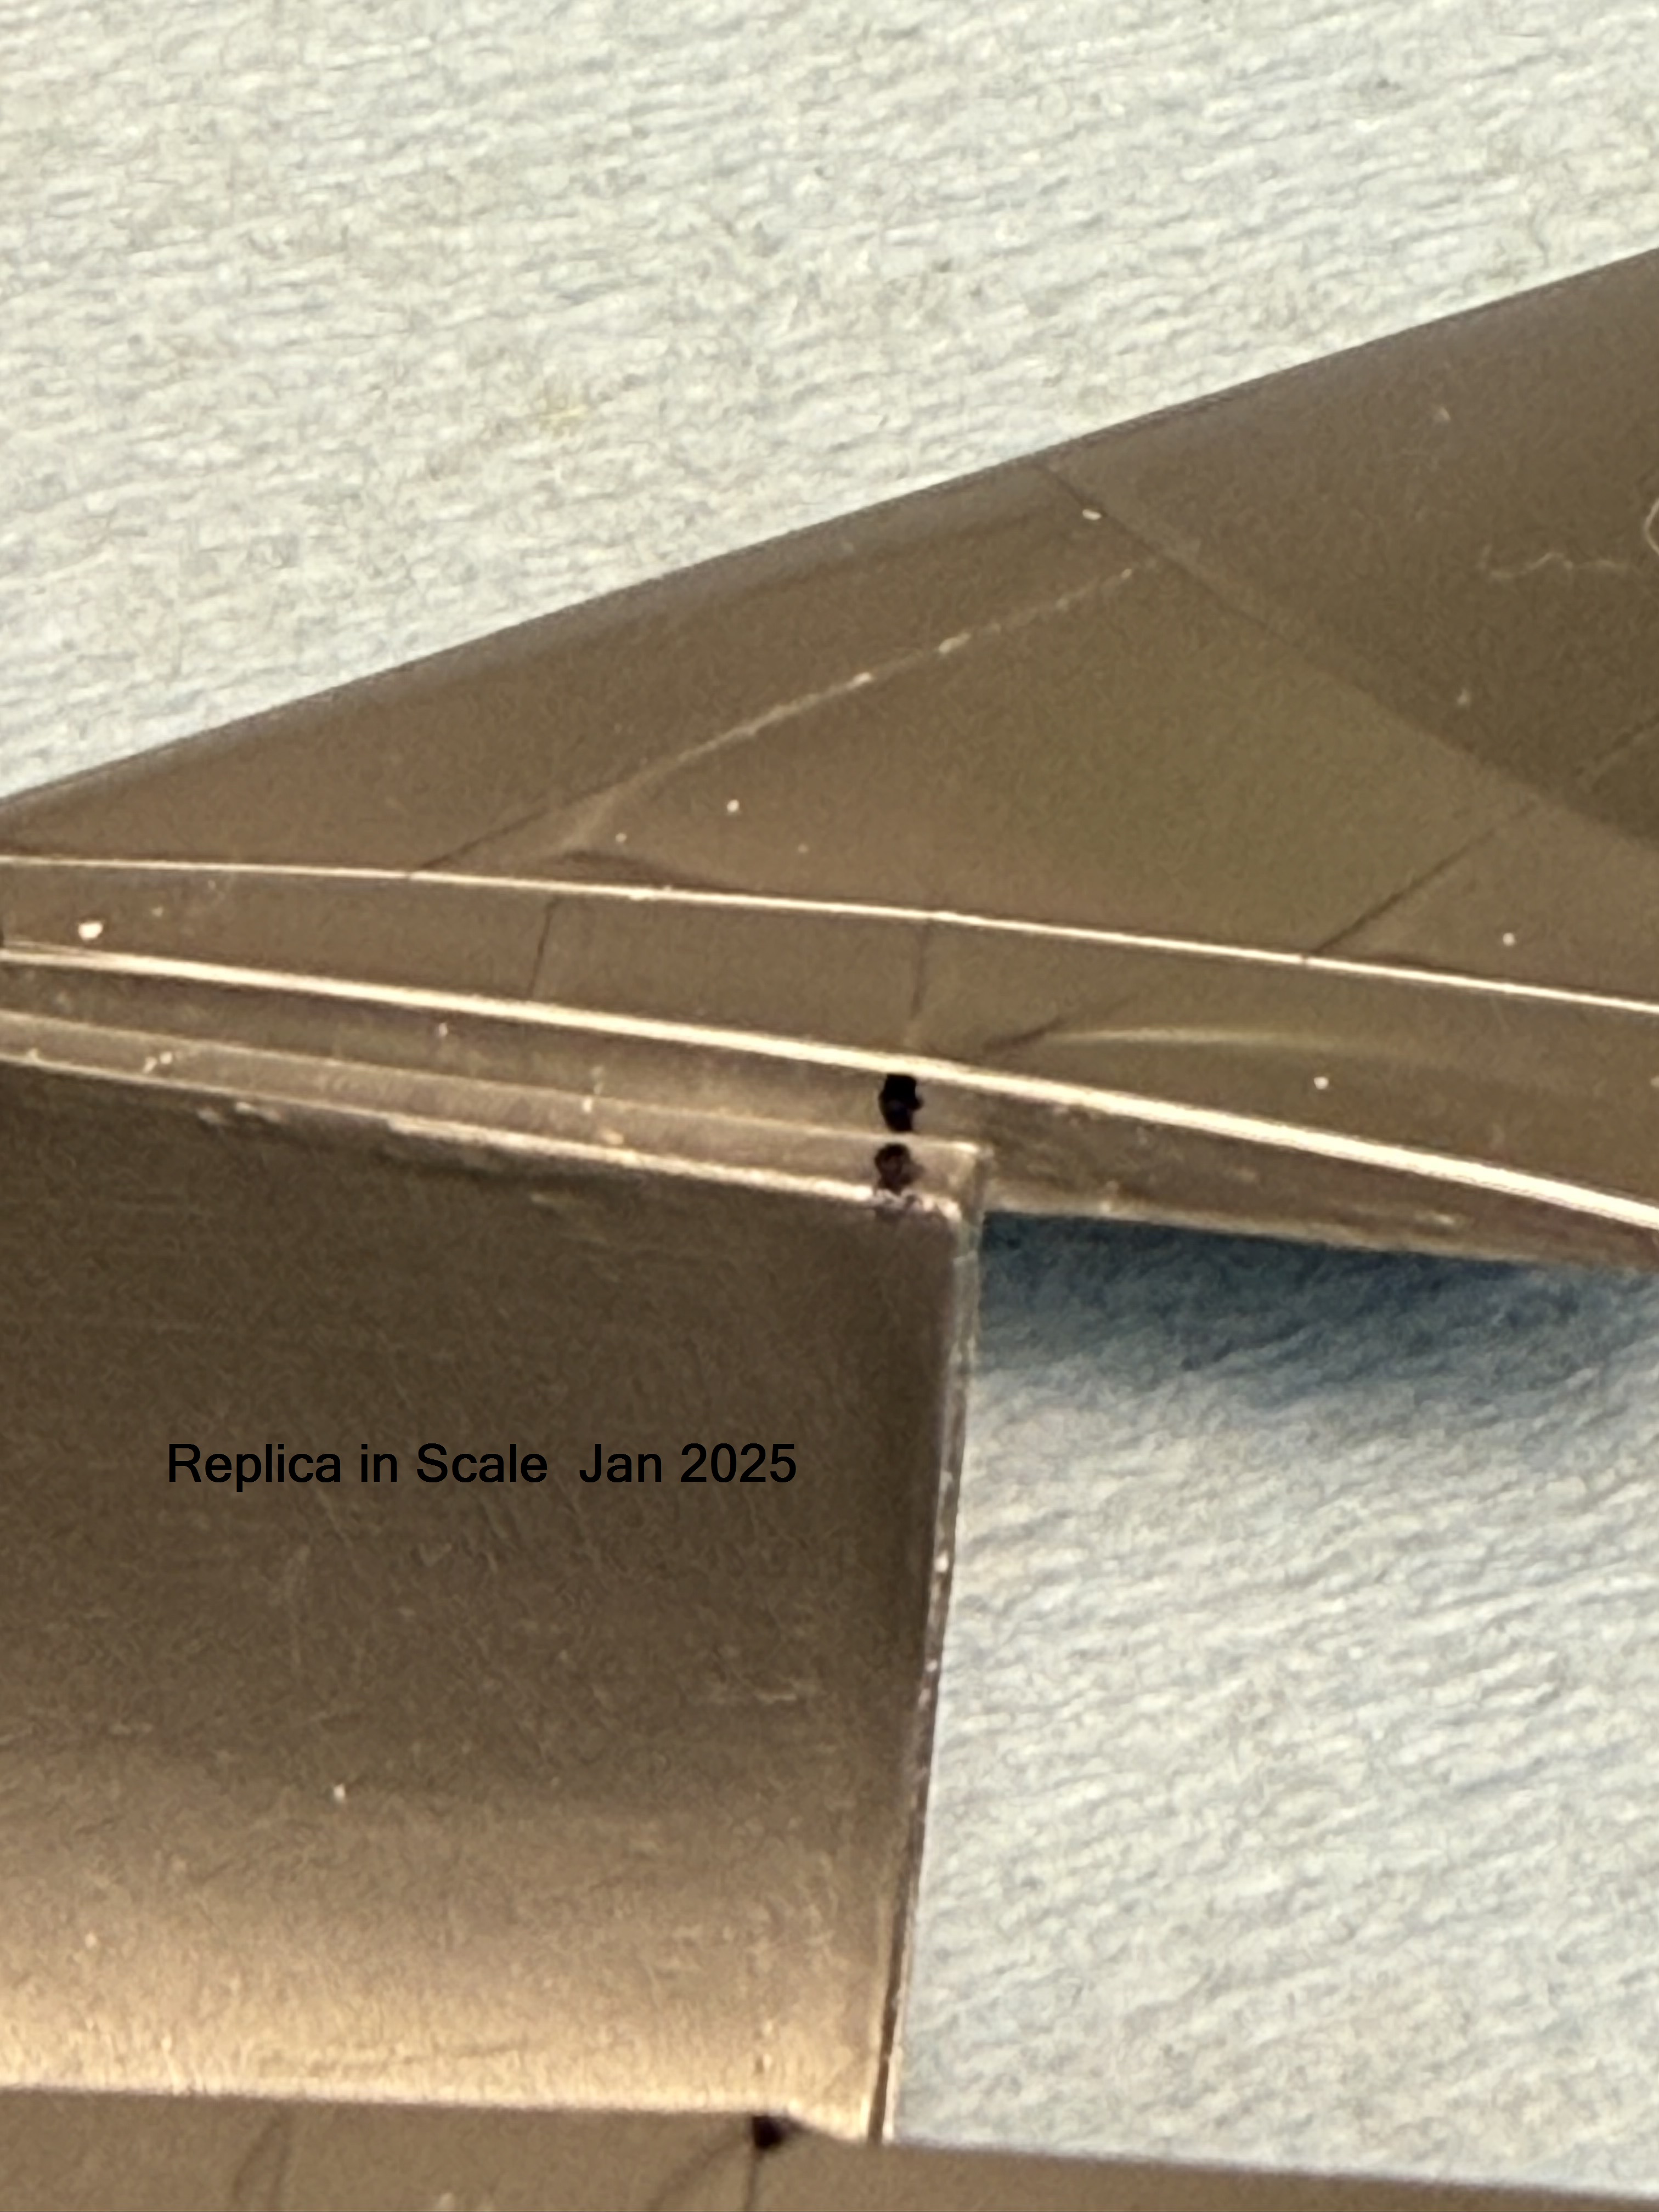
One thing you probably should fix are the wing caps found tight up against the fuselage on the lower wings, sitting on top of that line of segmented doublers that also lives down there. Once again they're there because Monogram modeled a late jet and almost all of the later F-100Ds and Fs had the reenforcements once a couple of wings failed in combat due to age, fatigue, and the occasional overstressing of components during combat. The bandaids are easy to spot, but a bit tricky to remove---see that raised detailing up against both upper and lower wings, right up beside the fuselage? That's not them, but the conglomeration of lumpy things scabbed onto those same details on both lower wings are. I've removed them carefully with a micro-chisel and sandpaper, and also by sanding all that detail completely away and doing some careful work with strip styrene and a scribing tool to replace the now-missing factory detail, and you don't have to do anything at all if you're modeling a later jet (1966 and later, I think...) but any silver Hun you replicate will most likely require a bit of bandaid removal.
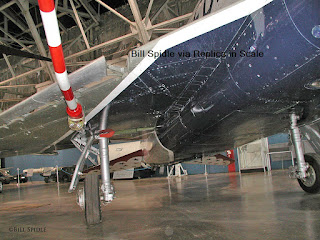
This photo, taken of a restored F-100D by Bill Spidle, shows the configuration of the reinforcement that lives under the wings and tight up against the fuselage. Look closely at the side closest to the main gear and you'll see the airplane has had the bandaid applied to the original wing root doublers. While we're down here, take a look at the base of the refueling probe as well. This is a wonderful photograph in so many ways! Bill Spidle

Here's a slightly different view of the same area of that restored Hun, showing the base of the refueling probe to what some people might call Good Advantage. It also helps to clarify the way the infamous bandaid mod appears as modeled on the Monogram kit---they actually overstated the mod just a bit and it's heavier than it ought to be, but it's entirely usable as-is for most SEA-era Hun models. Bill Spidle
One further thing you may want to deal with is the wing slat actuation mechanism, which is far busier than Monogram's kit would imply:
Note the slat actuation mechanism; Monogram gives the actuators as basic rectangles sticking out from the wings to attach to the underside of the slats, which was about as good as things got when the kit was new way back in 1980. The aftermarket hasn't bothered with reproducing the slat actuators yet and I honestly doubt they ever will, which is a shame since the whole business is fairly busy and would be somewhat difficult to scratch up, although modern 3-D printing could simplify the task. They may be better detailed in the Trumpeter kit, which could provide an option in that regard, but I've never owned one, so I just don't know! Bill Spidle
That takes care of the basic wings. You'll want to be careful with the refueling probes once your model has been mostly assembled; two different ones are provided in the kit, (two different bases and two different probes) from which you can easily model any one of the ten or so variations of that assembly that existed on the real airplane once you've got a handle on what those variations are. Dave Menard allegedly had all of that nailed down, but I have yet to see anything definitive that defines all of them, or even most of them, so once again photographs are your friend.
Those Accursed Wing Pylons
You'll have to add them sooner or later, but we aren't going to do that right now. For the time being it's enough to make sure what's in the kit have been cleaned up and fitted to the wings as well as they can be---they tend to suffer from Gaposis when in place but that's easy enough to deal with. You should, however, make up your mind right now as to what you intend on hanging under your finished model. The kit pylons are accurate, if only that, for a war-time Hun, but once again there were variations, and a great many of them too, or so it seems, and I'm going to tell you right now that I don't know what all of them were nor, apparently, do my go-to guys, so true accuracy may have to be one of those Someday things in that regard. Still, what's there will look a little better if you cut or file off those long attachment points on parts 42 and 72 (the inboard and outboard weapons pylons respectively), then take a close look at the "tabs" that stick out from their sides. That's one of the later configurations for that part, modified as combat experience was gained very early in the air war. If you're modeling an early, or pre-war, jet, you'll want to span that web and the easiest way to do it is to measure things, cut off the existing parts, and re-make them from .020 sheet styrene. Otherwise, thin them down at the very least, and do your best to duplicate what you're seeing there.
The middle pylons (parts 49 and attached to the kit's gas bags) are modeled integrally with what the kit provides as a fair representation of the pre-war 275-gallon aux tanks. That means you can use what's in the box for any pre-Vietnam War-era Hun with those tanks, should you choose to do so. You can also employ aftermarket bags, of which our current favorites are those from ResKit, whose superb set of tanks will allow you to model either a 275 or 335-gallon tank straight out of the box. They're cleverly designed and only require a modest amount of cleanup and minimal assembly in order to become a highlight of your F-100 build. If you need a pair of the 450-gallon tanks instead, you can source them from Gerry Asher at Fox 3, who can also set you up with a centerline pylon if you're modeling an early or mid-60s SIOP bird that's carrying a centerline weapon, or you can scratch up a pair by stealing the tanks from a Monogram F-101B and putting fins on them.
A detail often missed by modelers, and pretty much everyone else who studies the Hun, is the fact that those middle pylons have an airfoil shape to them to aid in stores separation since the tank pylons are permanently attached to the tanks and go with them when they're jettisoned. You can easily modify the kit pylons once they've been removed from their tanks and, although I can't offer you dimensions, I can share a photo or two that Ben Brown took that shows the shape:
This view shows the curvature of the airfoil on the starboard mid pylon. Note the somewhat severe curve and the bump that accompanies it. This is one of those things you just can't un-see once you know it's there. Ben Brown
Here's a view of the top of the pylon showing the subtlety of its shapes. Ben risked snakebite to take this shot for us, so you should be suitably grateful! Ben Brown
Both if these images are copyright to Ben Brown, by the way, and you ought to respect that and give credit where it's due should you decide to share the photos.
You can also hang a Mk 7 on the port middle pylon if you're doing an early SIOP bird, but in that instance it's a dedicated pylon and you'll have to scratch one up or modify one from another kit, since nobody that I'm aware of makes such a thing for the Hun in any scale.
The inboard pylons, parts 42, can be used to hang a TER from, but that's only a late-in-the-war thing, or AN/M65s, or Mk 82s, or nape cans, or, very early on, before they learned better, the AGM-12 Bullpup, on those airplanes configured to carry it. You could also hang a 200-gal gas bag there, but its use was heavily restricted during the war because it only exacerbated the F-100's already-squirrely low-speed handling characteristics and drastically reduced the airplane's limited weapons carriage ability.
The outboard pylons, kit parts 72, can be used for nape cans or Mk 82s or maybe an SUU-7 bomblet dispenser. They were a frequent sight on the F-100 as used in SouthEast Asia and are readily available from several aftermarket sources.
A couple of other notes while we're discussing pylons: First, the outboards and inboards were generally removed from the SIOP birds; Huns that used the centerline special weapons store (think the 531st TFS at Misawa, but staging out of South Korea when sitting armed alert) tended to carry a centerline weapon plus a pair of 450-gallon tanks on the mid-wing positions, while earlier SIOP aircraft have been photographed with a Mk 7 weapon on the port mid-wing station, a 450-gal bag on the starboard mid-wing pylon, and a pair of 200-gal tanks on the inboards.
The point to be taken from all this is that pictures are your friends if you choose to arm your model, and you really shouldn't just stick things on there without proof of what you're doing.
That Darned Bullpup
Way back in the 1950s Martin designed and built an air-to-ground command-guided missile known officially as the AGM-12 and, to pretty much every plastic modeler who's ever touched a kit of a 50s-60s American jet fighter, simply as the Bullpup. Most F-100 kits include a replica of the initial service variant, the Bullpup A, in their offerings and it's not uncommon at all to see the missiles firmly attached to completed models of the Hun. Unfortunately, most Bullpup-armed models are incorrect in their presentation because the missiles had their very own dedicated launcher to replace the inboard pylons, and those are the installation that went to war with the F-100D. Nobody has ever kitted those Type Xs that I'm aware of, mostly because so few people know of their existence. That's a configuration thing and it's important if you want to build an accurate model. Keeping that in mind, let's consider a couple of things that will matter to you should you want to incorporate the missile on your model.
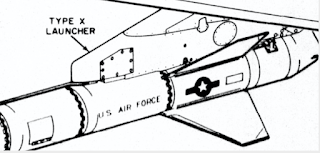
Here's a spiffy drawing that shows the Type X Launcher better than almost anything else, provided to us via the Jim Wogstad collection.
This photo, which has begun showing up in all sorts of places recently but was first identified to me by Ben Brown, shows a really murky view of the Type X launcher. Between that drawing and this image it should be possible to mod up something appropriate for a model, but keep in mind that the
Bullpup wasn't used all that often by any airplane that shot it in anger and wasn't very effective in any event. Ben Brown Collection
After you've done those things you'll want to narrow your search down to a particular airplane, and we can offer a bit of advice in that direction. First, Bullpup use in theater was a fleeting thing because the weapon didn't work as advertised; it's small warhead and requirement for a launch platform that flew relatively straight and level during delivery (I'm pretty sure the guidance system allowed for only a 10-degree deviation from the aforementioned straight and level flight, a consideration much appreciated by enemy antiaircraft gunners at the time.) That simple fact limits your Bullpup window to the 1965-time frame, which also limits you to the early silver jets. To be a bit more specific, there are photographs of the 416th and 481st Tac Fighter Squadrons with Huns actually armed with the missile in theater and there may be others, although I don't think so (a subjective opinion, that, but one based on looking at a lot of photographs; if you can offer a documented photo of an airplane from a different unit, or one in SEA camouflage, carrying the weapon I would love to see it and promise to be appropriately contrite in my correction!). Doug Barbier provided us with an incomplete yet fairly extensive list of the jets that could carry the weapon and I published that back in 2020---keep in mind that you can't accurately stick a pair of 'pups on just any F-100. The airplane would be configured for it, and once again reference to that 2020 article is your friend. (See, I TOLD you you'd need to have that piece too!)
The Speed Brake
The Super Sabre utilized two different speed brake configurations, with the earlier one being the one less-often kitted in plastic. Monogram's kit duplicates the later, modified component that was cut away in order to provide clearance for and allow the carriage of a container of Instant Sunshine, most often a Mk 28 Special Weapon, on the centerline. A few Huns carried primitive combat documentation pods (cameras) in that location early in the war in Southeast Asia but only briefly and generally only on the silver jets. It can be up or down when the airplane is parked but that's a configuration that was deliberately selected by the pilot or crew chief; it didn't droop of its own weight. The gear doors and slats didn't do that either, in case you were wondering, and in that vein, I'm going to strongly suggest you embark on a study of F-100 photos so you can better understand what's going on there configuration-wise.
The Landing Gear
Monogram got things right in so many ways when they cut the tooling for this kit, and the landing gear is a prime example of that. The gear legs, doors, and tires/wheels are just real darned good and can stand their own against any of the newest whiz-bang Wunder Kits if you do your part. Be careful, pay attention to what you're doing, and take your time cleaning up the mold lines. The results of a bit of diligence here could astound you, presuming you're prone to such things. You might want to take a look at those folding gear doors on the centerline while we're at it, because this ain't no Mustang or Sabre, ya'll, and those doors, just like all the others on the F-100, don't hang as the hydraulic system is allowed to bleed off pressure.
While we're dealing with the landing gear you should probably consider refining the arresting hook too. It's not that bad in basic detail but is way too thick and clunky and looks toylike in comparison to the rest of the model. Some time spent carefully cleaning it up will yield remarkable dividends, or you can just scratch up a replacement if you've got the chops---it's a simple component to make.
The Pitot Tube
You can use the kit item if you'd like but it's almost guaranteed that you'll break it during the cleanup process. Master, they of the exquisite turned brass gun barrels, manufacture scale pitot tubes as well and they make one for the flawed Trumpeter kit which just happens to work like a champ on the offering from Morton Grove. I'm going to suggest you buy one and use it and not even consider the kit item, but that's your choice.
The Air Refueling Probe, or Let's Get Confused!
It's possible to have some fun here, or to be pedantic, or to even do or be both things at once, but you have to understand the game and I'm here to tell you I mostly don't. I've tried; Lord knows I've tried, but I just don't have the tech manuals available to figure it all out. That said, we can at least get to a place where things will work for you, so pay attention, dang it!
The bugaboo here is the sheer number of probes we're talking about. The Monogram kit offers two; a straight probe without a light and a bent probe with one. That's pretty basic to the whole game, and I might even be able to describe several variations to you, but I can only figure out maybe five or six of those variants and I'm told by The People Who Know that there are at least ten different ones, based upon the research done by the late Dave Menard, aka Mr F-100. To be perfectly honest with you, if Dave said it I believe it, but the aforementioned People Who Know have yet to define all ten of those items, or at least they haven't shared what they know with me, so you're stuck with me telling you what I know and, even worse than that, what I think I know, but I do know one thing for sure: The refueling probe bases would accept all, or at least most, of the probes, which means mixing and matching was highly possible at the squadron, and certainly at the depot, maintenance levels.
First, we've got the straight probes, and there was at least one shorter one of those too, I think, and a longer one, both without lights. I'm pretty sure there was one with a light as well, so it's back to the photo stacks on that one, but that gets us up to three at any rate.
In theory the "bent" probes are a little easier, maybe, but then again maybe they aren't. I think the early ones could have been without lights, and after that I know there was a streamlined light and a "bumpier" late one, which is the one Monogram provides with their kit, although they apparently didn't know there was a light and a lens there, and which is appropriate for a late F-100D. You can use what's in the kit or you can mix and match the bases and probes, or just modify the bases, or maybe even steal one from the Trumpeter kit, but whatever you do I would suggest cutting out the "lens" portion on that late Monogram probe base and making a proper one from clear sprue.
With all that said, I'll give a big sigh and wait for the two or three people who still read the pitiful remnants of this blog, or maybe even those nefarious People Who Know, to contact me with the straight skinny regarding the mysteries and vagaries of the Hun refueling probe. I'll publish the results if they do, and I won't if they don't. Seems fair to me!
The Canopy
This really ought to be a no-brainer, but there's some stuff inside the canopy rails that's not included with the kit and will show if you choose to display that item in the open position. Have a look at some photos and duplicate what you see because the detail, or lack of same, will stick out like the proverbial sore thumb against the flat black of the inside of the canopy frame once you know it's supposed to be there.
A Summary of Sorts
The Monogram F-100D is a seriously good kit somewhat flawed by fuselage engineering that wasn't quite up to the task at the time the kit was tooled. When completed it looks like a Hun, it sits like a Hun, and those of us, including myself, who were privileged to be around them when they were still operational with the regular USAF, can attest to the fact that the boys from Morton Grove got it mostly right way back there in 1980. Yes, the kit will take a bit of work in order to get it up to contemporary standards and, to be perfectly frank about it, your results are going to depend a lot on your ability to plan ahead and your existing skill sets. There are people out there who aren't quite ready for the kit yet; you can generally tell who they are because of their excessively negative comments regarding it. It's not perfect, and certainly not up to the computer-assisted standards many of our polystyrene compatriots are used to working with, but it's an entirely viable kit that will yield splendid results with just a little bit of forethought, planning, and elbow grease.
Let's Look at Some More Pictures!
But this time let's do it with real airplanes instead of models! The images I'm sharing today are somewhat of a hodge-podge in that they're all D-models, but some are distinctly pre-SEA War, while others were photographed in the thick of things; the variety is quite deliberate because I wanted to illustrate a fairly compact part of the Hun's history, specifically those years between 1960 and 1970. It may, in point of fact, be of more importance for everyone to understand what this piece is not intended to be rather than what it is! Specifically, it's not a serial number listing nor is it a definition of the myriad of units that flew the Hun. nor is it a weapons treatise, and I'm most assuredly not attempting a potted history of the air war over SouthEast Asia during the 1960s nor a tech order by tech order listing of all the changes made to the airplane during its service life. I wish I could, but I just don't have those resources at the moment. Look on these images as an aid to our comprehension, if you will, and nothing more than that. (I will, however, insert the somewhat blatant statement at this time that I'm always looking for photography of American military airplanes and the Century Series in general and images of The Silver Air Force and the Hun in particular. If you hold such photos and would like to share, you can reach me at replicainscale dot blogspot dot com.
Now, are you ready? Let's look at some pictures!
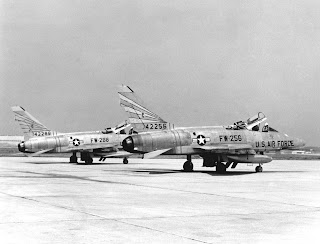
Let's start with a couple of pre-War PACAF birds! The squadron is the 80th TFS and the location is their home drome at Itazuke AB, Japan. I think the year is 1959, although that may be off by a year or two, and these airplanes illustrate a number of the features we've discussed in this article to advantage: The tailplanes have been positioned in their full-down position to allow easy crew chief access to the access panels at that end of the airplanes, and all of the landing gear doors are down, as well as the as-yet unmodified speed brakes. Both aircraft are carrying a pair of 200-gallon tanks on their inboard stations, not a popular thing with pilots due to their unfavorable impact on the aircraft's flight characteristics in some flight regimes, and they feature one of the several variations of straight refuelling probe. The airplanes are being pre-flighted and readied for a mission, thus providing us with a great insight into the daily operations of the squadron during their time on Kyushu during the late 1950s.
..jpg)
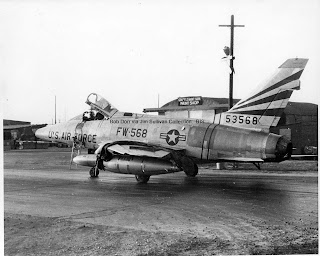
You've seen this one before, but it's worth seeing again, first because it's probably the oldest image in this series but also because it shows the airplane the way it appeared when it sat on SIOP alert in Korea during the late 1950s and early to mid-1960s due to the Japanese government's steadfast refusal to allow special weapons in their country. This shot of an 8th TFW F-100D was taken at Osan during 1959. The airplane is manned and that's a Mk 7 on its port mid-wing pylon, with a 200-gallon bag on the inboard station. The starboard wing would have been configured with the same 200-gallon inboard tank as well as a 275 (or possibly 335) gallon tank on the mid station. The outboard pylons were removed since their capability wasn't required for the mission. Modelers note the horizontal stabs, which are in the neutral position, and the wing fences which appear to be painted the same color as the tail flashes. Bob Dorr via Jim Sullivan Collection
.jpg)
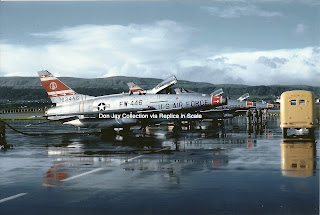
Here's an evocative shot of some D-models from the 354th TFW through Lajes, in the Azores, during 1960. Note the straight refueling probes with lights and the flat ECM panels up on the vertical tail, as well as the tailplanes sitting in their full-down position---that's a crew chief thing, done to allow drogue chute access and to make life easier in general for the ground crews. I've said it before and will say it again: The hydraulics on the F-100 did not allow for control surface, speed brake, or landing gear door "droop", so the only times you'll see those things moved around on the ground will be if somebody deliberately did them. The gas bags are noteworthy; they're the 450-gallon variety normally utilized for maximum range or special missions. In this case it was a maximum range thing. Don Jay Collection
.jpg)
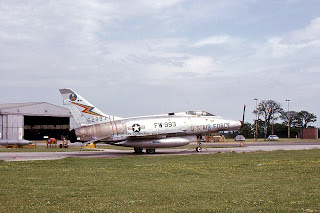
Here's a lovely study of a 20th TFW Delta on a taxiway at Upper Heyford, also during 1960. The flat RHAW fairing is evident on the vertical tail and there are covers over the afterburner, intake, and pitot boom. Note how that canvas burner cover is attached to the fully deflected horizontal stab, and the silver-painted landing gear struts, as well as the overall silver paint on the airframe itself, excluding the sheet metal around the jet pipe which is heavily discolored by the heat of the afterburner. The airplane carries a pair of 450-gallon external tanks, but all other wing pylons have been removed, a fairly certain indication that this airplane was tasked with the SIOP mission. Don Jay Collection
%20(2)..jpg)
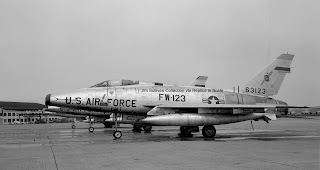
Here's a lovely study of 56-3123 sitting on a wet and dreary ramp ca 1960. She's wearing a pair of 335-gallon tanks on her midwing stations with empty pylons both inboard and outboard of them---note that original "flange" on the bottom of the outboard station because it will change within a couple of short years to more of a "bikini" sort of shape once combat shows the additional weight and presumed functionality to be unnecessary. All the gear doors are hanging, and the tailplanes are in the full-down position. She's a beauty in this shot but ended her days at the hands of an AIM-9P, as a QF-100D drone. It was a sad end for a proud girl... Jim Sullivan Collection
.jpg)
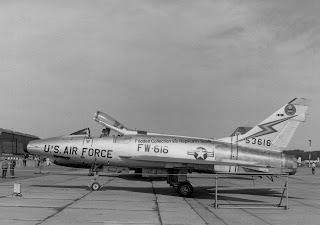
55-3616 is another 20th TFW bird and of particular interest to us. The photo was taken at a public display at Weathersfield, UK, date unknown, and once again we're looking at an airplane configured for the SIOP mission---note the pylon for a Mk 28 weapon on her fuselage centerline---and those slick wings indicate that she would normally be carrying a pair of 450-gallon aux tanks there, which are not fitted in this shot. Of interest to modelers is the complete lack of underwing pylons; F-100Ds fitted for nuclear delivery during the late 50s to early 60s frequently carried only the special store on a centerline pylon (with modified speed brake) and a pair of gas bags under the wings. The pylons that mounted said tanks to the wings were permanently attached to those tanks and not to the wings themselves, just like on an F-86. The devil's in the details. Friddell Collection
.jpg)
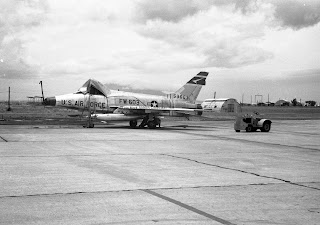
The 405th TFW was based out of Clark AB in the Philippines during the late '50s and early '60s and was heavily involved in deployments throughout the region. This shot, which shows 55-3603 on the ramp at Clark, depicts a clean airplane with only a pair of 200-gallon bags to spoil its clean lines. The Hun's pitot boom was articulated near the intake and folded upwards as depicted here, thus simplifying parking requirements on the ramp. The airplane's canvas covers are all in place, presumably to protect the airplane from the area's frequent rain showers, but the canopy is up, and the airplane is still on the towbar; the activity in the main landing gear well could signify pre-flight concerns, or it could be the airplane was just being serviced prior to parking. Merle Olmstead via Mark Aldrich Collection
.jpg)
A bad day at Nevada's Bike Lake. 56-3125, from the 522nd TFS of the 27th TFW, suffered a collapsed nose gear in this 13 February 1961 incident, but the photo provides us with some nice details for the modeler. The only pylons are on the mid-wing stations and are mounted with 450-gallon tanks, while the refueling probe is an early variation of the bent variety and is apparently
sans light. The forced landing was the direct result of fuel starvation, which seems odd given those enormous gas bags, although I don't know any further details regarding the mishap. Don Jay Collection
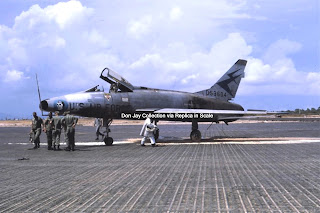
Skipping ahead a few years and proving that even the most famous of airmen can have a bad day, here's Harold Comstock's 55-3604 from the 416th TFS on the ground at Vung Tao in June of 1965 after an unscheduled arrival due to battle damage and what seems to have been a small airframe fire. The airplane is sitting high on its gear and therefore light, and all of the wing pylons have been blown off prior to recovery. The drogue chute is still attached to the aircraft, and the aft fuselage shows significant staining, as does the area forward, up around the quartet of Pontiac M39 guns that live there. Comstock was a Second World War ace and his airplane was prominently marked with mission markers and his WW2 kills in the area immediately above the U.S. in the U.S. AIR FORCE logo, although that seems to have been either painted over or retouched out of the image by someone for the purpose of the photograph. The 416th's blue alars on the vertical tail had been in use at least since the squadron's time at Misawa with the Hun back during the late 50s and early 60s, but this jet came over with the squadron from England AFB after they had been transferred there during mid-1964. Note the inlet duct in the leading edge of the fin signifying the fitment of the lightweight nav system to the airplane. Don Jay Collection

And here's the culprit; streaming jet fuel from a fuselage fuel tank punctured in multiple places by an enemy 12.7mm machine gun during a strafing run. The aircraft recovered safely, and Col. Stockton wasn't injured during the event, but this pair of images proves once again that there are no easy days flying combat. Don Jay Collection
.jpg)
Here's a somewhat happier image of a 481st TFS Hun on its way to some mischief in the summer of 1965. The wing tanks are the by now ubiquitous-in-theater 335-gallon items while the bombs, attached to both inboard and both outboard pylons, are the AN/M64s fitted during the early days of American involvement in SouthEast Asia, prior to the introduction of the M117 to the combat zone. There's a small amount of staining from powder residue and gun grease up around the gun ports but the airplane is essentially clean, which may indicate that the photo was taken fairly early in the squadron's TDY deployment to Vietnam. The Hun tended to accumulate staining on its belly if not frequently cleaned.
USAF
In an obviously staged image Major L.R. Leavoy, operations officer of the 416th TFS, stands in front of his silver Hun prior to a February 1966 mission. In so many ways the image sums up air operations during those awkward early days in South Vietnam; An Operations Officer's Thanatopsis might be an appropriate title for the photo, although we sincerely hope that Major Leavoy survived his tour! Don Jay Collection
The Hun began wearing camouflage fairly early in the war, as demonstrated by this 31st TFG D-model photographed about to taxi out on the 1st of January 1967, carrying a pair of nape cans on her outboards and bombs, quite possibly M117s by now, on her inboard stations. The photo is a bit murky but is clear enough to show how the pylon webs bearing the weapons have been cut away from their original configuration. NARA DN-SF-82-00895
Here's another image you've seen before on these pages, but this time displayed in a somewhat less annotated version. She's from the 309th TFS/31st TFW and was photographed on 25 November 1967 prior to her pilot manning up. The RHAW gear has morphed into a variation of its later appearance but is still relatively streamlined. This jet would be a fine example to mimic if you were wanting to build a model from the late-1967-time frame. Greater St Louis Air and Space Museum via Mark Nankivil
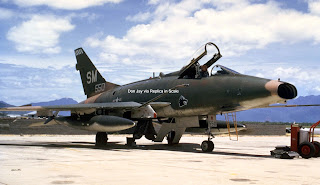
1968 saw the 308th's 55-3550 armed up and sitting on the ramp at Tuy Hua, devoid of underwing stores other than her 335-gallon bags and proudly wearing her boar's head in front of the wings. In a grim bit of irony, she was the last Hun to be lost in the SEA conflict. Don Jay collection
Yet another previously seen image, "Snooper", of the 90th TFS sits at Bien Hoa during 1968 and provides us with a look at what seems 56-1440, although I'm willing to stand corrected on that one. The blast treatment around the gun ports is noteworthy since it appears to be painted black instead of being the far more normal stainless steel, and the visible inboard pylon provides us with an excellent look at that cutaway feature above the bomb's sway braces. Don Jay Collection
.jpg)
"The Goodship Lollypop" was from the 615th TFS at Phan Rang and was photographed there just prior to leaving for the party back in 1969 and carrying a full load of bombs. There's plenty going on here to interest the scale modeler, starting with the TERs hanging off the inboard pylons, a fitment seen with a few squadrons late in the war. The F-100 was never designed for multiple weapons carriage on a single station, so the triple ejector rack was of limited use in many situations due to clearance issues with other weapons. All the gear doors are hanging on this airplane but not the dive brake panel, and the RHAW gear seen on the vertical stab is typical of the late-war period. 55-3674 would make a fine subject for a model if depicted in this configuration---any takers? Don Jay Collection
Here's the 306th's "Peg O' My Heart" on the ramp at Tan Son Nhut in January of 1970 illustrating a
Super Sabre pretty much as presented to us in kit form by Monogram. The RHAW presentation is the late-war variation, although the boys from Morton Grove somehow managed to miss out on the nose-mounted component of the APN/APR-25 gear. As with almost all of the late-war images presented today, we're pretty much guaranteed the wing bandaids are there under the wings, and the deployed speed brake shows off its SIOP-inspired reshaping to good advantage. You get another fine view of those cutaway pylon sway braces in this view as well---look at the inboard stations to see that---and, as a bonus, the articulated pitot boom is folded providing us with an excellent view of it in that position. Don Jay Collection
.jpg)
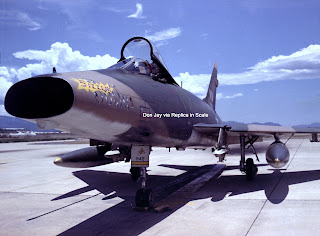
Aside from some tasty artwork, this shot of 56-2942 of the 352nd TFS, taken at Phan Rang in August of 1970, provides us with a fine shot of a pair of TER racks as installed on the Hun late in the war. Never an Every Airplane Had Them sort of thing, their installation greatly enhanced the F-100D's ordnance hauling capabilities. The RHAW installation under the intake and the stainless steel panel surrounding the 20mm cannon muzzles are particularly well-illustrated in this shot. Don Jay Collection
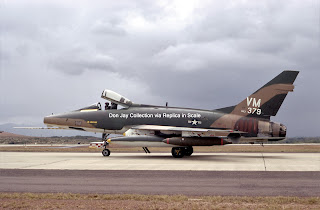
Let's end our photo essay of the real thing with this superb shot of 56-3379, also from the 352nd but this time taken at Phu Cat on 16 March 1971. Of particular interest here is the candy stripe on her pitot boom and her overall clean appearance that's somewhat offset by her heavily heat-stained rear fuselage. Her speed brake is deployed and she's carrying a pair of camouflaged firebombs on her outboard stations---it's a good guess that the inboards have a pair of Mk 82s attached to them as well, but that's impossible to know from this image. Don Jay Collection
Maybe It's a Conclusion, and Maybe It Isn't!
But let's say it is! It's my opinion (my opinion; MY opinion, maybe not yours but most assuredly mine) that the Monogram 1/48th scale kit of the North American Aviation F-100D is far and away the most accurate "Hun" kit available to the plastic modeler, and that's regardless of scale, manufacturer, or timeline. It's a dinosaur for sure, first seeing the light of day back in 1980, and it has all the hallmarks of a Monogram kit of that era: An accurate cockpit, finely detailed and mostly accurate landing gear, adequate wheel wells and gear doors, and fidelity to scale and accurate dimensions that its far more contemporary competition can't match. It builds up into a fine replica of a late F-100 and requires very little in the way of help in order to get there.
There's a downside, of course. There always is, and in this case the issues are difficult basic construction due to the design of the model's larger components, coupled with the kit's raised panel lines. I personally don't see either of these things as any sort of significant issue, but rather more of a challenge that calls for a little bit of Modeling 101. Anyone who learned their chops on modern kits, say anything past 1995 or so and most assuredly most kits designed and produced after 2015, may well have an issue with this "Hun" but in that case it's nothing more than an opportunity for personal growth, right? The thing is, it's got good bones, is essentially accurate, and presents a fine opportunity to learn how to scribe a plastic model, although that last part isn't strictly necessary. Yes, it requires some skillsets that many less-experienced modelers may not currently possess, but it's just not that tough a date. You absolutely positively can get there from here, and your end result will be far more accurate than it would have been had you used a different kit.
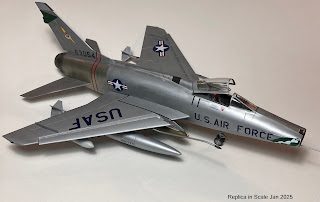
Here's a recent build of mine of the Monogram F-100D using aftermarket gas bags (Reskit) and weapons (Eduard's Brassin'), Master brass pitot tube, a modified QuickBoost seat, plus Furball decals. It isn't perfect but it's far better than its 1/48th scale ESCI and Trumpeter competition. Some modeling skills are required, however! Friddell
This isn't the last you'll see of the "Hun" on these pages, since it may well be the most misunderstood and poorly documented of the Century Series of USAF jet fighters and there's so much more to cover. I'd love to hear from you if you have anything to correct or add to this piece and I've listed the email address at the bottom of this blog.
Under the Radar
I actually have several books I'd like to make you aware of, but I'm just not prepared to stretch this issue out any longer than it already is, so let's agree that I'll try to do that next time.
Happy Snaps
Not today. (That's getting old, isn't it?)
The Relief Tube
Let's see now...
I haven't published anything, not one darned thing, since August of 2023, so the tubes don't require relieving at the moment. On the other hand, I'm always up to hear from our readership and recently decided I ought to publish the more germane comments received, so I'll actually do that if I get any. That suitably hacked up email addy is replicainscale at yahoo dot com. Spammers and vehicular extended warranty salesmen need not apply!
Whew!
I could probably run this missive on quite a bit longer, but that's not the thing to do just now so I'll sign off instead. Be good to your neighbor, and we'll meet again sooner or later!
phil




.jpg)


..jpg)
.jpg)
.jpg)
%20(2)..jpg)
.jpg)
.jpg)
.jpg)


.jpg)


.jpg)


.jpg)
.jpg)
.jpg)


%20(2).jpg)
%20(2).jpg)
%20(2).jpg)
%20(2).jpg)
.jpg)
.jpg)
%20(2).jpg)
.jpg)
%20(2).jpg)
%20(2).jpg)
.jpg)
%20(2).jpg)
%20(2).jpg)
.jpg)
.jpg)
%20(2).jpg)
.jpg)

%20(2).jpg)
.jpg)
.jpg)
.jpg)
.jpg)
.jpg)
.jpg)
.jpg)
.jpg)
.jpg)
.jpg)
.jpg)
.jpg)
.jpg)
.jpg)
.jpg)
.jpg)
.jpg)

